Access the Admin Interface:
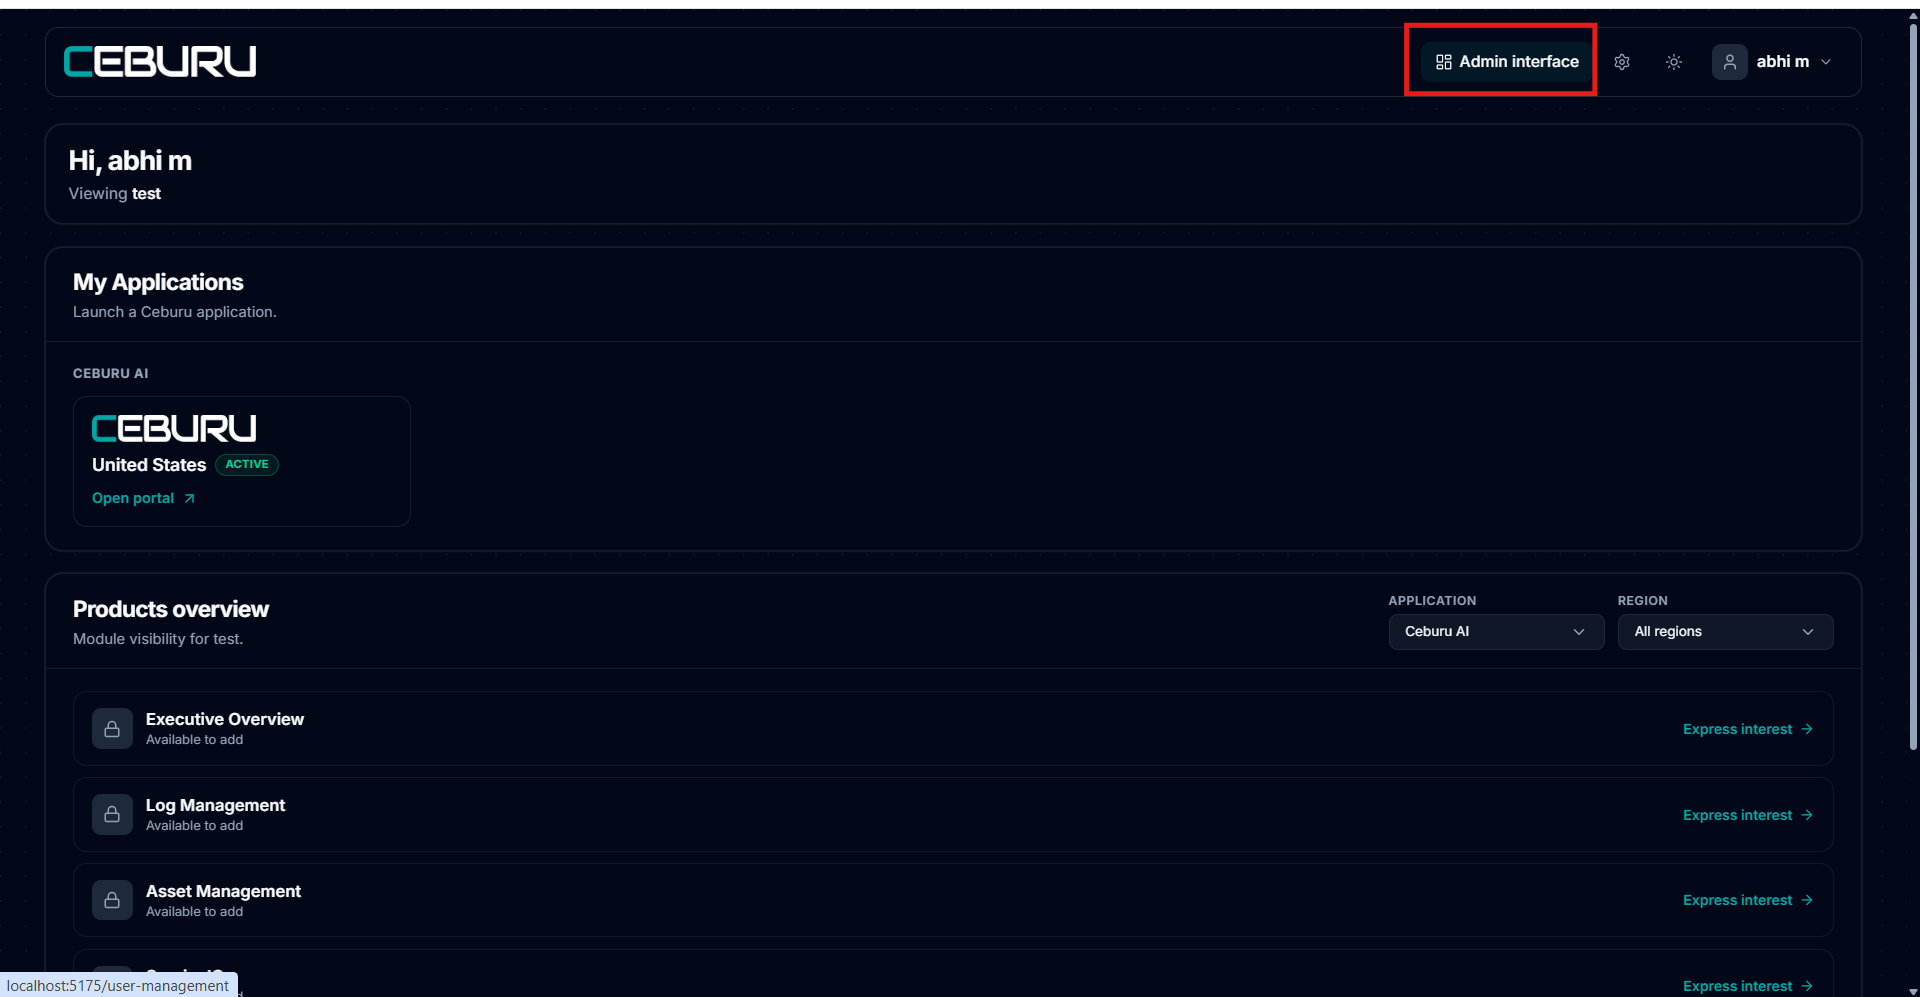
After you successfully sign in, you will be able to access the Ceburu Auth Portal.
The Auth Portal displays the Ceburu applications available to your organization. You can select Open portal to launch an available Ceburu application.
Users with administrative permissions will also see the Admin interface option at the top of the page.
Select Admin interface to access administrative settings and management features.
1. Understanding MSP and DSP Companies
Ceburu supports two company models in the Admin Interface. The administration options and module visibility responsibility depend on whether the company is an MSP or a DSP.
Company type | Description | Who controls module visibility |
MSP company | A parent service provider organization that can manage its own users and linked DSP sub companies. | Ceburu provides the modules available to the MSP company itself. |
DSP linked to an MSP | A customer or sub company associated with an MSP. The MSP can onboard and administer the linked company. | The MSP Org Admin controls module visibility for the linked DSP, using the modules Ceburu has made available to the MSP. |
Standalone DSP | An independent DSP company that is not under an MSP. | Ceburu provides and controls module visibility directly for the standalone DSP. |
Important module rule: Ceburu is the source of module entitlement for an MSP. An MSP Org Admin can pass visibility to linked DSP companies, but cannot make available a module that Ceburu has not provisioned. A standalone DSP receives its module visibility directly from Ceburu. |
Relationship summary
- The MSP is the parent organization and is administered by the Org admin role.
- A DSP linked to an MSP is a sub company. The MSP can onboard it and manage its module visibility within the entitlement Ceburu provided to the MSP.
- A standalone DSP is independent. Ceburu provides its module visibility directly, while the DSP Company Admin manages users and groups inside that access.
2. Supported Roles and What They Can Access
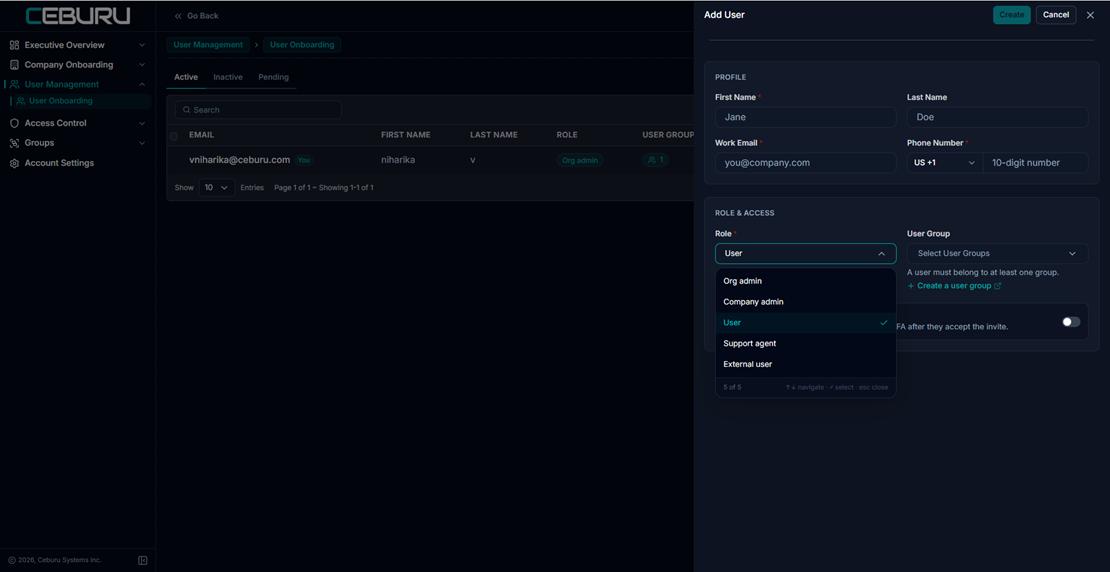
The available roles depend on the company type. The role list shown when adding a user changes between an MSP organization and a DSP company.
Roles available in an MSP organization
Role | Primary purpose | Typical administration scope |
Org admin | Top level MSP administrator | Manages the MSP organization, linked companies, users, module visibility for linked DSP companies, groups and administrative settings. |
Company admin | Administrator for a specific company | Manages users, groups and settings for the company they administer. Does not change Ceburu supplied module entitlement. |
User | Standard product user | Uses the Ceburu modules and features made available through company visibility and user group assignment. |
Support agent | MSP support user | Supports linked DSP companies according to Support Agent Group permissions. Permissions can include user or company View, Edit, Create and password reset. |
External user | Restricted or external participant | Receives only the access assigned through the company and user group configuration. |
Figure 1. MSP user creation shows the full role set: Org admin, Company admin, User, Support agent and External user. |
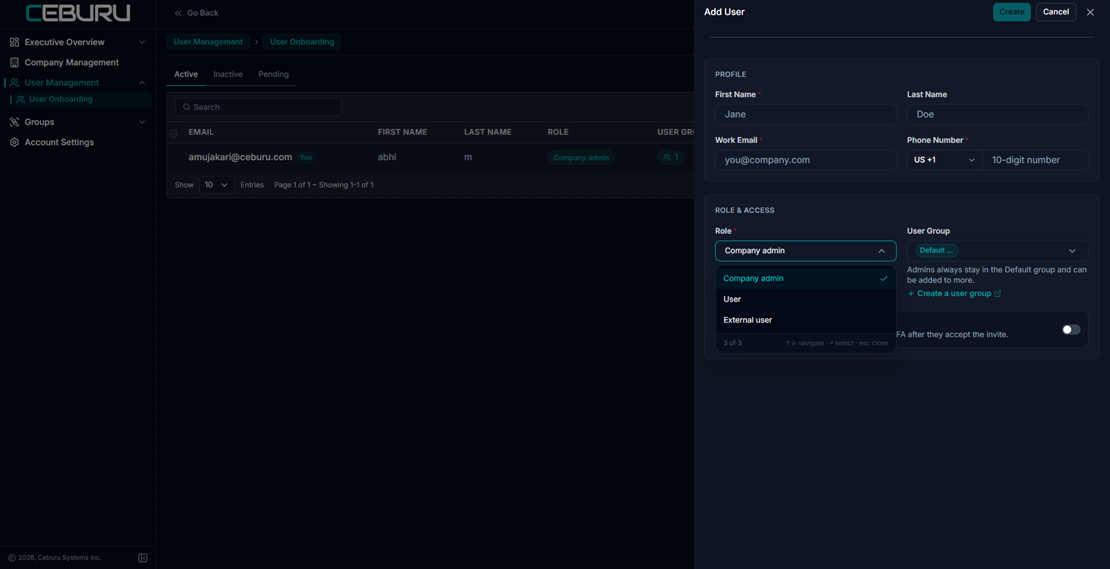
Roles available in a DSP company
Role | Primary purpose | Access |
Company admin | DSP company administrator | Administers the DSP company, including its users, groups and company level settings. |
User | Standard DSP user | Accesses modules and features available to the DSP and assigned through user groups. |
External user | Restricted DSP user | Receives limited access based on the user group and module configuration. |
Figure 2. DSP user creation shows Company admin, User and External user roles. |
3. Executive Overview
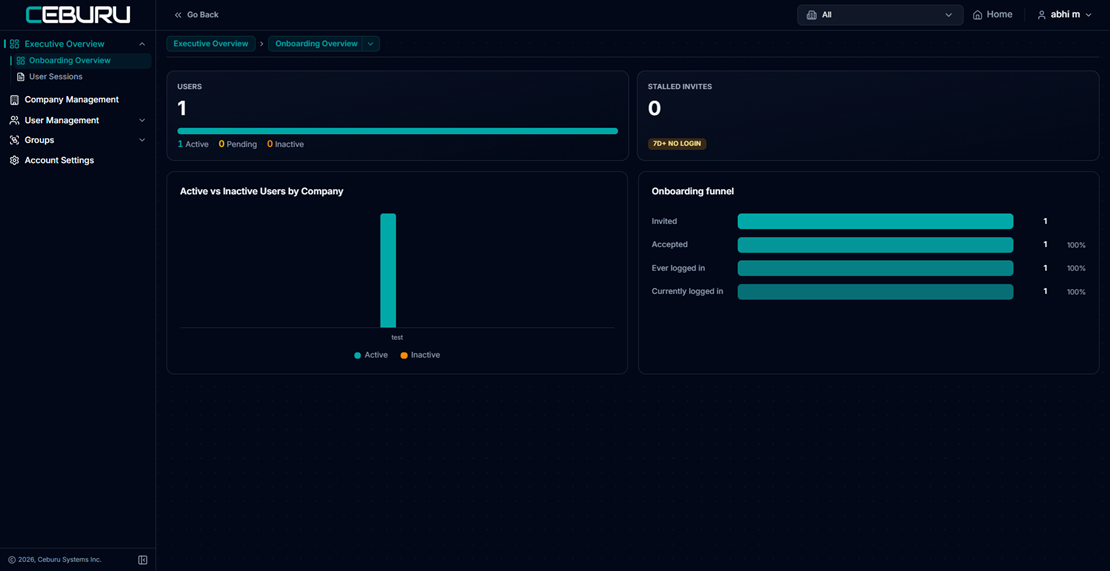
The Executive Overview gives administrators a high level view of onboarding activity and active user sessions.
Onboarding Overview
- Users shows the total user count and the number of Active, Pending and Inactive users.
- Stalled Invites highlights invitations that have not resulted in a login after the configured period.
- Active vs Inactive Users by Company provides a visual comparison by company.
- Onboarding funnel shows how many users were Invited, Accepted, Ever logged in and are Currently logged in.
Figure 3. Executive Overview > Onboarding Overview provides user onboarding and adoption metrics. |
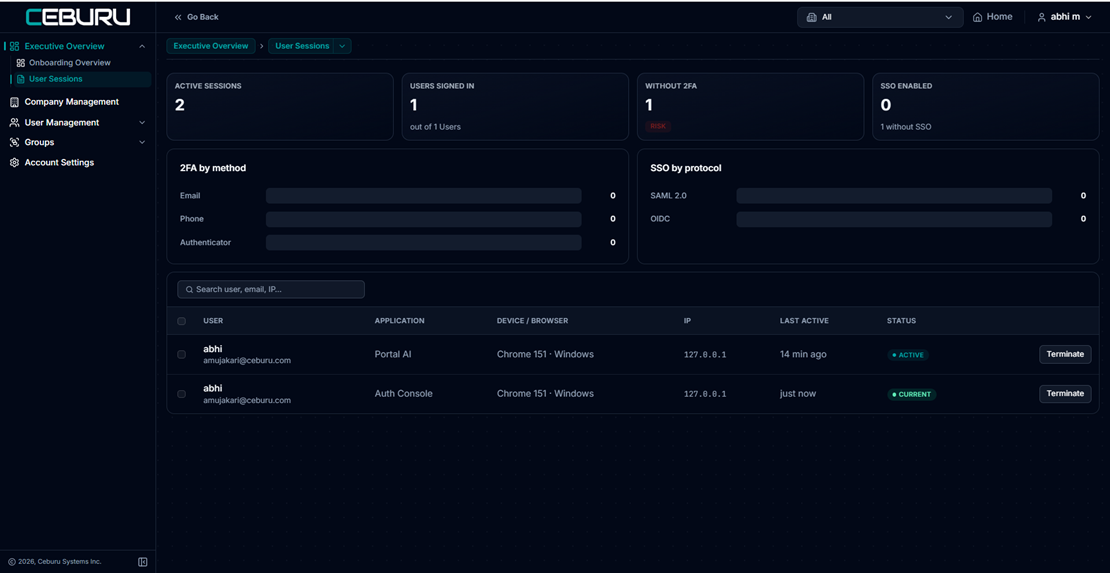
User Sessions Overview
- Active Sessions shows the number of current sessions across the selected scope.
- Users Signed In shows how many users currently have active access.
- Without 2FA identifies users who do not have Two Factor Authentication enabled.
- SSO Enabled shows how many users or companies are using configured Single Sign On.
- 2FA by method summarizes Email, Phone and Authenticator usage.
- SSO by protocol summarizes SAML 2.0 and OIDC usage.
- The session table shows user, application, browser, IP, last activity and status, with an option to terminate a session.
Figure 4. Executive Overview > User Sessions provides security and session visibility across users. |
4. Company Management
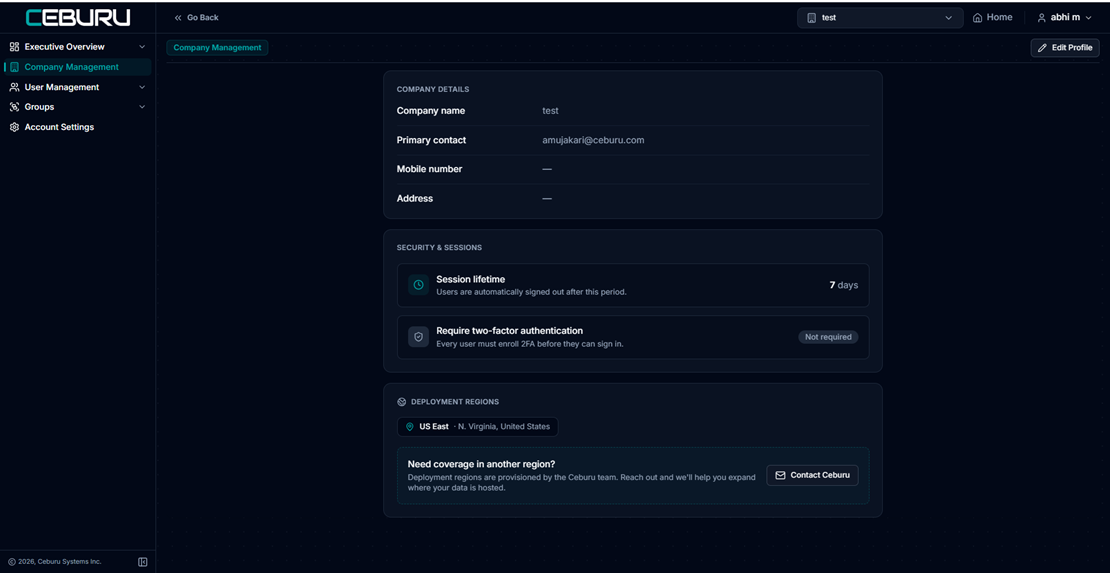
Company Management shows the configuration for the currently selected company. This is useful for reviewing company details, security requirements and deployment regions.
- Company Details includes the company name, primary contact, mobile number and address.
- Security and Sessions shows the configured session lifetime and whether Two Factor Authentication is required for all users.
- Deployment Regions shows where the company is provisioned.
- Edit Profile is used to update supported company details.
- If another deployment region is needed, the page provides a Contact Ceburu option because deployment regions are provisioned by the Ceburu team.
Figure 5. Company Management displays company information, security settings and deployment region information. |
5. MSP Company Onboarding for Linked DSP Companies
An MSP Org Admin can onboard a linked DSP company from Company Onboarding. The company remains in Awaiting Activation until the primary company administrator accepts the invitation and completes account setup.
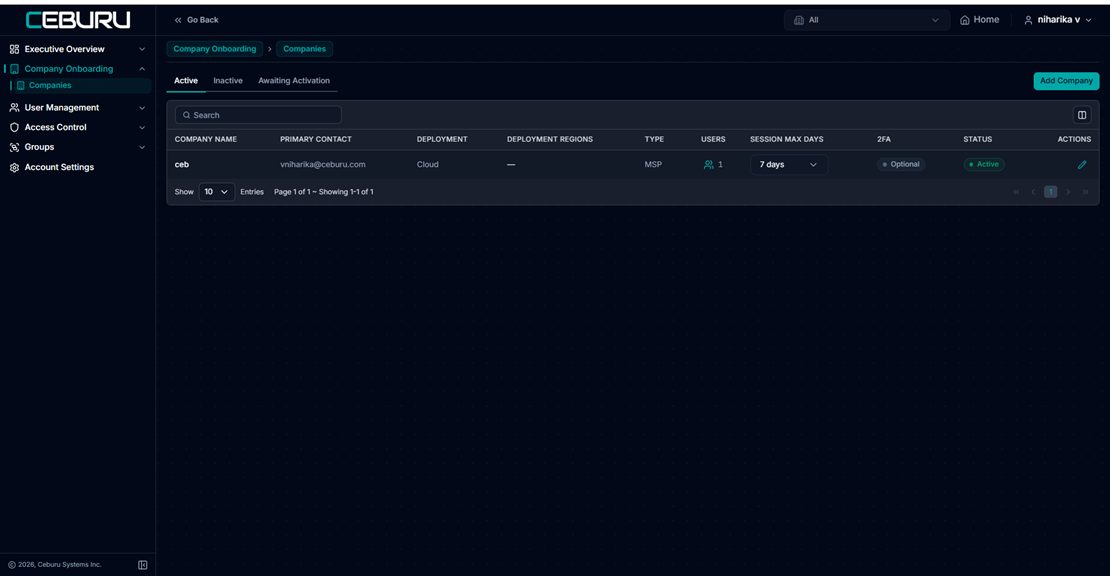
Company list
- The Companies page separates records into Active, Inactive and Awaiting Activation.
- The list displays company name, primary contact, deployment, deployment regions, type, user count, session maximum days, 2FA requirement and status.
- Select Add Company to start the onboarding workflow.
Figure 6. Company Onboarding > Companies shows existing companies and the Add Company action. |
Add Company workflow:
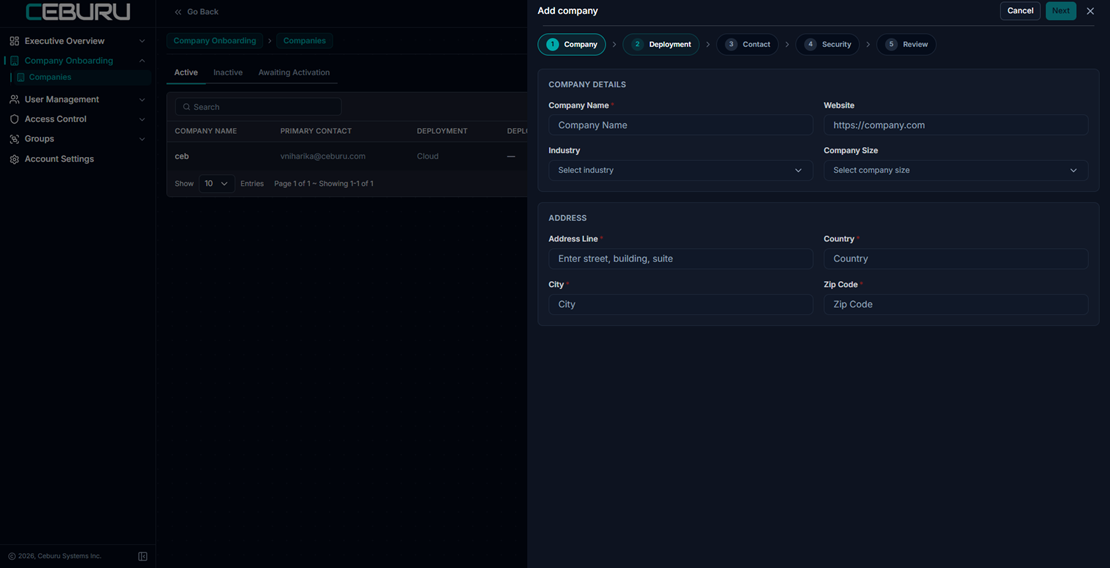
The Add Company wizard contains five steps: Company, Deployment, Contact, Security and Review.
Step 1: Company
- Enter the Company Name.
- Add the website, industry and company size when applicable.
- Enter the company address, city, country and ZIP code.
Figure 7. Add Company step 1 captures company profile and address information. |
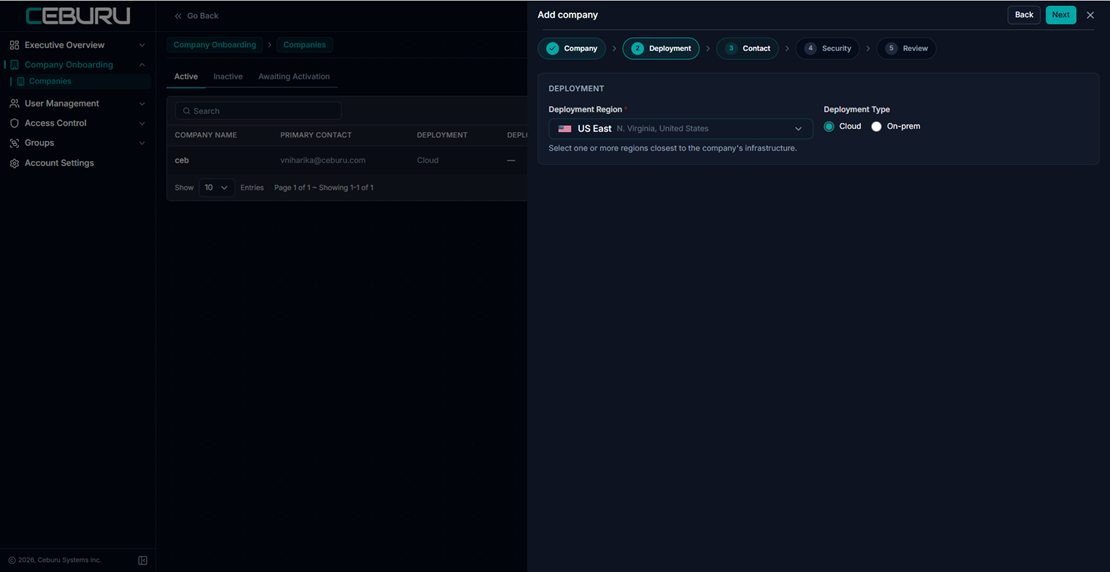
Step 2: Deployment
- Choose one or more deployment regions closest to the company infrastructure.
- Select the deployment type, such as Cloud or On prem, according to the company setup.
Figure 8. Add Company step 2 selects deployment region and deployment type. |
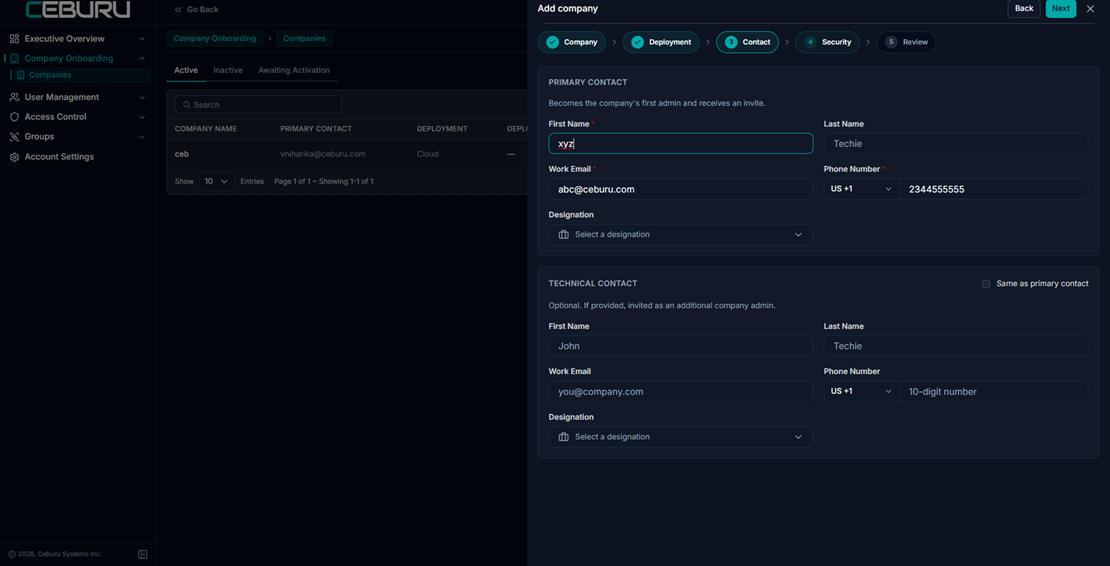
Step 3: Contact
- The Primary Contact becomes the company first administrator and receives the invitation.
- Enter the primary contact name, work email, phone number and designation.
- The Technical Contact is optional. When provided, the technical contact is invited as an additional company administrator.
- Select Same as primary contact when the same person handles both responsibilities.
Figure 9. Add Company step 3 configures the primary and optional technical contacts. |
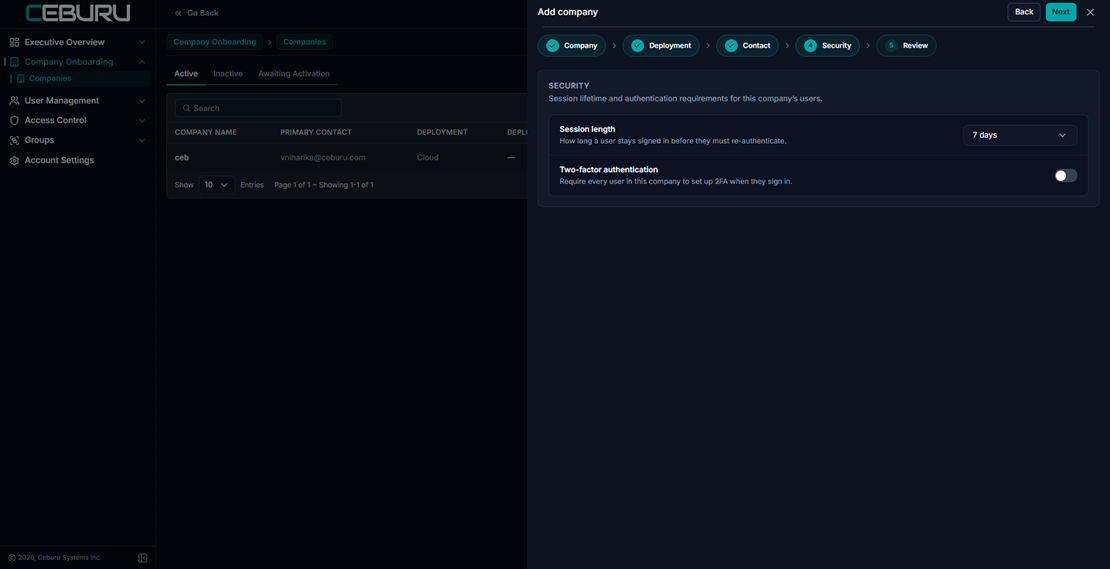
Step 4: Security
- Set the Session length to determine how long a user remains signed in before reauthentication is required.
- Enable Two Factor Authentication when every user in the company must set up 2FA during sign in.
Figure 10. Add Company step 4 configures session lifetime and company wide 2FA requirements. |
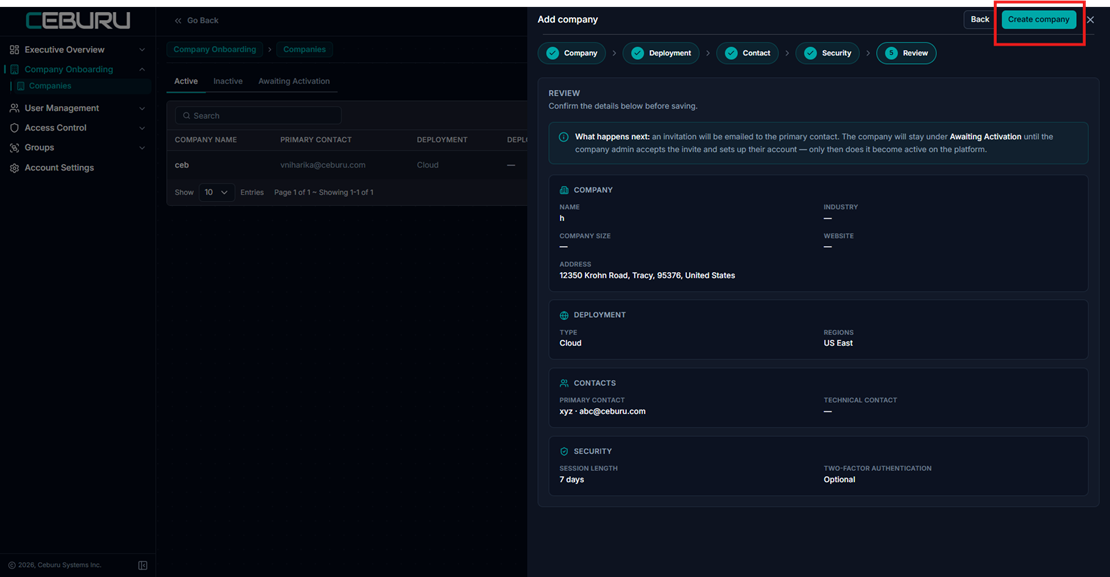
Step 5: Review and Create
- Review the company, deployment, contact and security information before saving.
- Select Create company when the information is correct.
- After creation, an invitation is emailed to the primary contact.
- The company stays under Awaiting Activation until the company admin accepts the invitation and sets up the account.
Figure 11. The final review explains that the company remains Awaiting Activation until the invited admin completes setup. |
6. Module Visibility and Access Control
Module Visibility determines which Ceburu AI modules and features are available to a company. The owner of this responsibility changes depending on the company relationship.
Scenario | Module visibility owner | How it works |
MSP company itself | Ceburu | Ceburu provisions the module set for the MSP. The MSP can view its own module configuration but does not change its own entitlement. |
DSP linked under an MSP | MSP Org Admin | The MSP Org Admin controls which available modules are visible to the linked DSP company. The choices are limited to modules Ceburu has provisioned to the MSP. |
Standalone DSP not under an MSP | Ceburu | Ceburu directly provisions the module set for the standalone DSP. The DSP Company Admin manages users and groups within that entitlement. |
Module Visibility summary
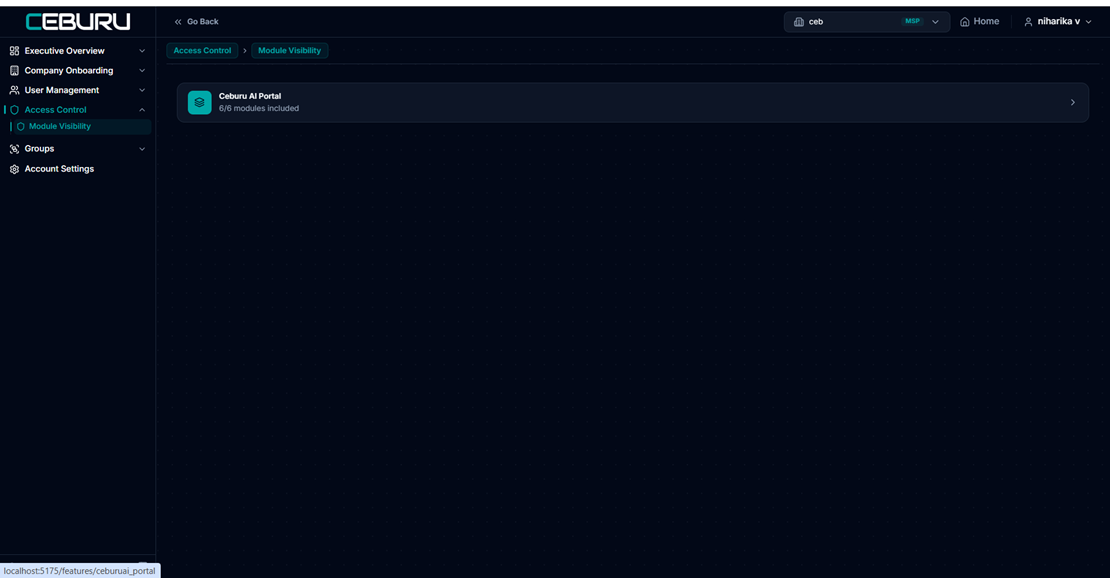
- Open Access Control > Module Visibility.
- Select the Ceburu AI Portal to view included modules.
- The overview shows how many modules are included for the selected company.
Figure 12. Access Control > Module Visibility displays the Ceburu AI Portal and the number of included modules. |
Viewing the module set
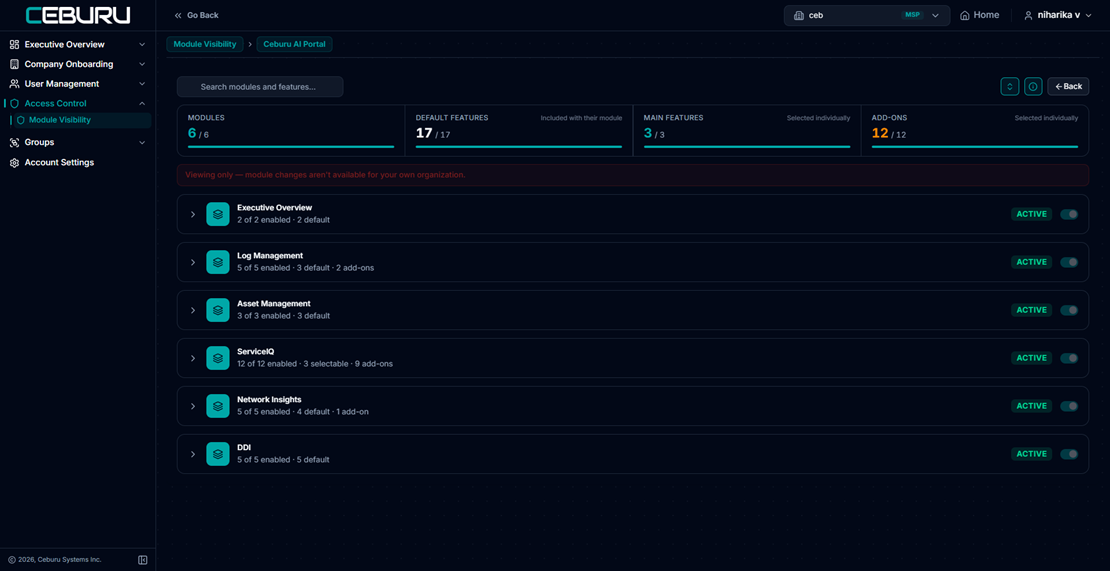
- The module page summarizes Modules, Default Features, Main Features and Add ons.
- Each module can be expanded to review the features that belong to it.
- For the MSP own organization, the page can be viewing only because Ceburu controls those modules.
- For a linked DSP, the MSP Org Admin can manage the DSP module visibility within the entitlement Ceburu supplied to the MSP.
Figure 13. Module Visibility shows enabled modules and feature counts. The viewing only banner indicates that the current organization module entitlement is controlled by Ceburu. |
7. User Management and User Onboarding
User Management is used to invite users, assign roles, place users in groups and optionally require Two Factor Authentication.
User list
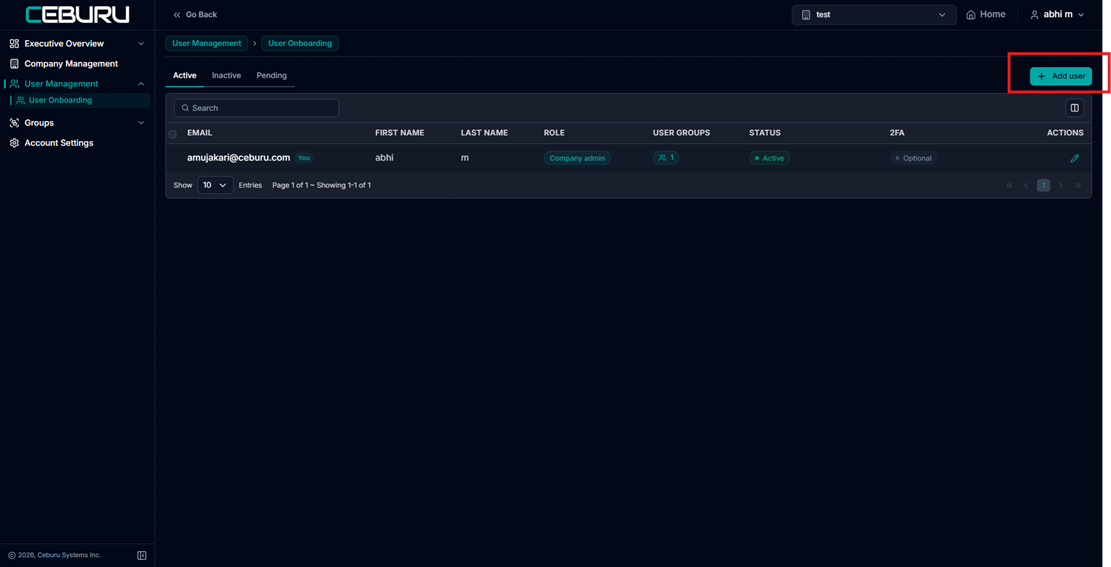
- Active, Inactive and Pending tabs separate users by onboarding and account status.
- The table shows email, first name, last name, role, user groups, status and 2FA configuration.
- Select Add user to invite a new user.
Figure 14. User Management > User Onboarding shows existing users and the Add user action. |
Adding a user
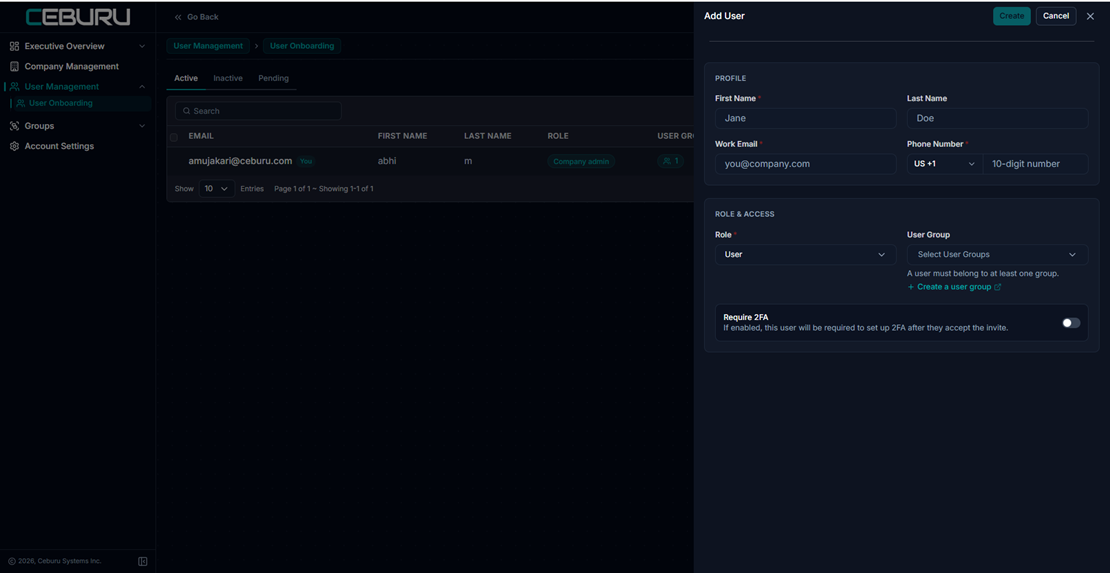
- Enter First Name, Last Name, Work Email and Phone Number.
- Select the appropriate Role for the user.
- Select at least one User Group for standard users when required by the company configuration.
- Enable Require 2FA if the invited user must configure Two Factor Authentication after accepting the invitation.
- Select Create to send the invitation.
Figure 15. The Add User panel captures profile information, role, user group and optional 2FA requirement. |
8. User Groups
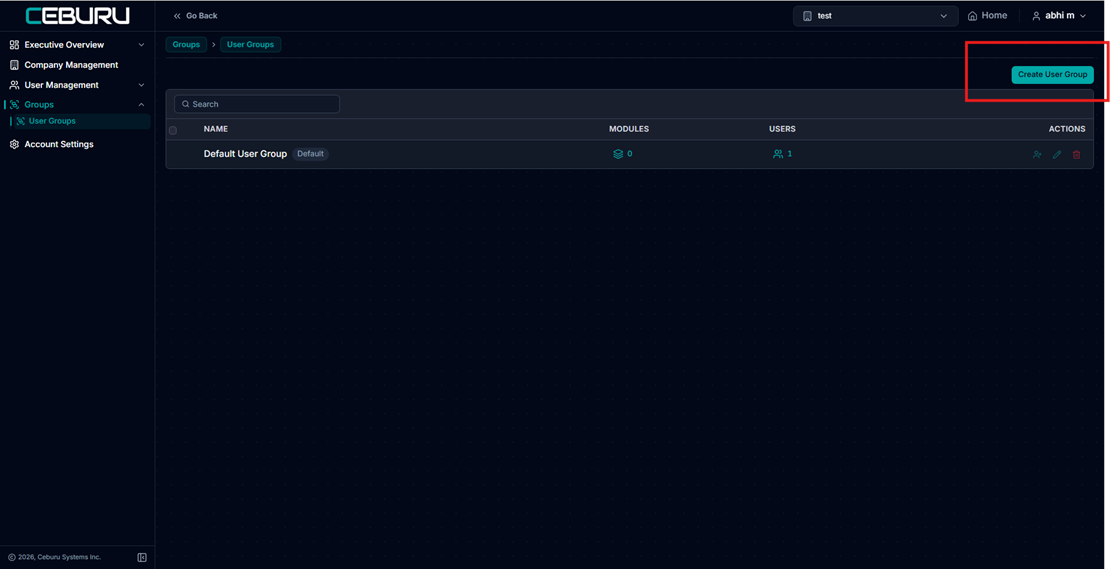
User Groups organize company users and connect users to the modules or features that should be available to them.
User Groups list
- The list shows group name, assigned modules, number of users and available actions.
- A Default User Group is created for the company.
- Select Create User Group to create an additional group for a specific access pattern.
Figure 16. Groups > User Groups lists the Default User Group and provides the Create User Group action. |
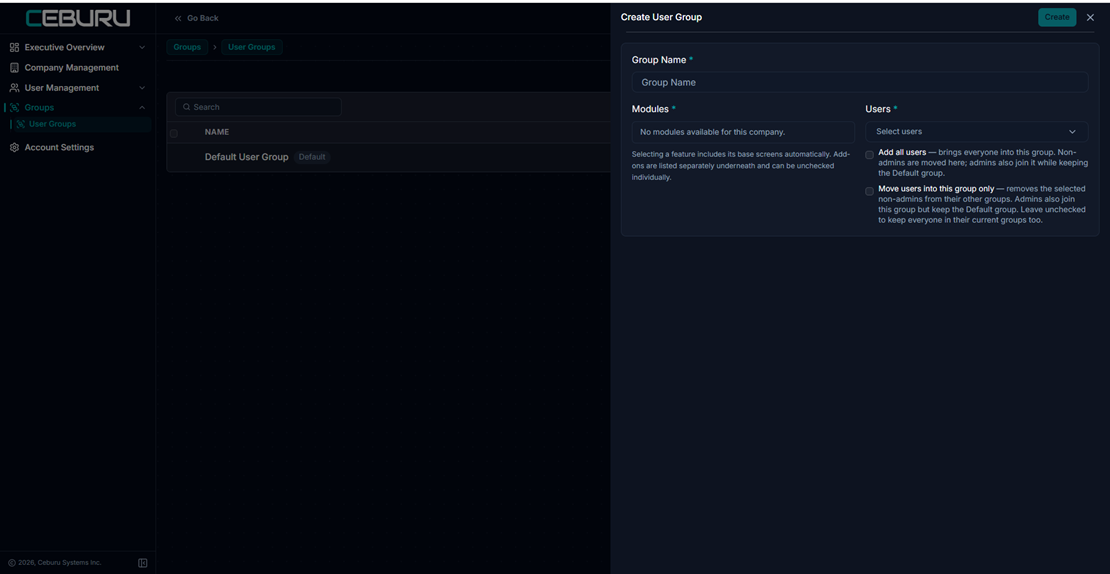
Create a User Group
- Enter a Group Name.
- Select the Modules that members of the group should be able to use. Only modules available to the company can be assigned.
- Select the Users who should be members of the group.
- Add all users places everyone in the group. Non admin users are moved there, while admins remain in the Default group as well.
- Move users into this group only removes selected non admin users from other groups. Admins remain associated with the Default group.
- Select Create to save the group.
Figure 17. Create User Group assigns available modules and users to the new group. |
9. MSP Support Agent Groups
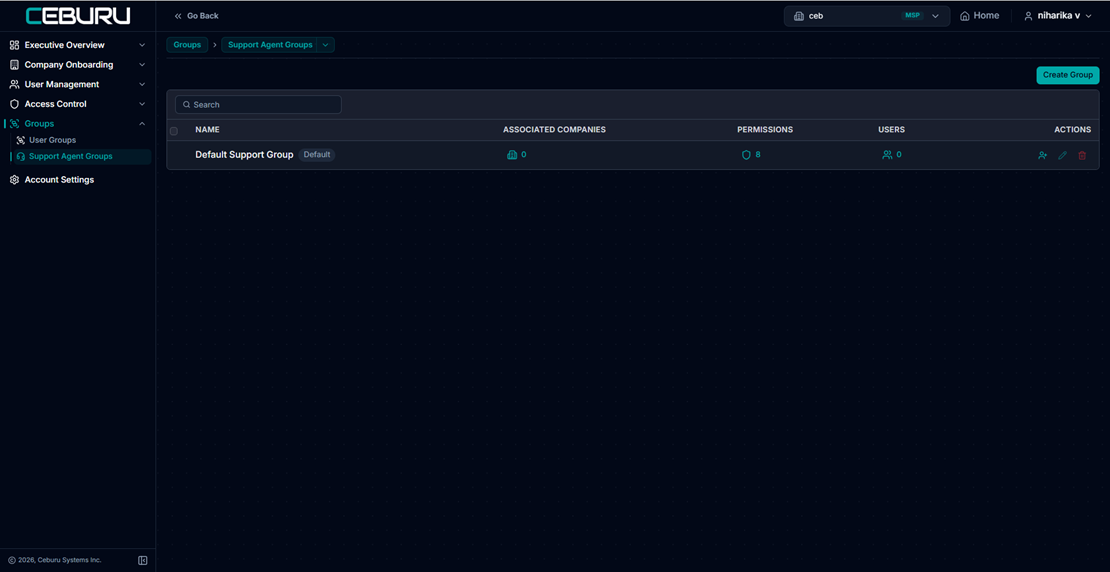
Support Agent Groups are an MSP capability used to organize support agents and define what they can do for linked DSP companies.
Support Agent Groups list
- The list shows the support group name, associated companies, permissions, users and actions.
- A Default Support Group is available for the MSP.
- Select Create Group to add another support team or tier.
Figure 18. Groups > Support Agent Groups lists support groups and their associated companies, permissions and users. |
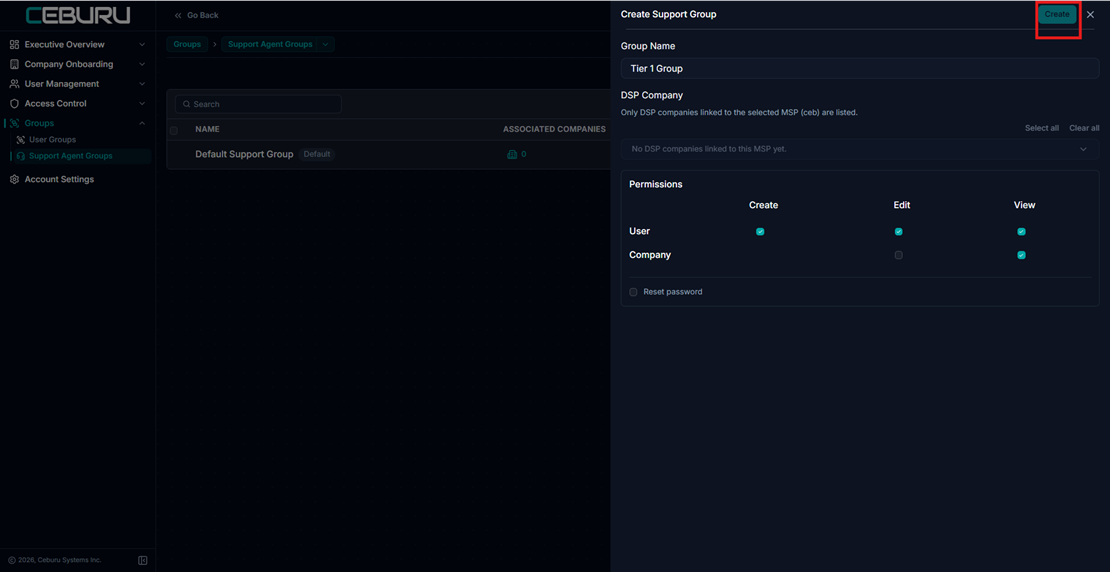
Create a Support Group
- Enter the Group Name, for example a Tier 1 support group.
- Select the linked DSP companies the support group is allowed to support.
- Configure permissions for User and Company operations.
- Create, Edit and View permissions can be granted separately.
- Reset password can be enabled when support agents in the group are allowed to perform that action.
- Select Create to save the support group.
Figure 19. Create Support Group links DSP companies to the MSP support group and defines user and company permissions. |
Account Settings:
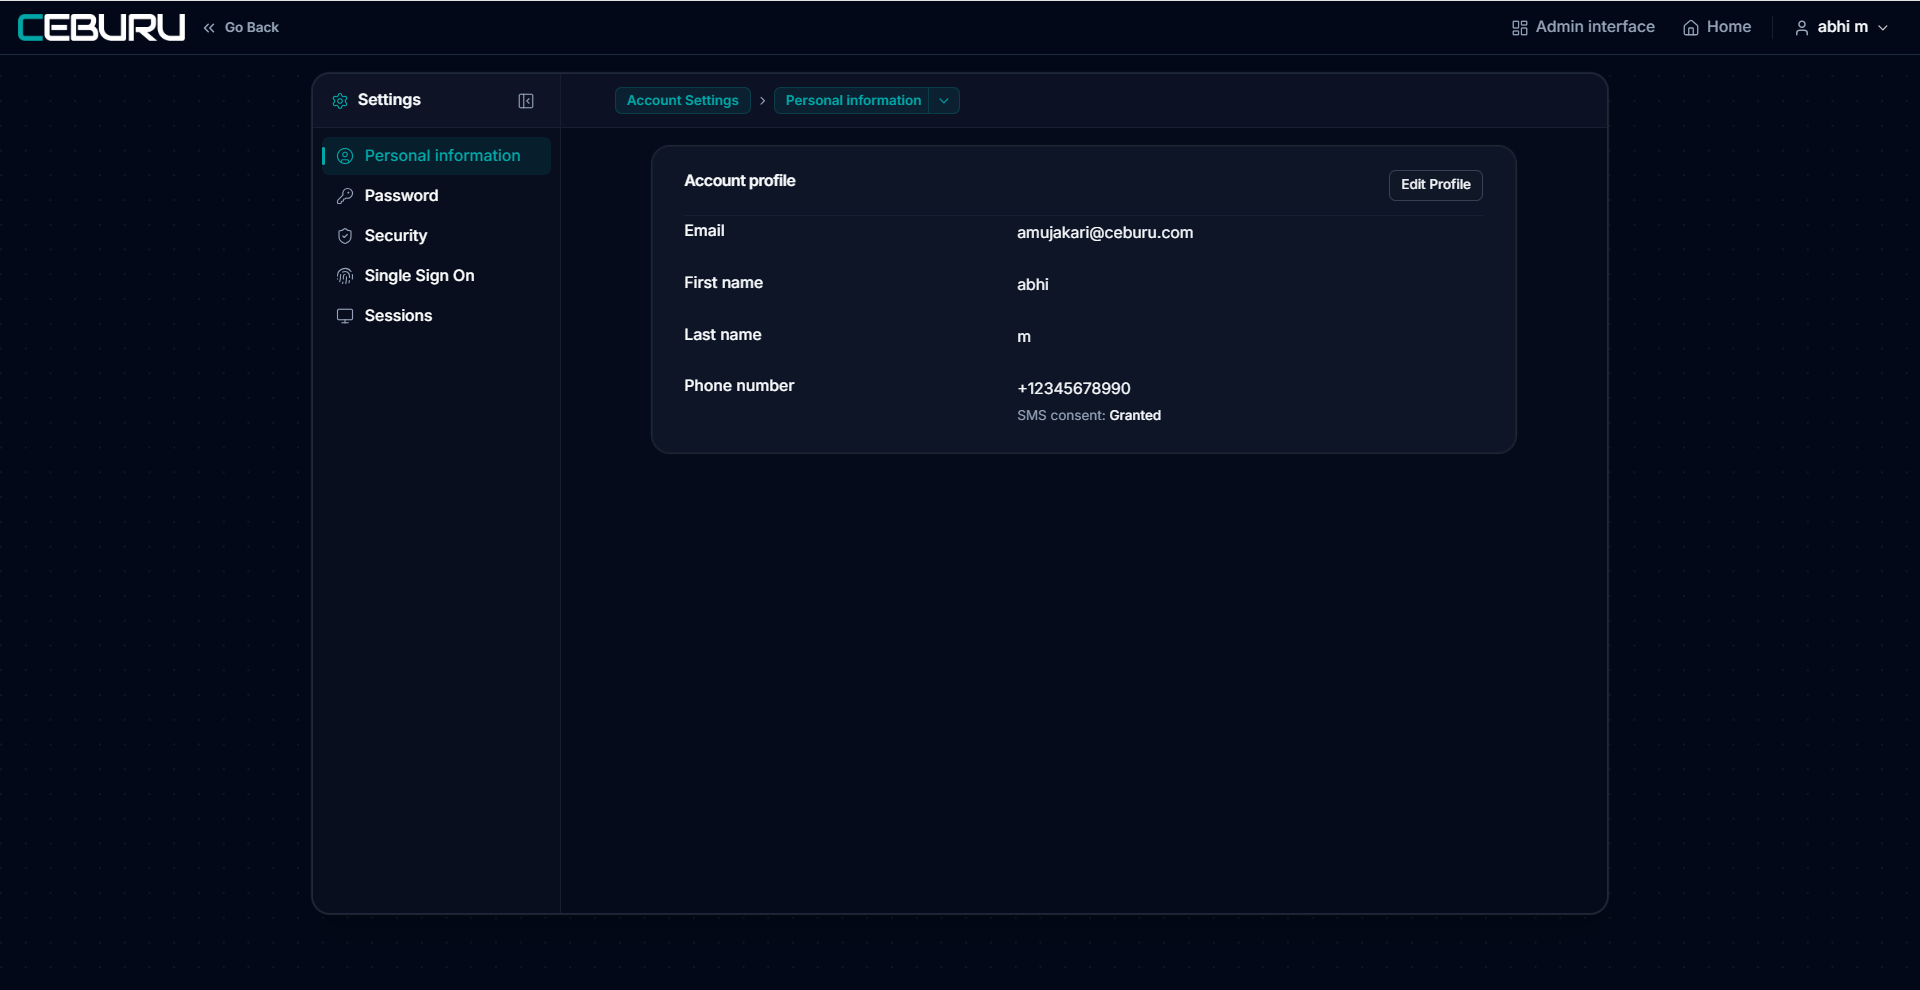
After signing in to Ceburu, you can manage your account information, password, security options, and active sessions from Account Settings.
Go to Account Settings → Personal Information.
This page displays the profile information associated with your Ceburu account, including your email address, first name, last name, phone number, and SMS consent status.
Select Edit Profile to update your personal information.
Change Your Password:
Go to Account Settings → Password.
Use this page when you know your current password and want to change it. Enter your current password, enter the new password, confirm the new password, and select Update password.
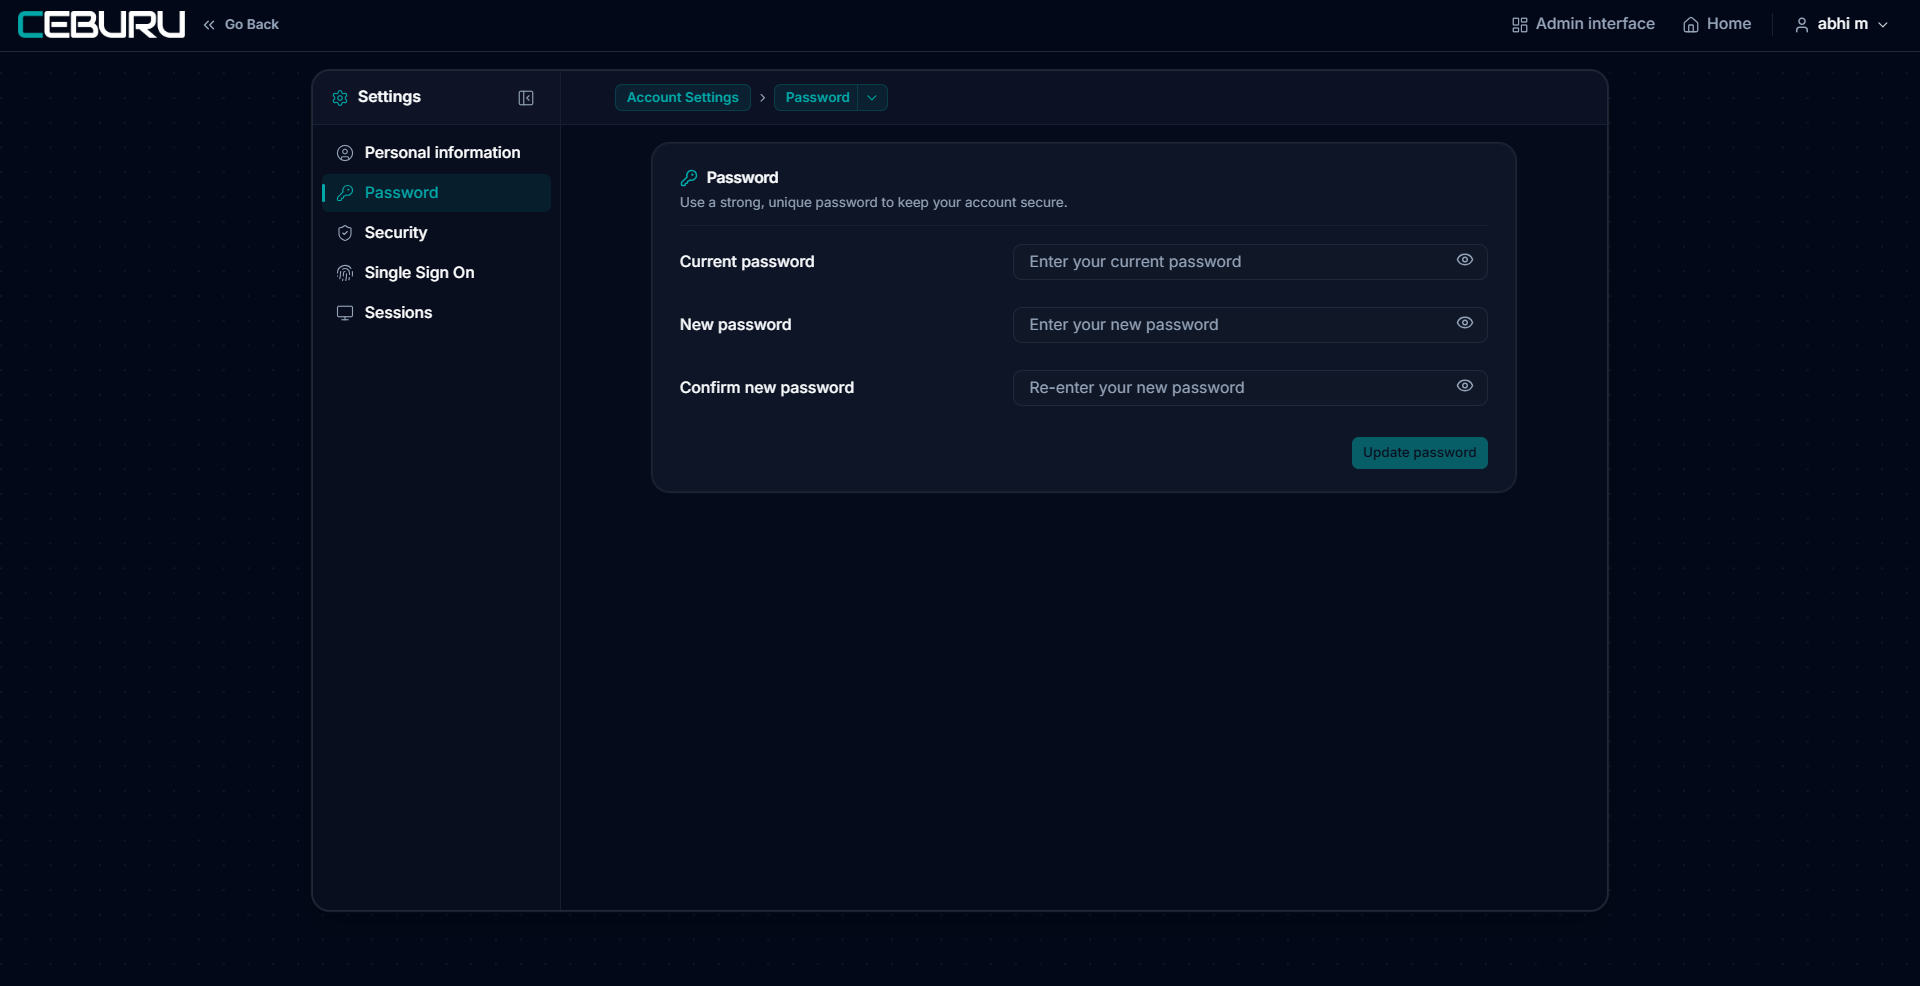
If you do not remember your current password, use Forgot password? from the Ceburu login page instead.
Security and Two Factor Authentication:
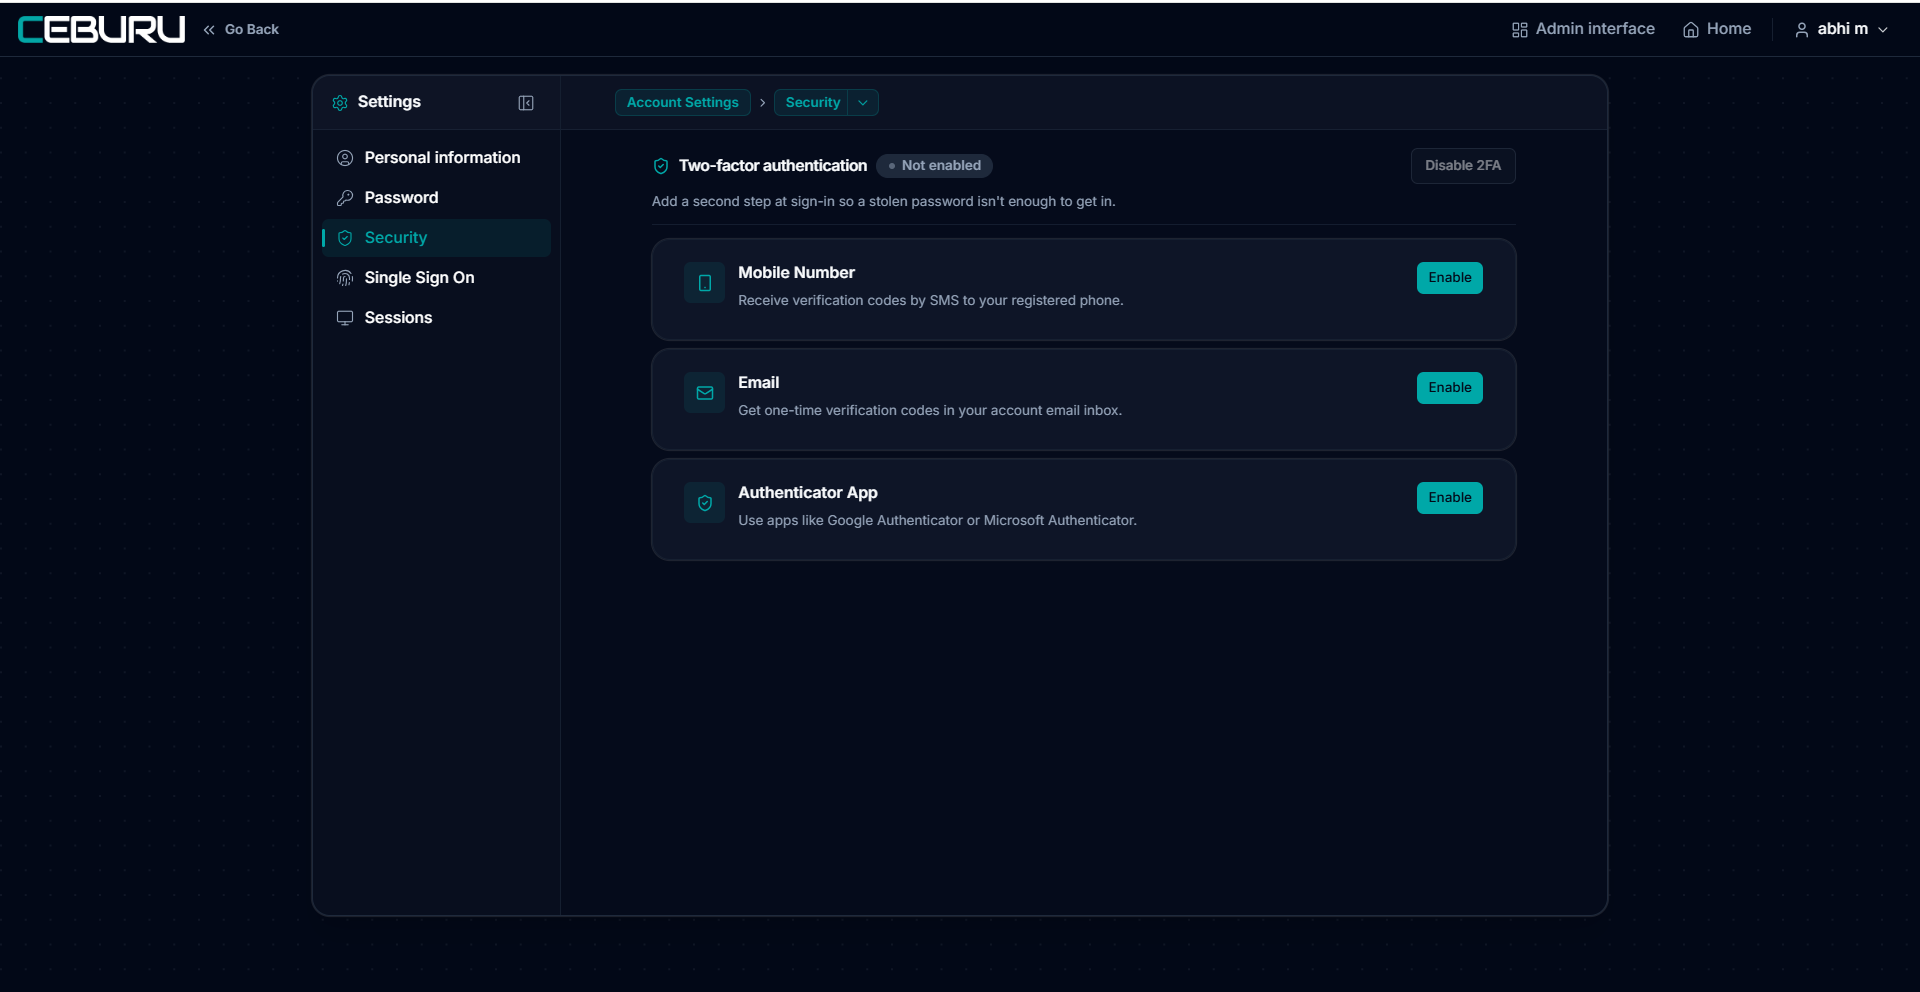
Go to Account Settings → Security.
The Security page allows you to enable Two Factor Authentication (2FA). This adds an additional verification step when signing in and helps protect your account even if your password is compromised.
Ceburu provides three verification options: Mobile Number, which sends a verification code by SMS; Email, which sends a one time verification code to your registered email address; and Authenticator App, which allows you to use an application such as Google Authenticator or Microsoft Authenticator.
Select Enable next to the method you want to configure.
Manage Active Sessions:
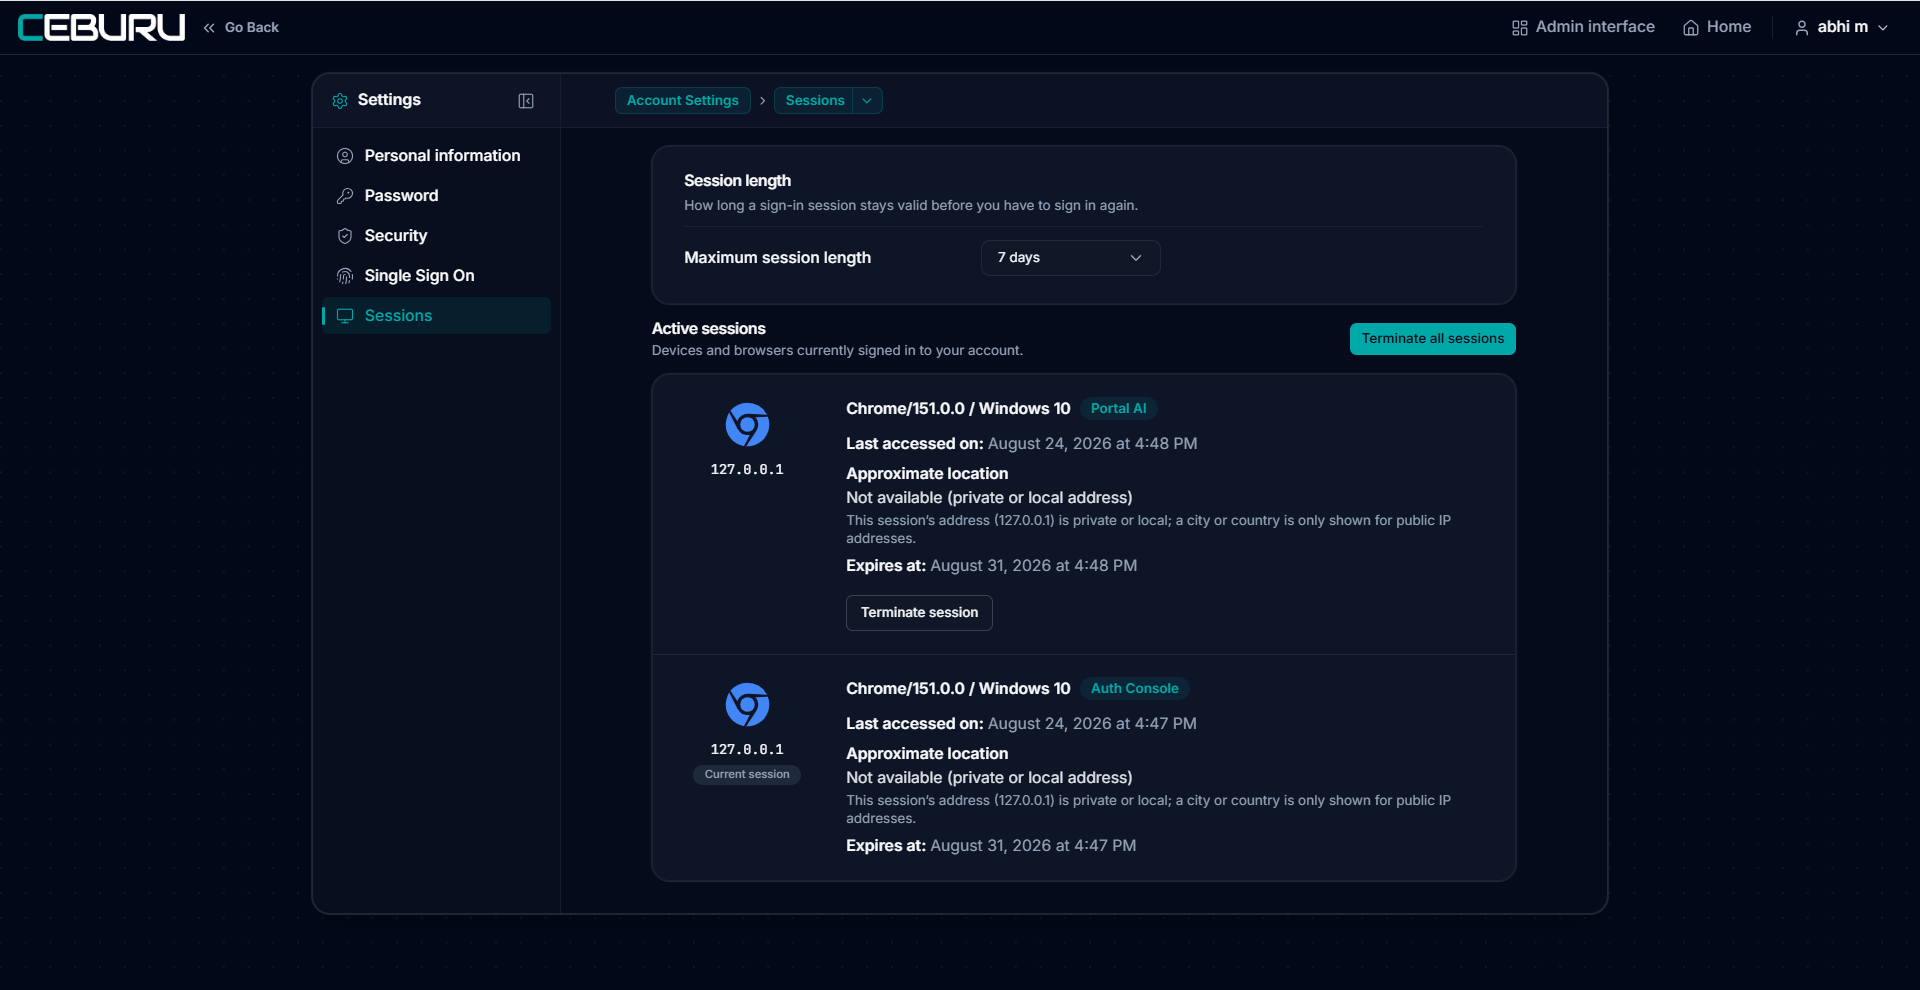
Go to Account Settings → Sessions.
The Sessions page allows you to review devices and browsers that are currently signed in to your Ceburu account.
For each session, Ceburu displays information such as the browser and operating system, application being accessed, last accessed date and time, IP address, approximate location when available, and session expiration time.
You can also configure the Maximum session length, which determines how long a login session remains active before you need to sign in again.
Select Terminate session to end one specific session, or select Terminate all sessions to sign out all active sessions.
Was this article helpful?
That’s Great!
Thank you for your feedback
Sorry! We couldn't be helpful
Thank you for your feedback
Feedback sent
We appreciate your effort and will try to fix the article