CeburuAI Single Sign On Setup Guide
Created by niharika Velidhi, Modified on Thu, 3 Sep at 4:49 AM by niharika Velidhi
Configuring Single Sign-On (SSO) for Ceburu
Auth0, Okta, and Microsoft Entra ID — SAML 2.0 and OpenID Connect.
Tip: Click any section below to expand the instructions for your Identity Provider. All other sections stay collapsed.
Before You Begin
- Ceburu acts as the Service Provider (SP). Auth0, Okta, or Microsoft Entra ID acts as the Identity Provider (IdP).
- Use the Ceburu URLs shown below unless your Ceburu administrator provides different values for your environment.
- Administrator access is required in the selected Identity Provider and in Ceburu.
Ceburu SSO Values
| Setting | Value |
|---|---|
| SAML ACS / Reply URL | https://auth.ceburuai.com/api/accounts/sso/saml/acs/ |
| SP Entity ID | https://auth.ceburuai.com/ |
| OIDC Callback URL | https://auth.ceburuai.com/api/accounts/sso/oidc/callback/ |
Choose your Identity Provider
1. Auth0 — SAML 2.0
Use this setup when Auth0 authenticates users and returns a SAML assertion to Ceburu.
Step 1 — Create the Ceburu application in Auth0
- Sign in to the Auth0 tenant you want to connect.
- Go to Applications → Applications and create or open the Ceburu application.
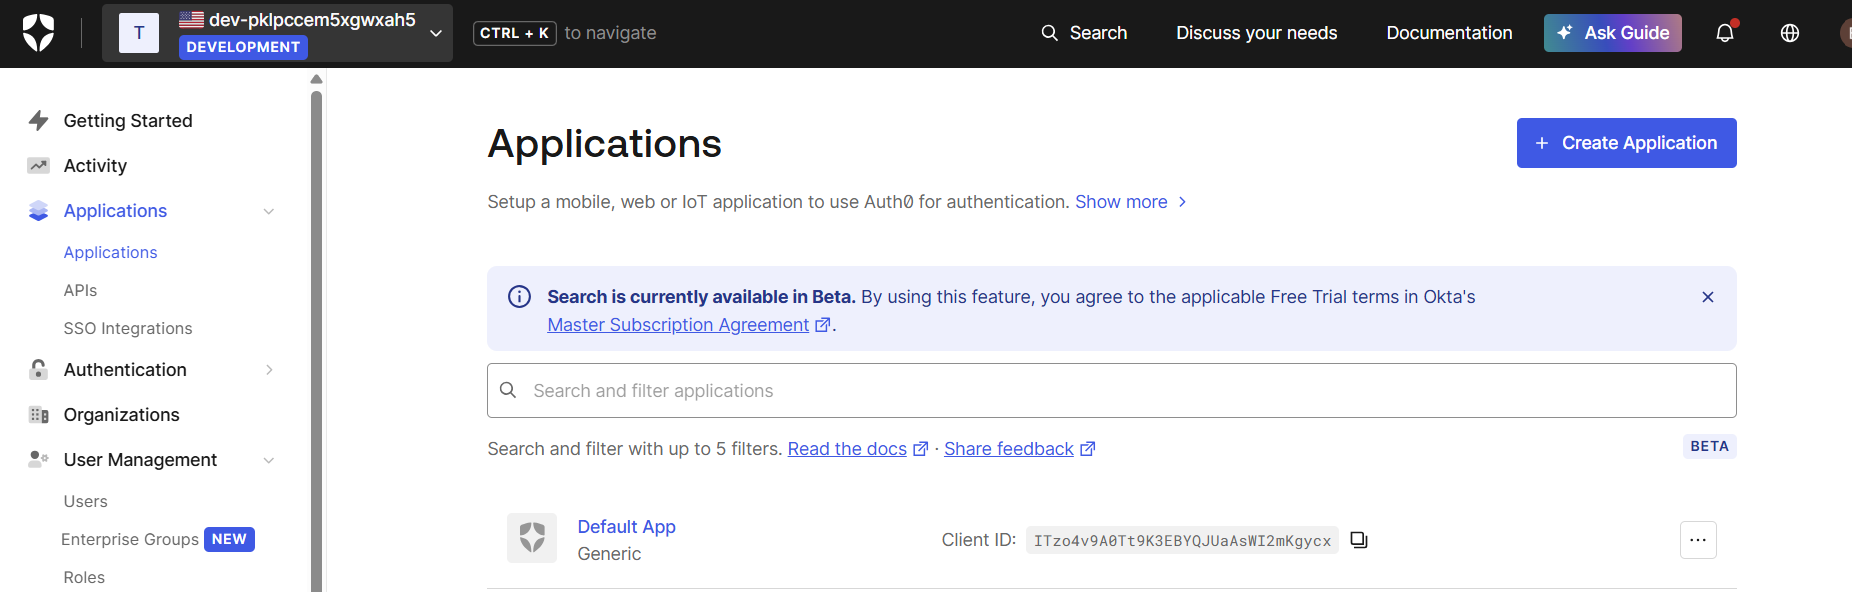
Figure 1.1 — Creating the Ceburu application in Auth0.
Step 2 — Enable the SAML2 Web App addon
Open Applications → your app → Addons and enable SAML2 WEB APP.
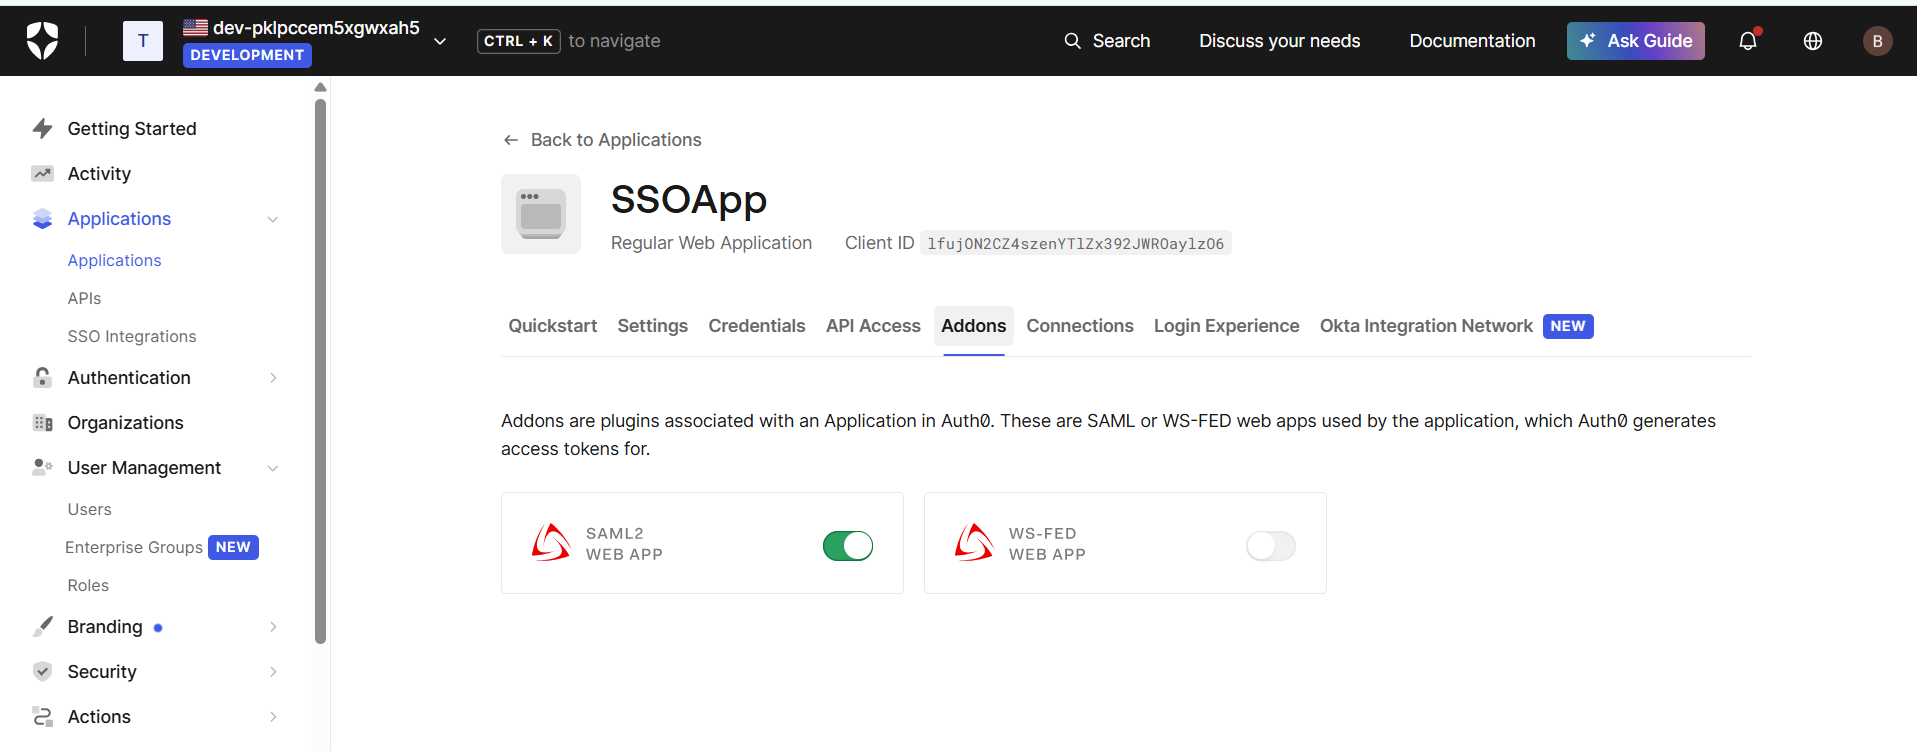
Figure 1.2 — The Addons tab with SAML2 WEB APP enabled.
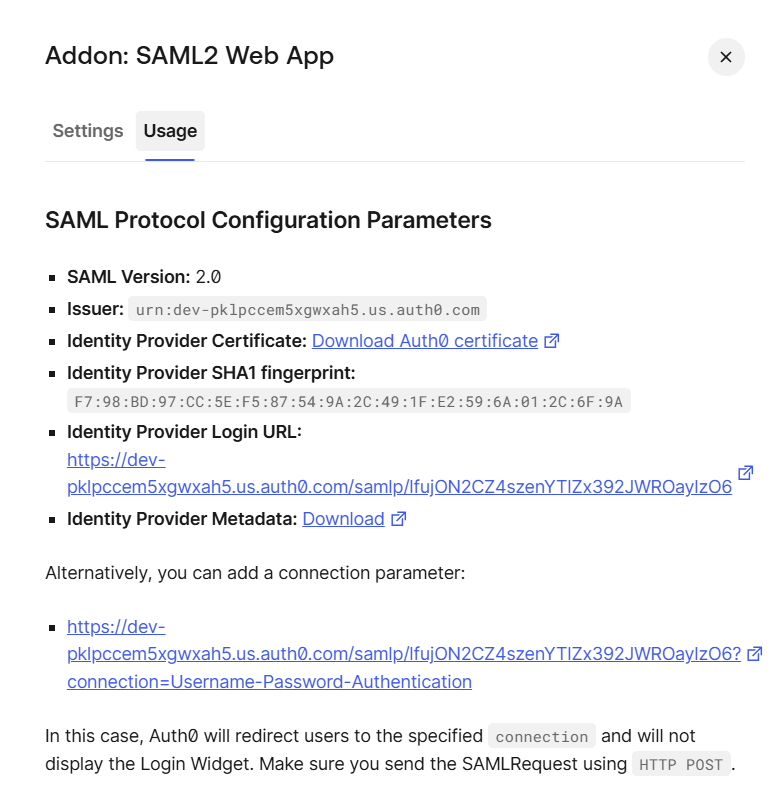
Figure 1.3 — SAML2 Web App addon settings.
Step 3 — Set the Application Callback URL
Set the Application Callback URL to the Ceburu SAML ACS URL:
https://auth.ceburuai.com/api/accounts/sso/saml/acs/
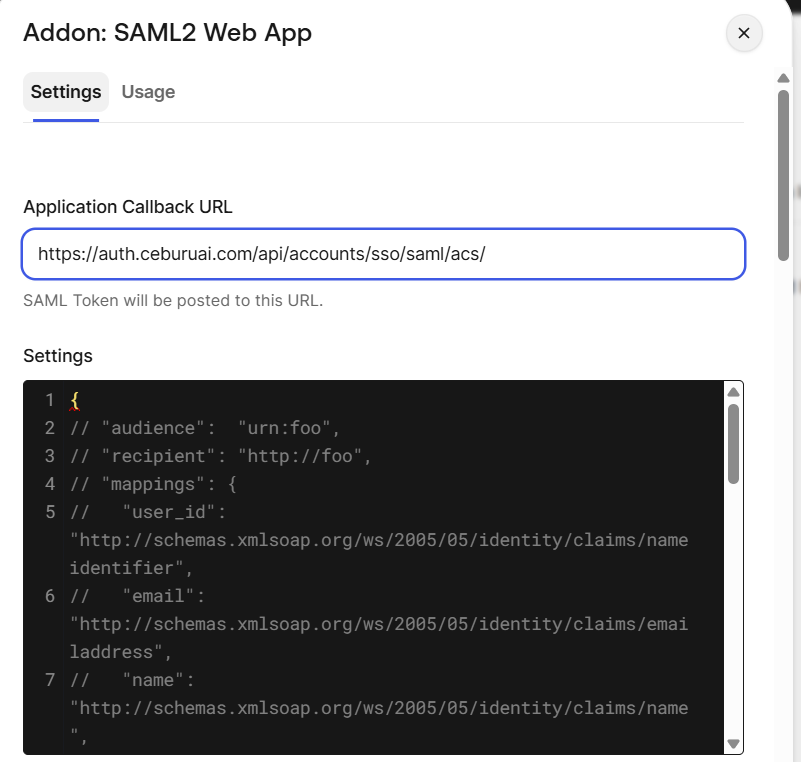
Figure 1.4 — Application Callback URL set to the Ceburu ACS URL.
Step 4 — Copy the Auth0 values into Ceburu
| Ceburu Field | Where to get it in Auth0 |
|---|---|
| Identity Provider Sign-In URL | SAML2 Web App → Usage → Identity Provider Login / Sign-in URL |
| Identity Issuer URL | SAML2 Web App → Usage → Issuer |
| Identity Provider X.509 Certificate | SAML2 Web App → Usage → signing certificate. Copy the full PEM certificate. |
In Auth0, fill these from Ceburu (SP-side):
- ACS URL = https://auth.ceburuai.com/api/accounts/sso/saml/acs/
- SP Entity ID (optional) = https://auth.ceburuai.com/
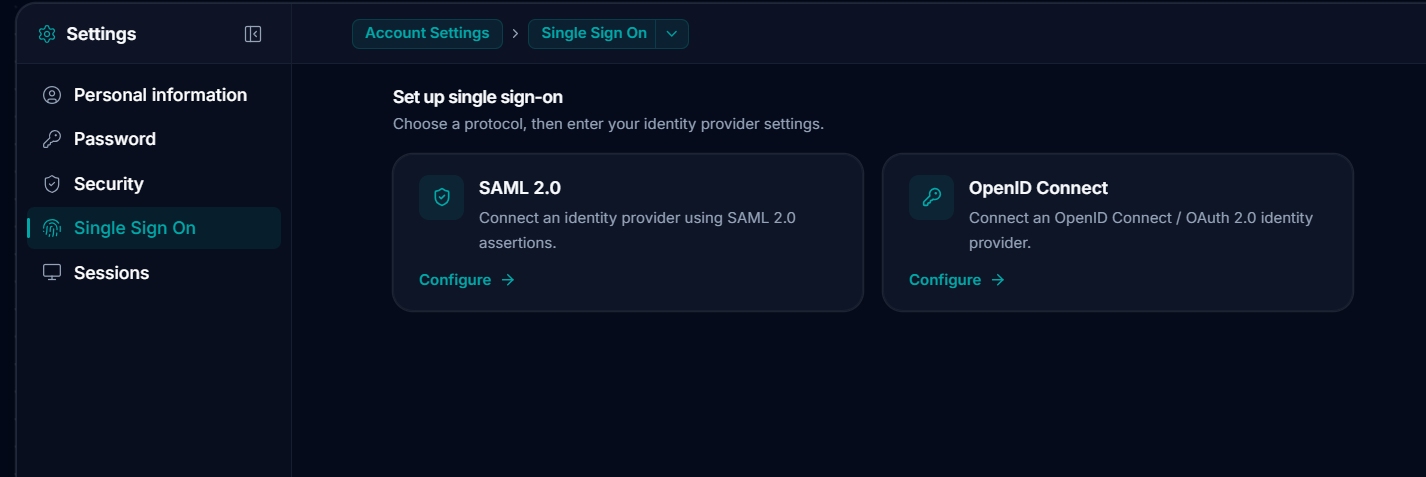
Figure 1.5 — Auth0 Usage tab: Sign-in URL, Issuer, and signing certificate.
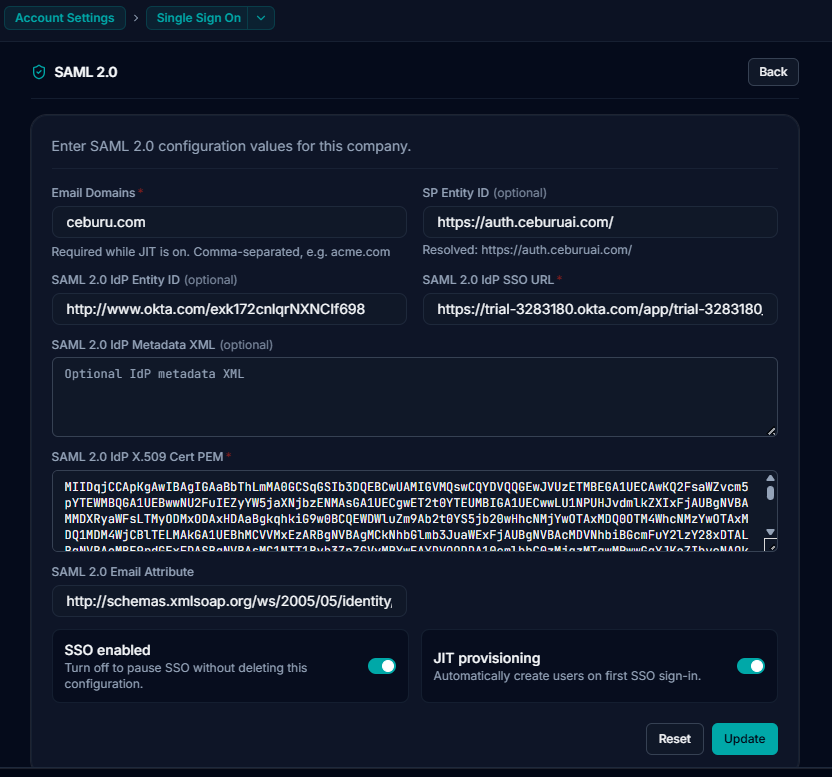
Figure 1.6 — Pasting the Auth0 values into the Ceburu SAML configuration.
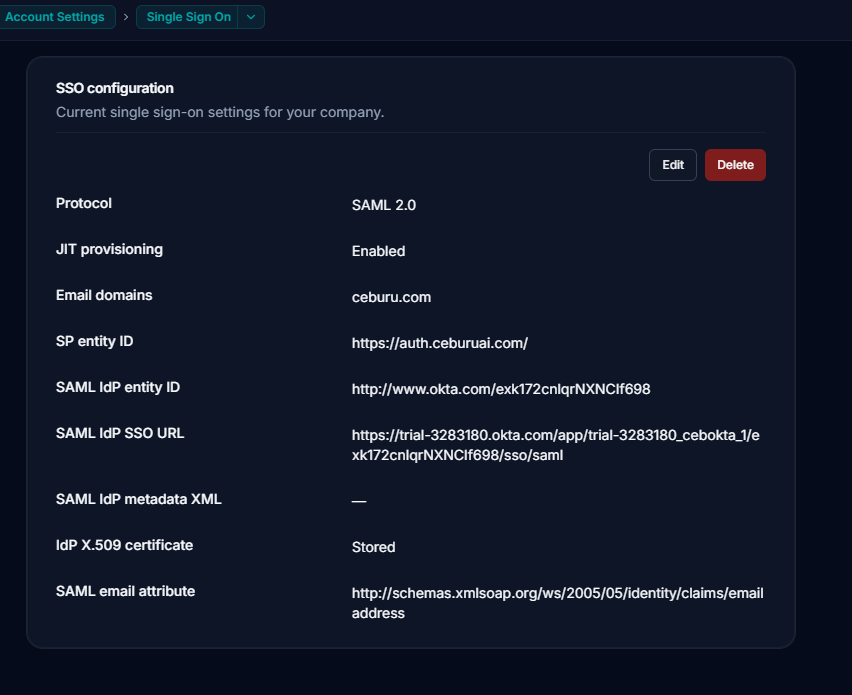
Figure 1.7 — The saved and enabled Ceburu SAML integration.
Step 5 — Add users in Auth0
Step 6 — Sign in to Ceburu with SSO
- Open the Ceburu login page.
- Choose Single Sign-On (SSO).
- Enter the work email (or the organisation's SSO identifier, depending on how your Ceburu tenant is set up).
- You are redirected to your Identity Provider (Auth0) to authenticate.
- After successful authentication, you are redirected back into Ceburu.
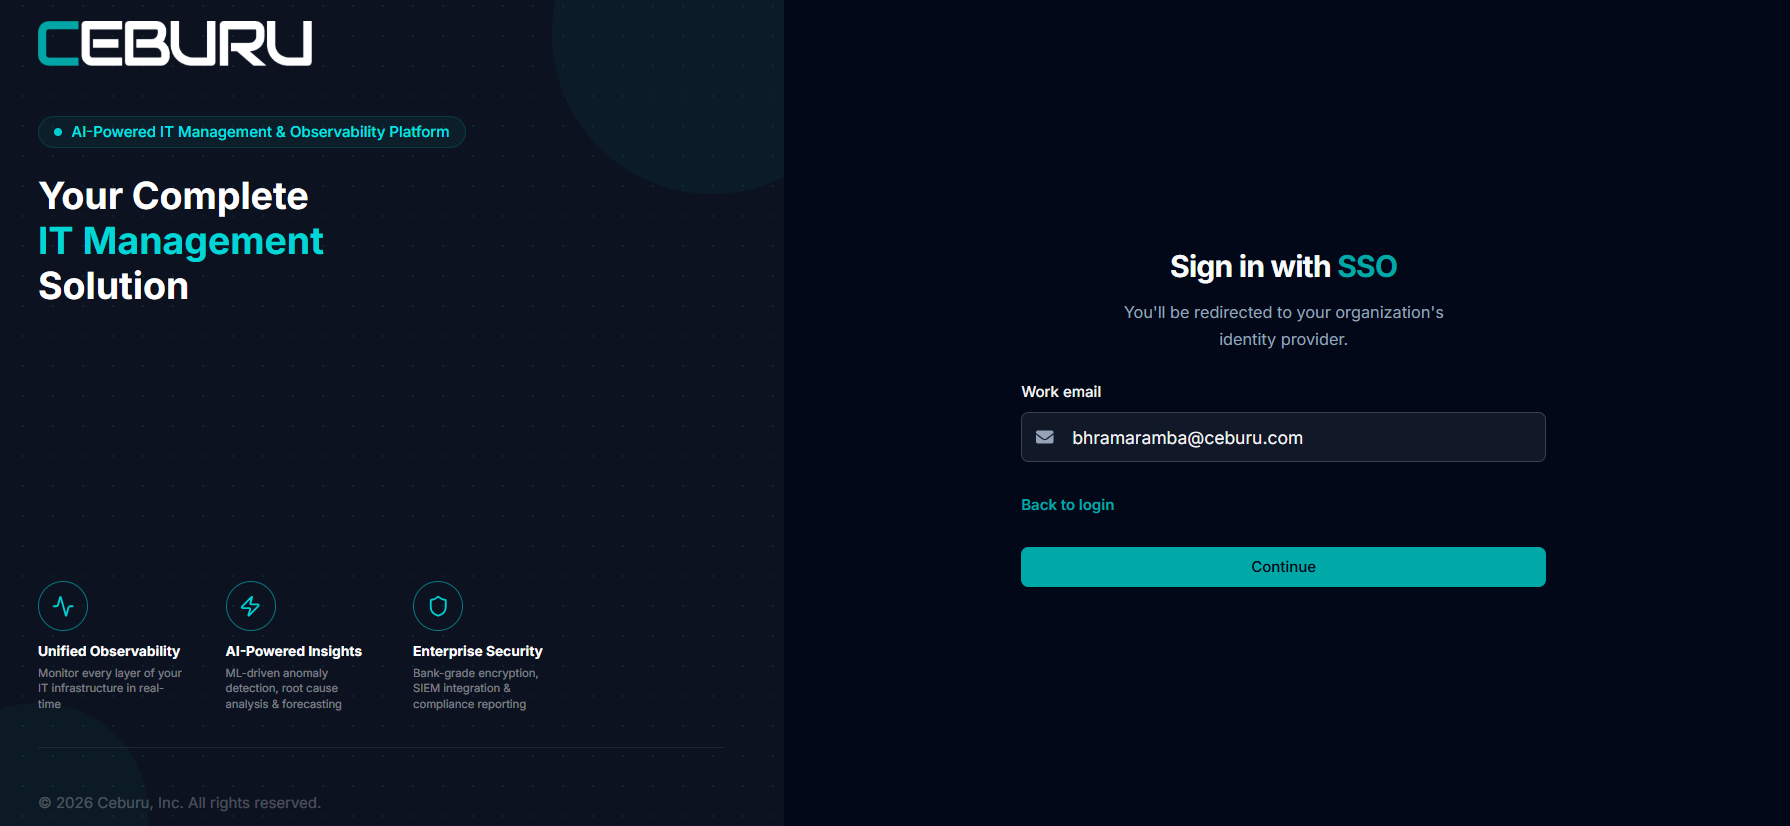
Figure 1.8 — Ceburu login page with the Single Sign-On option.
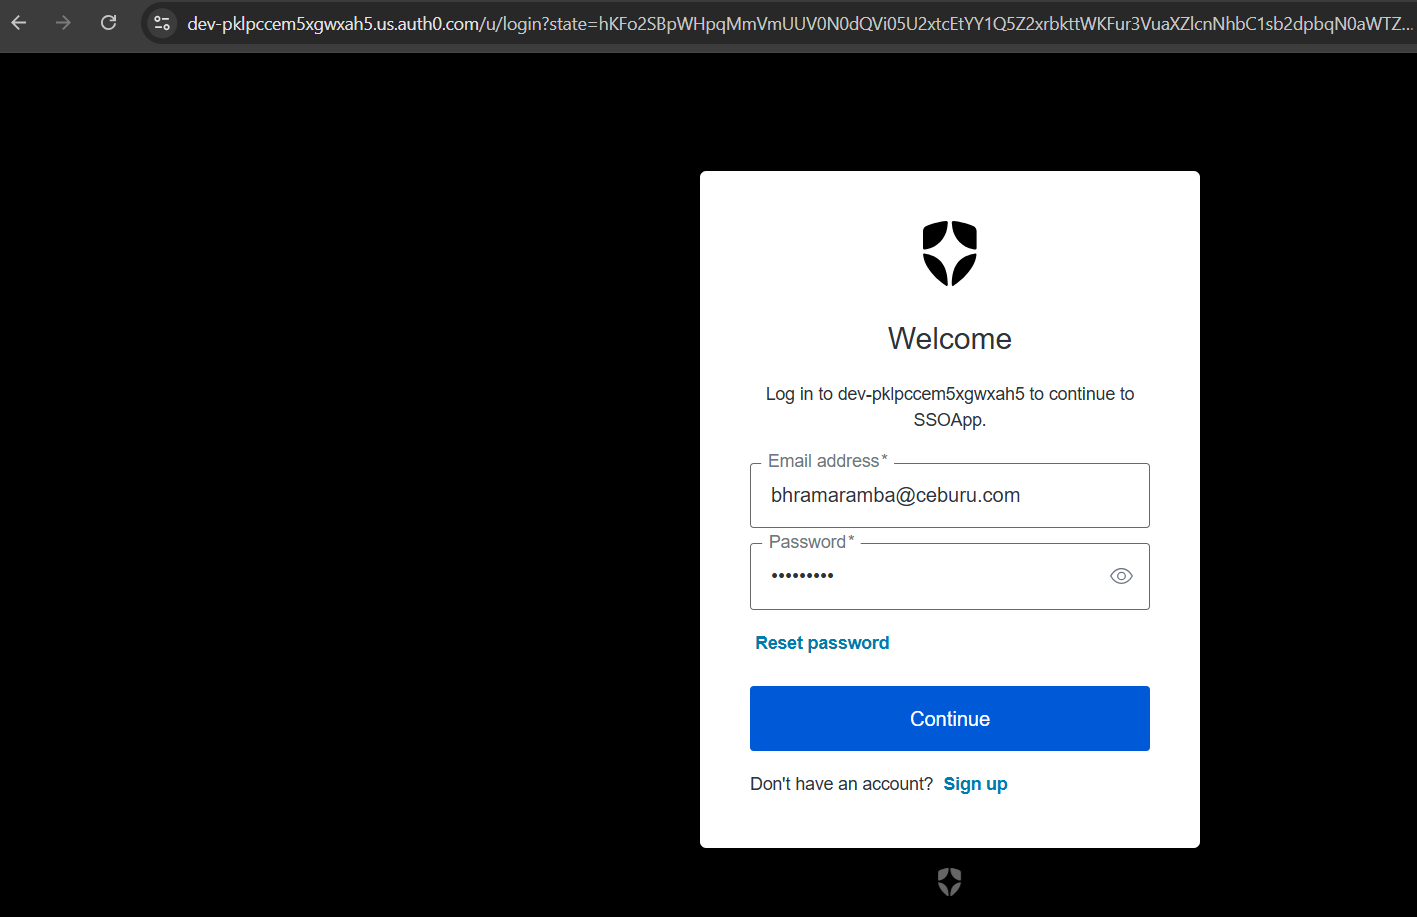
Figure 1.9 — Authenticating with Auth0.
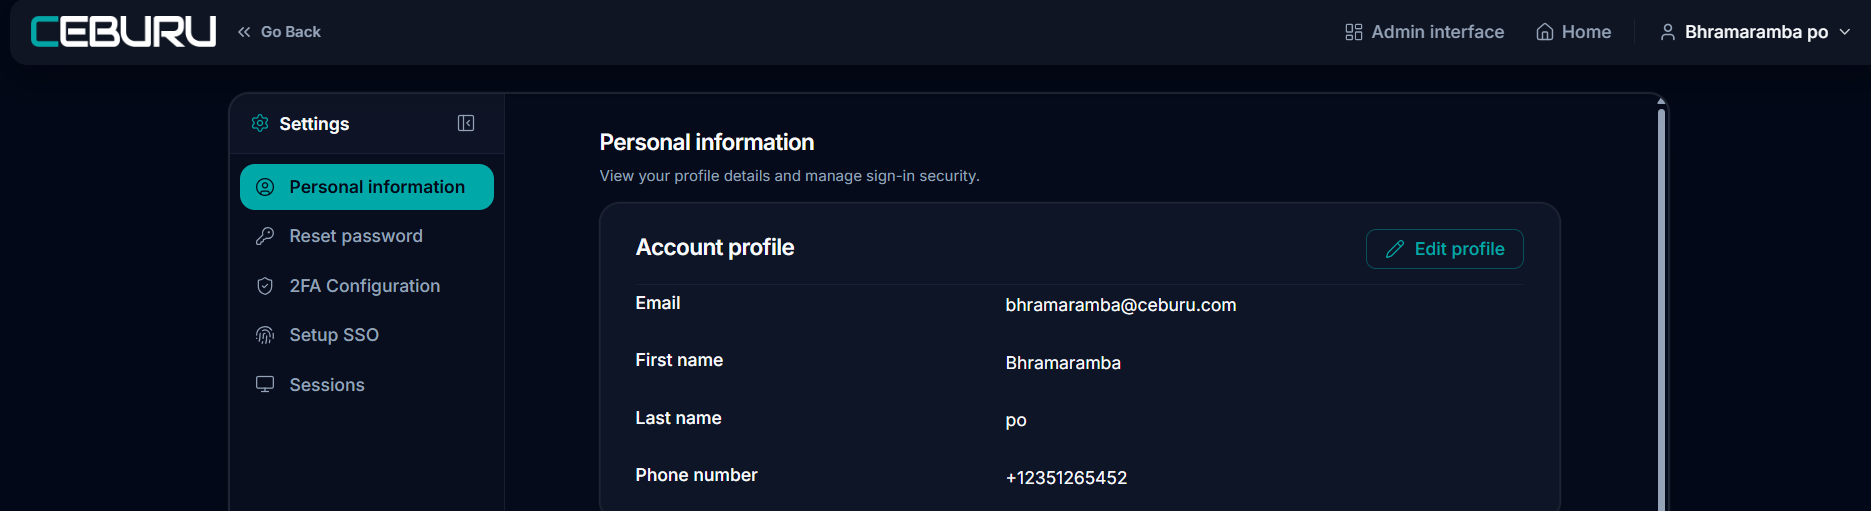
Figure 1.10 — Redirected back into Ceburu after successful authentication.
2. Auth0 — OpenID Connect (OIDC)
OIDC uses the Auth0 application settings and the tenant OpenID Discovery document.
Step 1 — Set the Allowed Callback URL
- Open Applications → your Ceburu application → Settings.
- Set Allowed Callback URLs to https://auth.ceburuai.com/api/accounts/sso/oidc/callback/
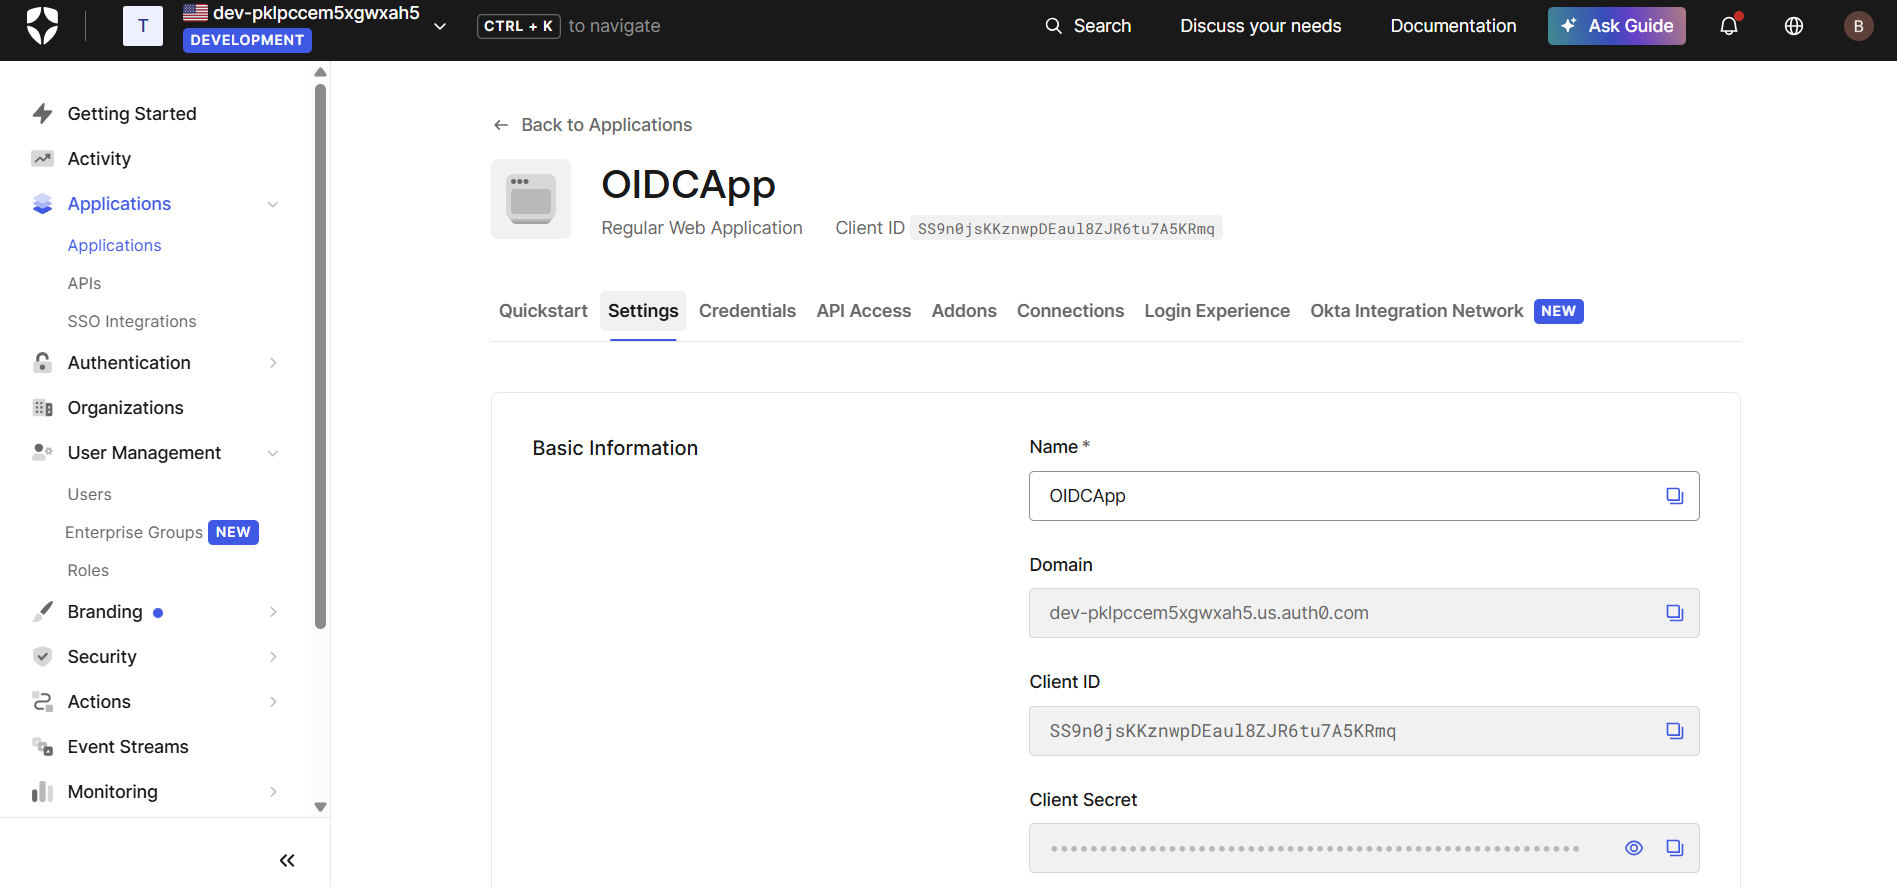
Figure 2.1 — Auth0 application settings.
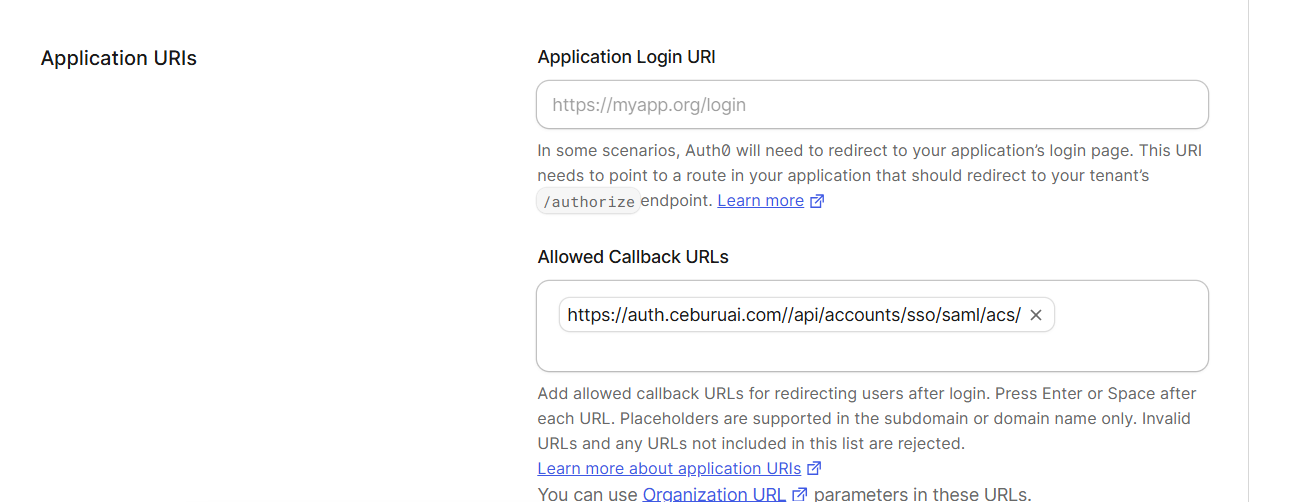
Figure 2.2 — The Allowed Callback URLs field with the Ceburu OIDC callback URL.
Step 2 — Get the Authorization Endpoint, Token Endpoint, and JWKS URI
These are tenant-level endpoints, not application-specific settings, so Auth0 does not provide a dedicated UI page listing them for each application. They are exposed through the OpenID Discovery document instead.
Discovery URL format:
https://<your-auth0-tenant>/.well-known/openid-configuration
For the example tenant dev-pklpccem5xgwxah5.us.auth0.com:
https://dev-pklpccem5xgwxah5.us.auth0.com/.well-known/openid-configuration
From that document, copy:
{
  "authorization_endpoint": "https://dev-pklpccem5xgwxah5.us.auth0.com/authorize",
  "token_endpoint": "https://dev-pklpccem5xgwxah5.us.auth0.com/oauth/token",
  "jwks_uri": "https://dev-pklpccem5xgwxah5.us.auth0.com/.well-known/jwks.json"
}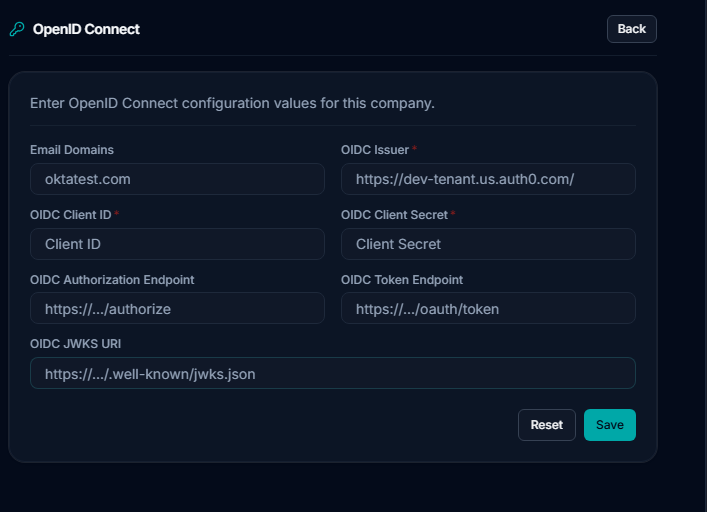
Figure 2.3 — The Auth0 OpenID Discovery document.
Step 3 — Fill in the Ceburu OIDC fields
| Ceburu Field | Source |
|---|---|
| OIDC Issuer | Your Auth0 tenant issuer |
| OIDC Client ID | Auth0 application settings |
| OIDC Client Secret | Auth0 application settings |
| Authorization Endpoint | authorization_endpoint from the discovery document |
| Token Endpoint | token_endpoint from the discovery document |
| JWKS URI | jwks_uri from the discovery document |
Step 4 — Sign in to Ceburu with SSO
- Open the Ceburu login page.
- Choose Single Sign-On (SSO).
- Enter the work email (or the organisation's SSO identifier).
- You are redirected to Auth0 to authenticate.
- After successful authentication, you are redirected back into Ceburu.
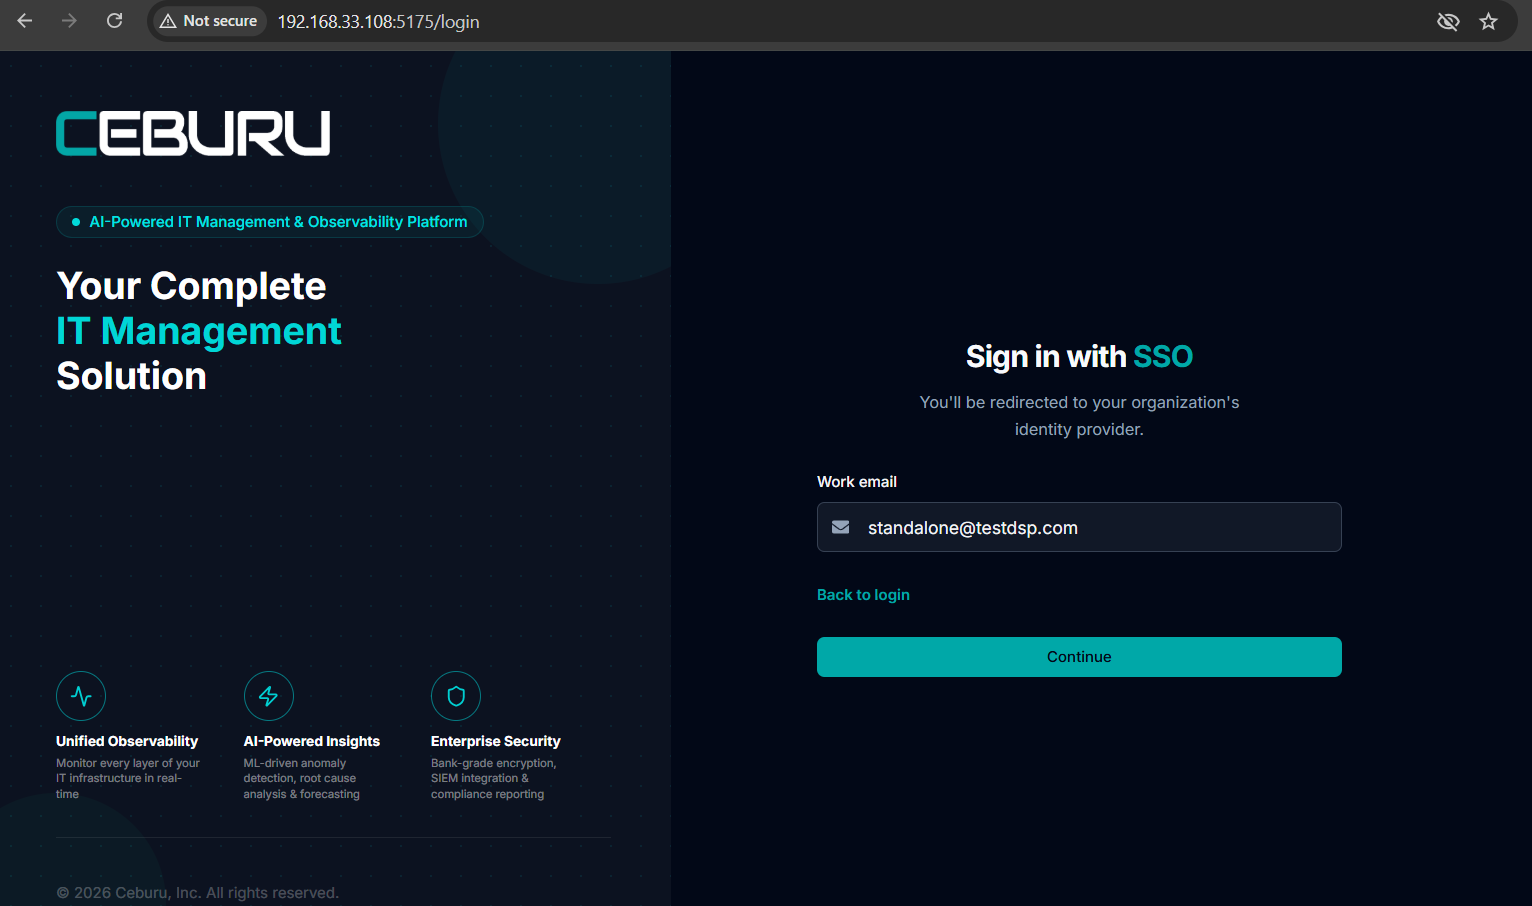
Figure 2.4 — Starting the OIDC sign-in from Ceburu.
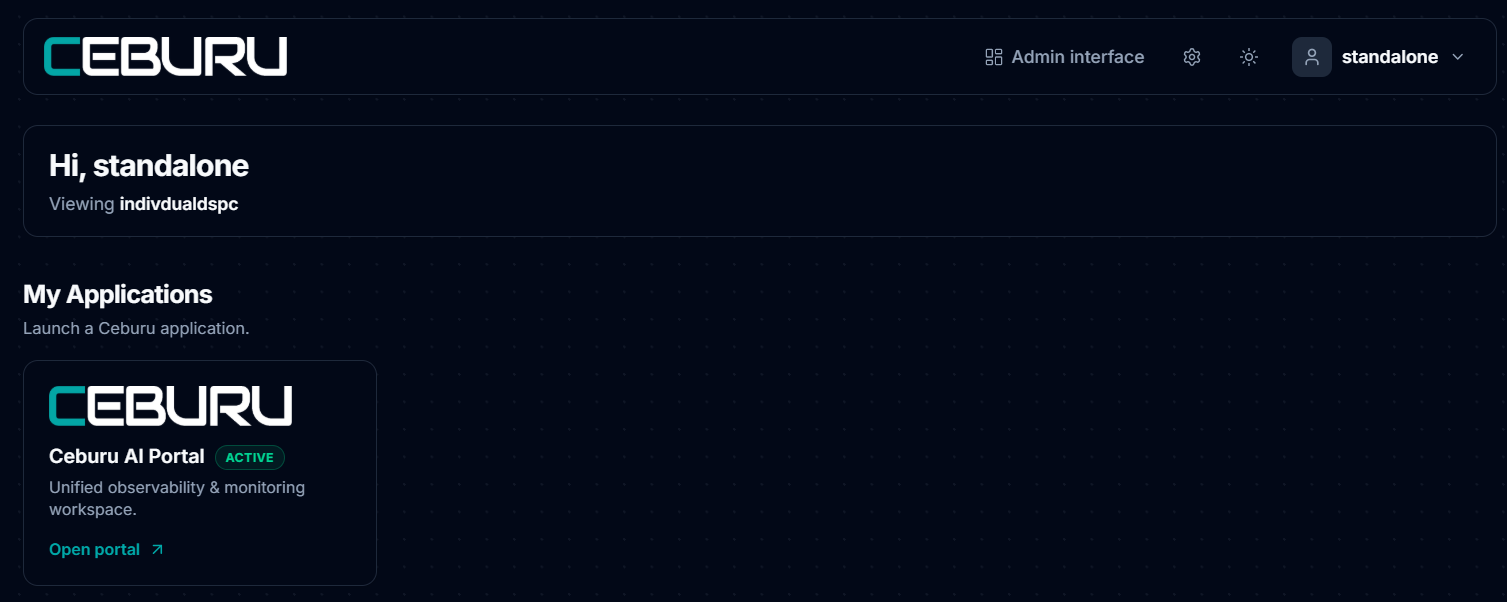
Figure 2.5 — Redirected back into Ceburu after successful authentication.
3. Okta — SAML 2.0
Use this setup when Okta is the Identity Provider and Ceburu is the Service Provider.
Step 1 — Create the SAML app integration
- In the Okta Admin Console, go to Applications and create a new app integration.
- Select SAML 2.0.
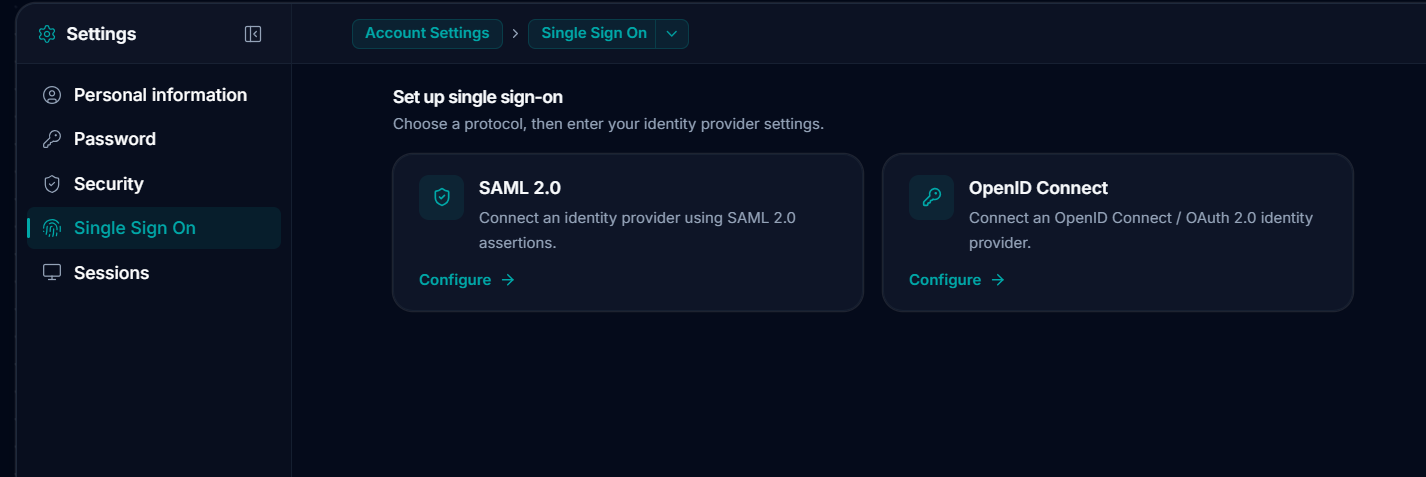
Figure 3.1 — Starting the Okta SAML application setup.
Step 2 — Configure the ACS URL and SP Entity ID
Create a custom SAML 2.0 application in Okta for Ceburu Production and enter:
- ACS URL = https://auth.ceburuai.com/api/accounts/sso/saml/acs/
- SP Entity ID (optional) = https://auth.ceburuai.com/
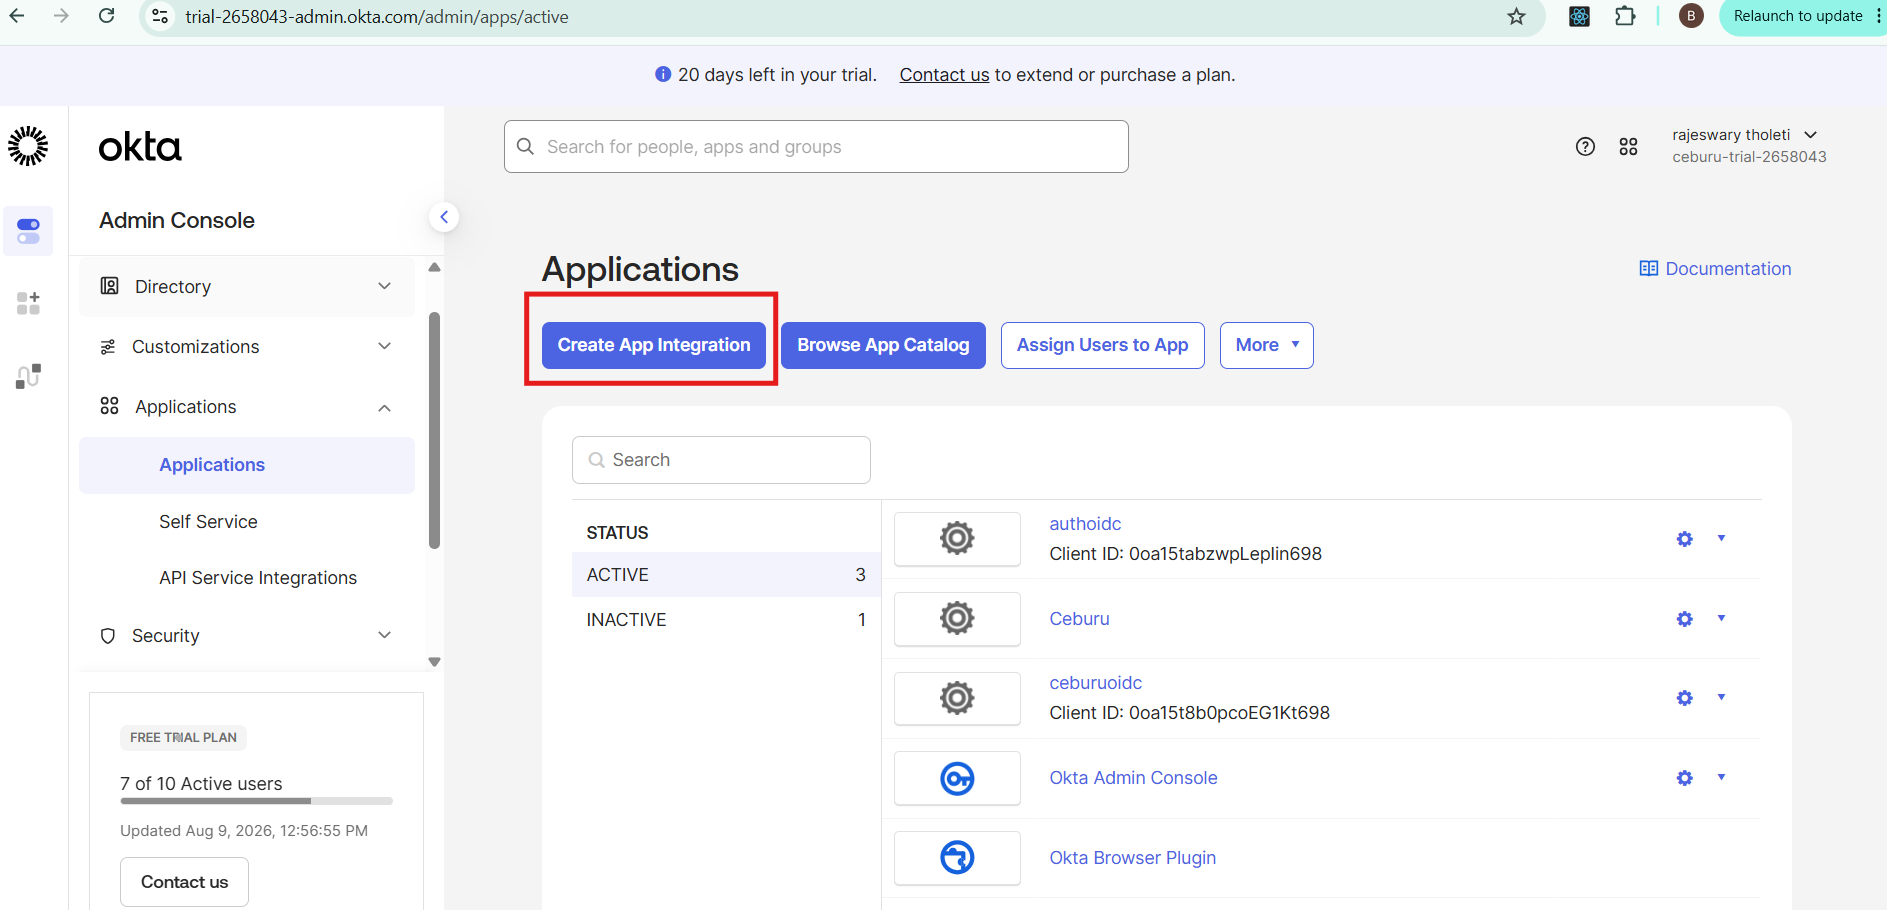
Figure 3.2 — General settings for the Okta SAML application.
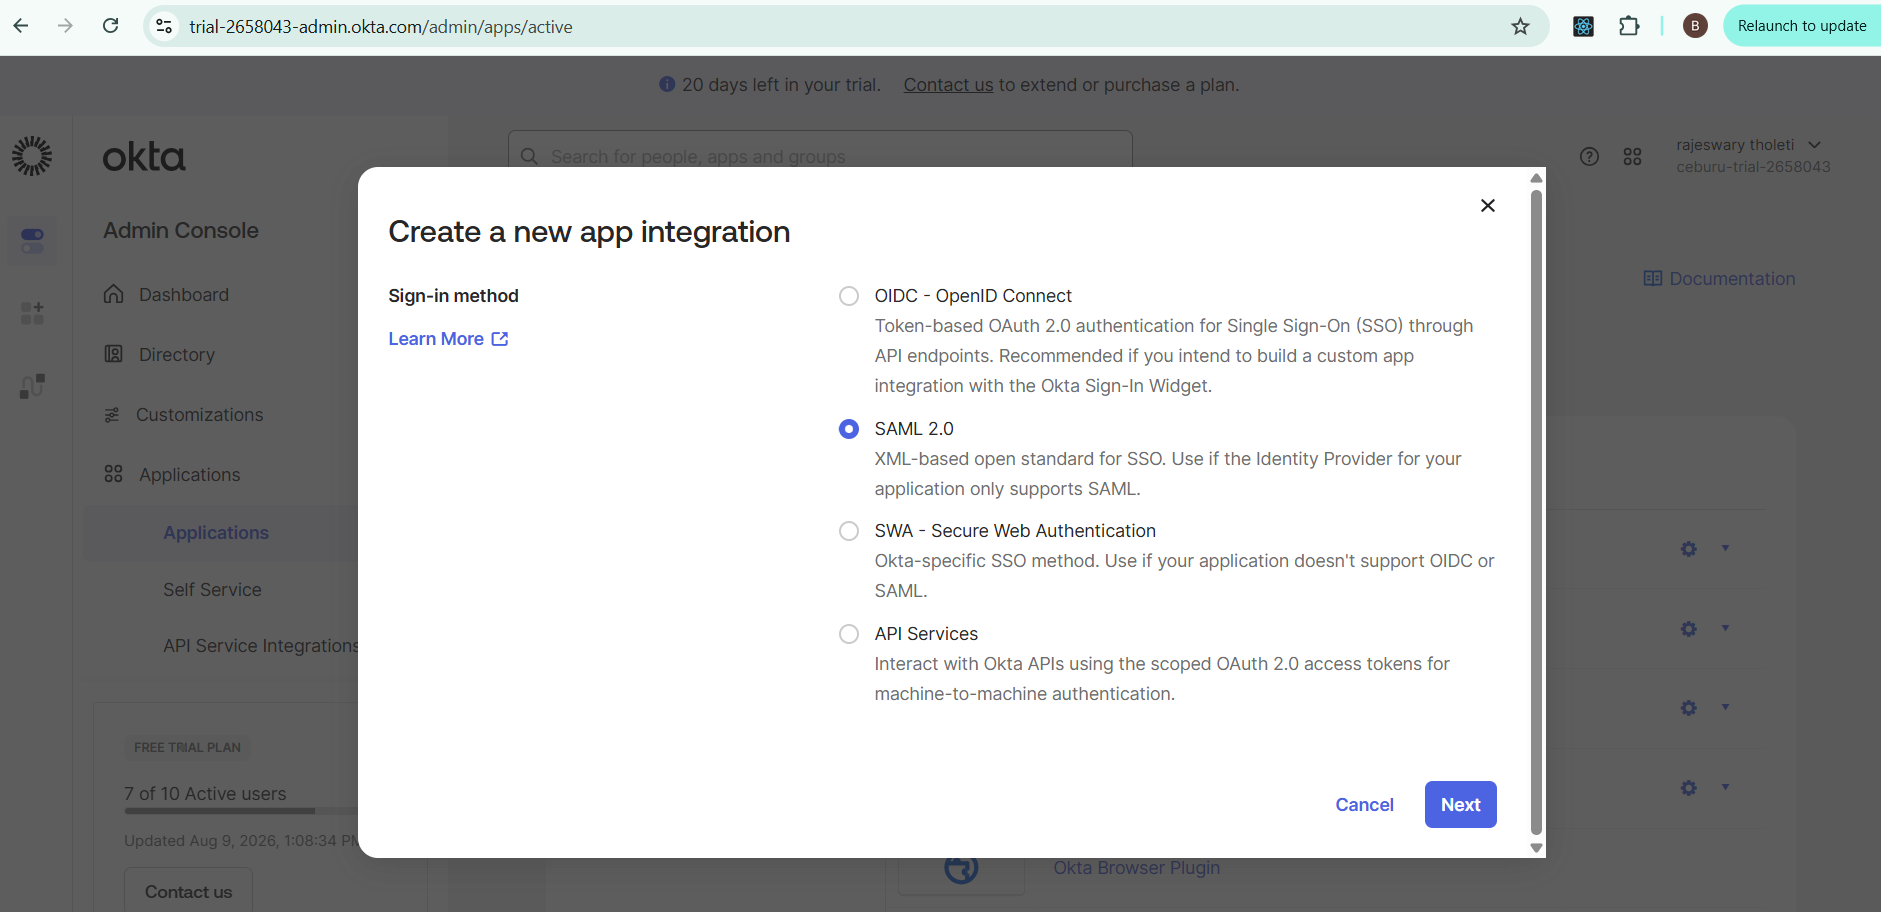
Figure 3.3 — Entering the Ceburu ACS URL and SP Entity ID.
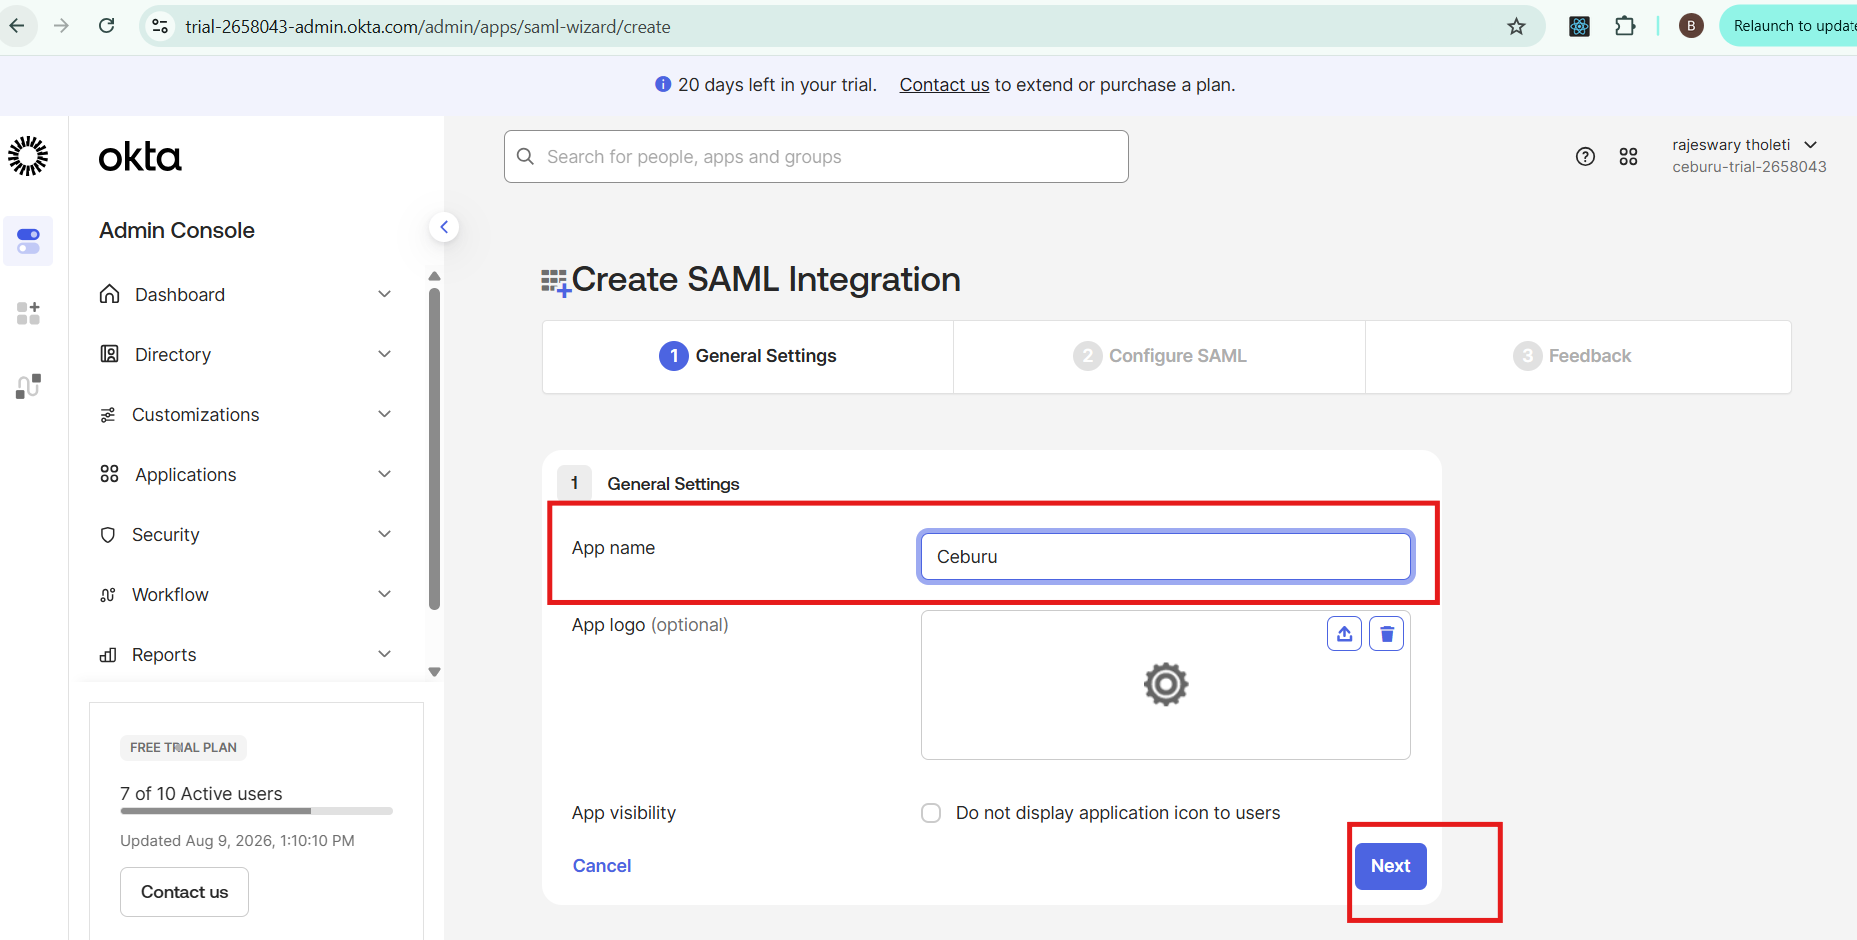
Figure 3.4 — Okta SAML configuration, continued.
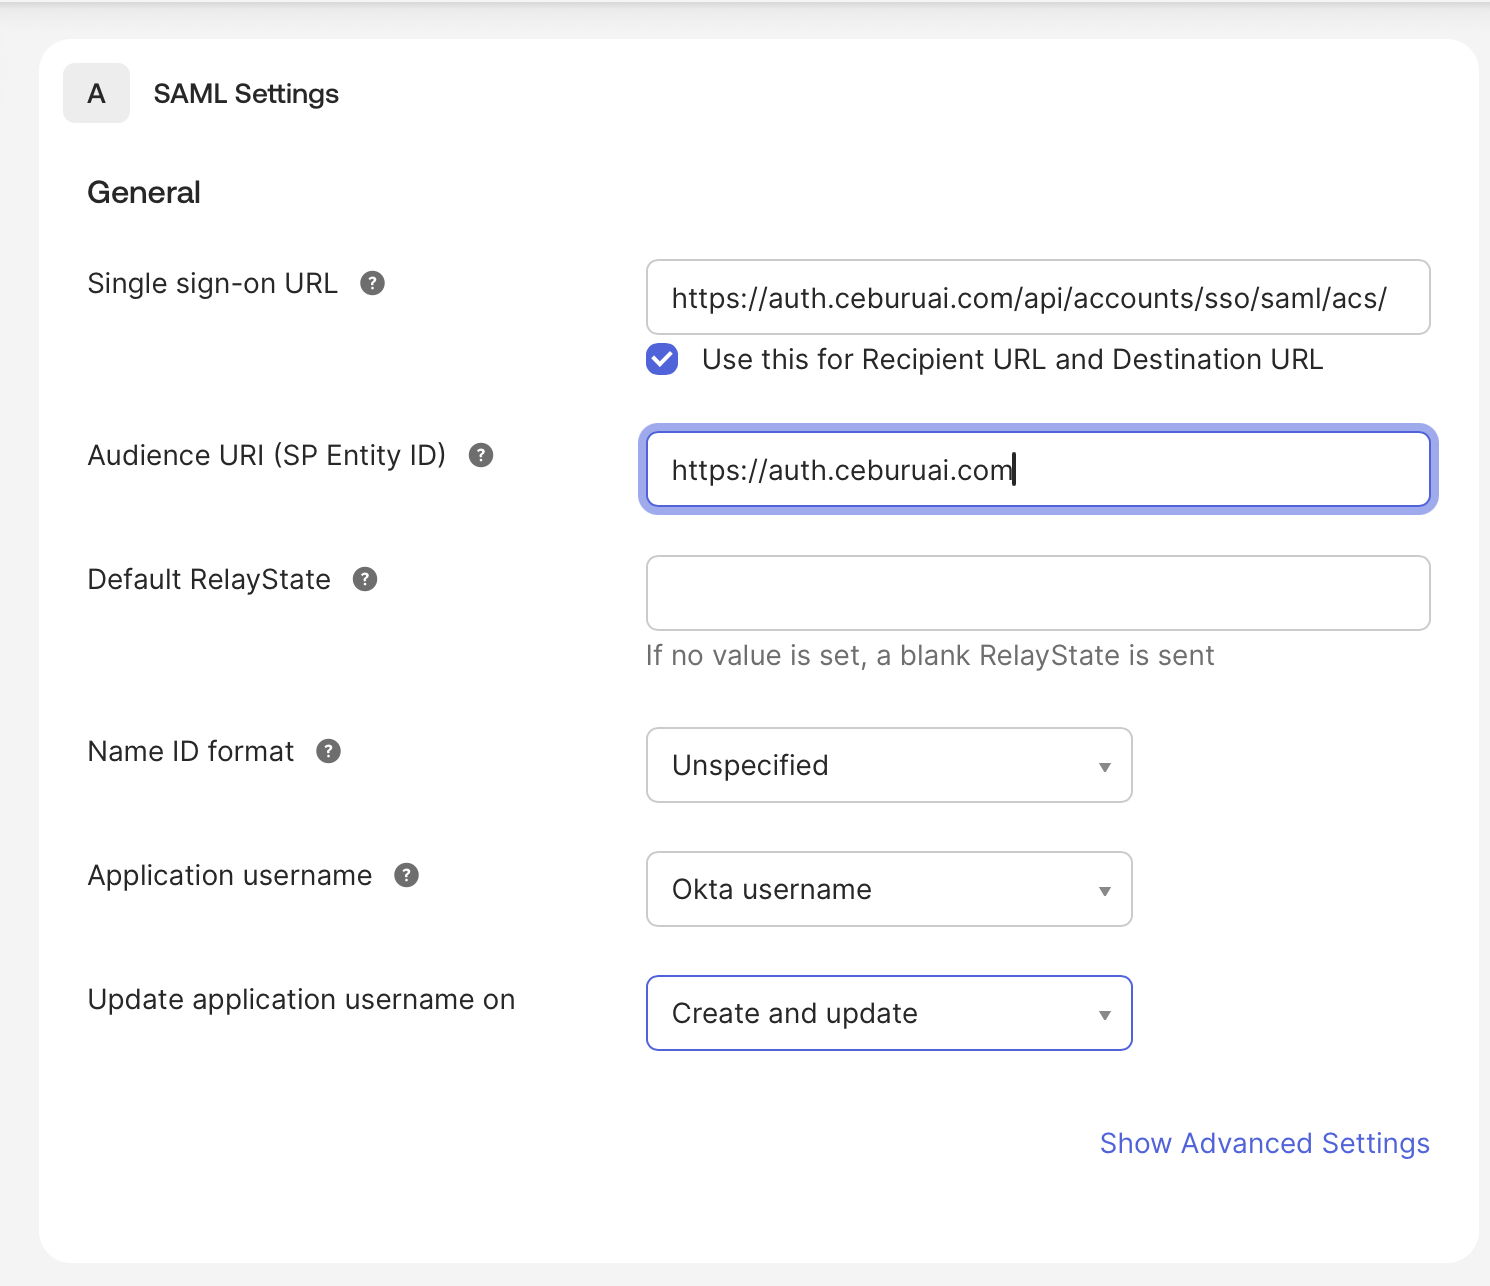
Figure 3.5 — Okta application configuration.
Step 3 — Add the required SAML attribute statements
Configure the following attributes so Ceburu can identify the user and receive the profile information needed for provisioning.
| Attribute Name | Okta Expression |
|---|---|
| user.profile.email | |
| first_name | user.profile.firstName |
| last_name | user.profile.lastName |
| phone_number | user.profile.primaryPhone |
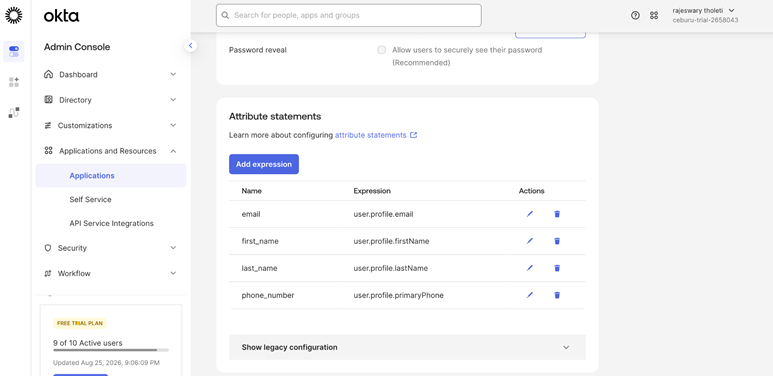
Figure 3.6 — Attribute statements configured in Okta.
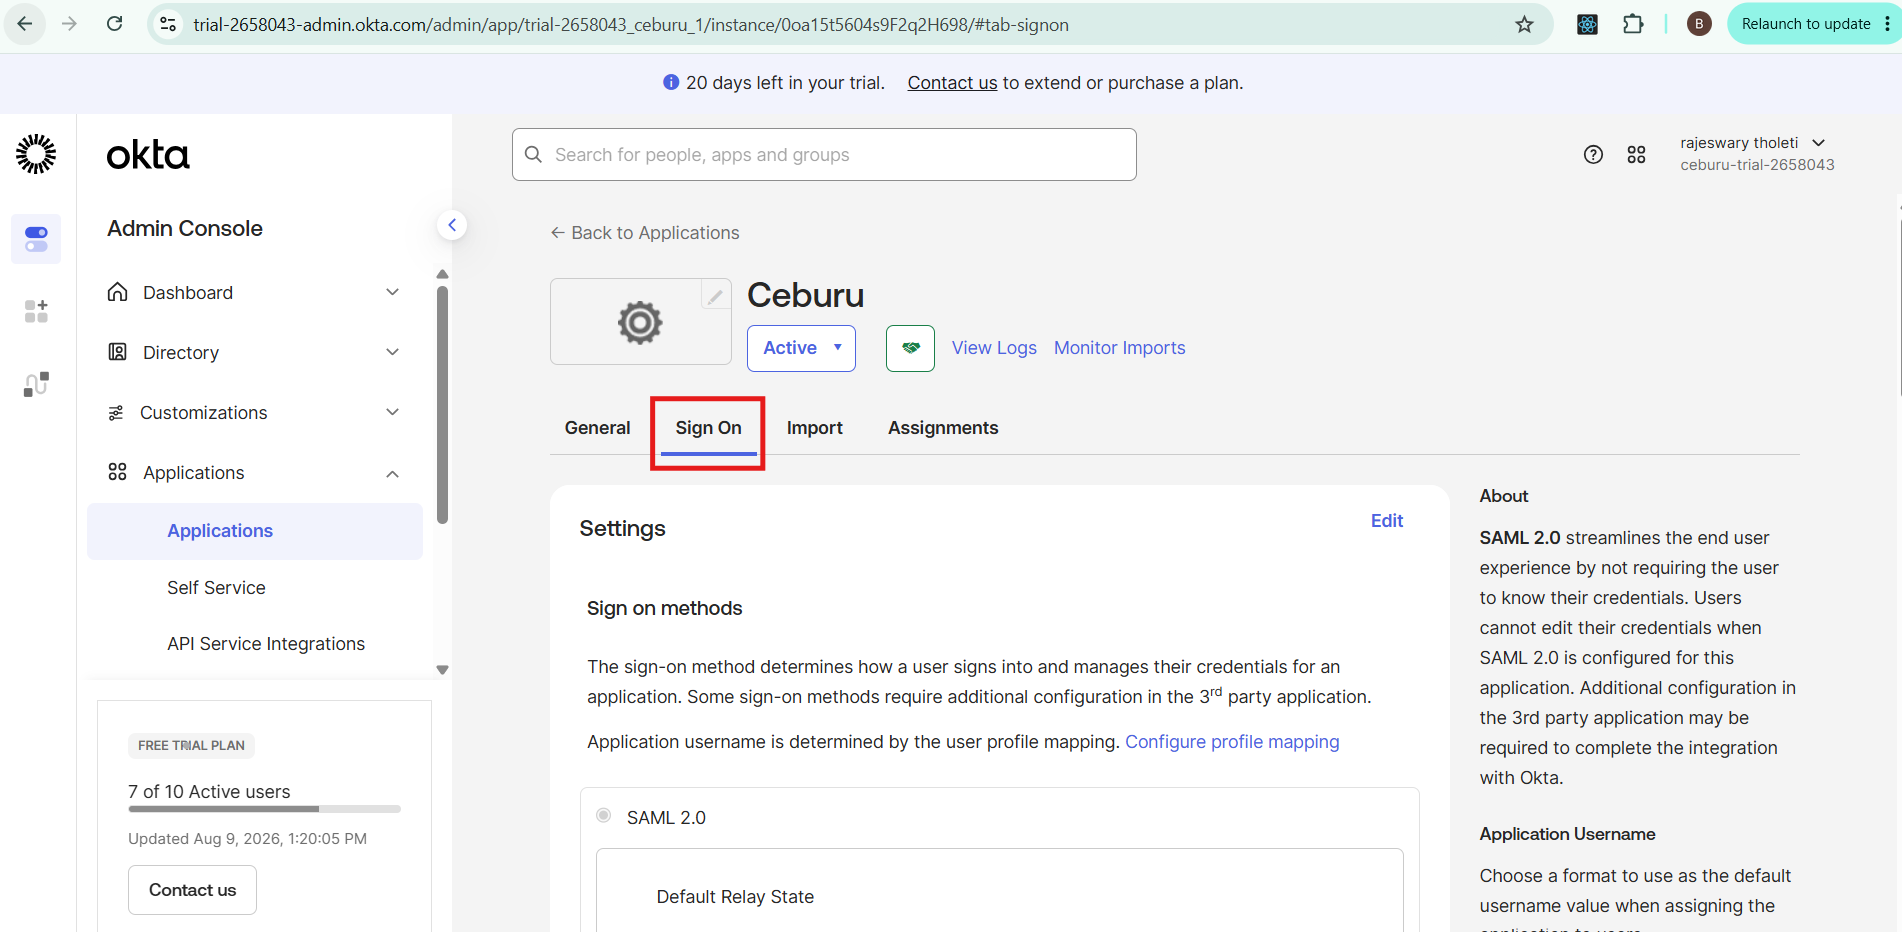
Figure 3.7 — Attribute statements, continued.
Step 4 — Copy the Okta SAML values into Ceburu
- Sign on URL → Identity Provider Sign-In URL
- Issuer → Identity Issuer URL
- Signing Certificate → Identity Provider X.509 Certificate
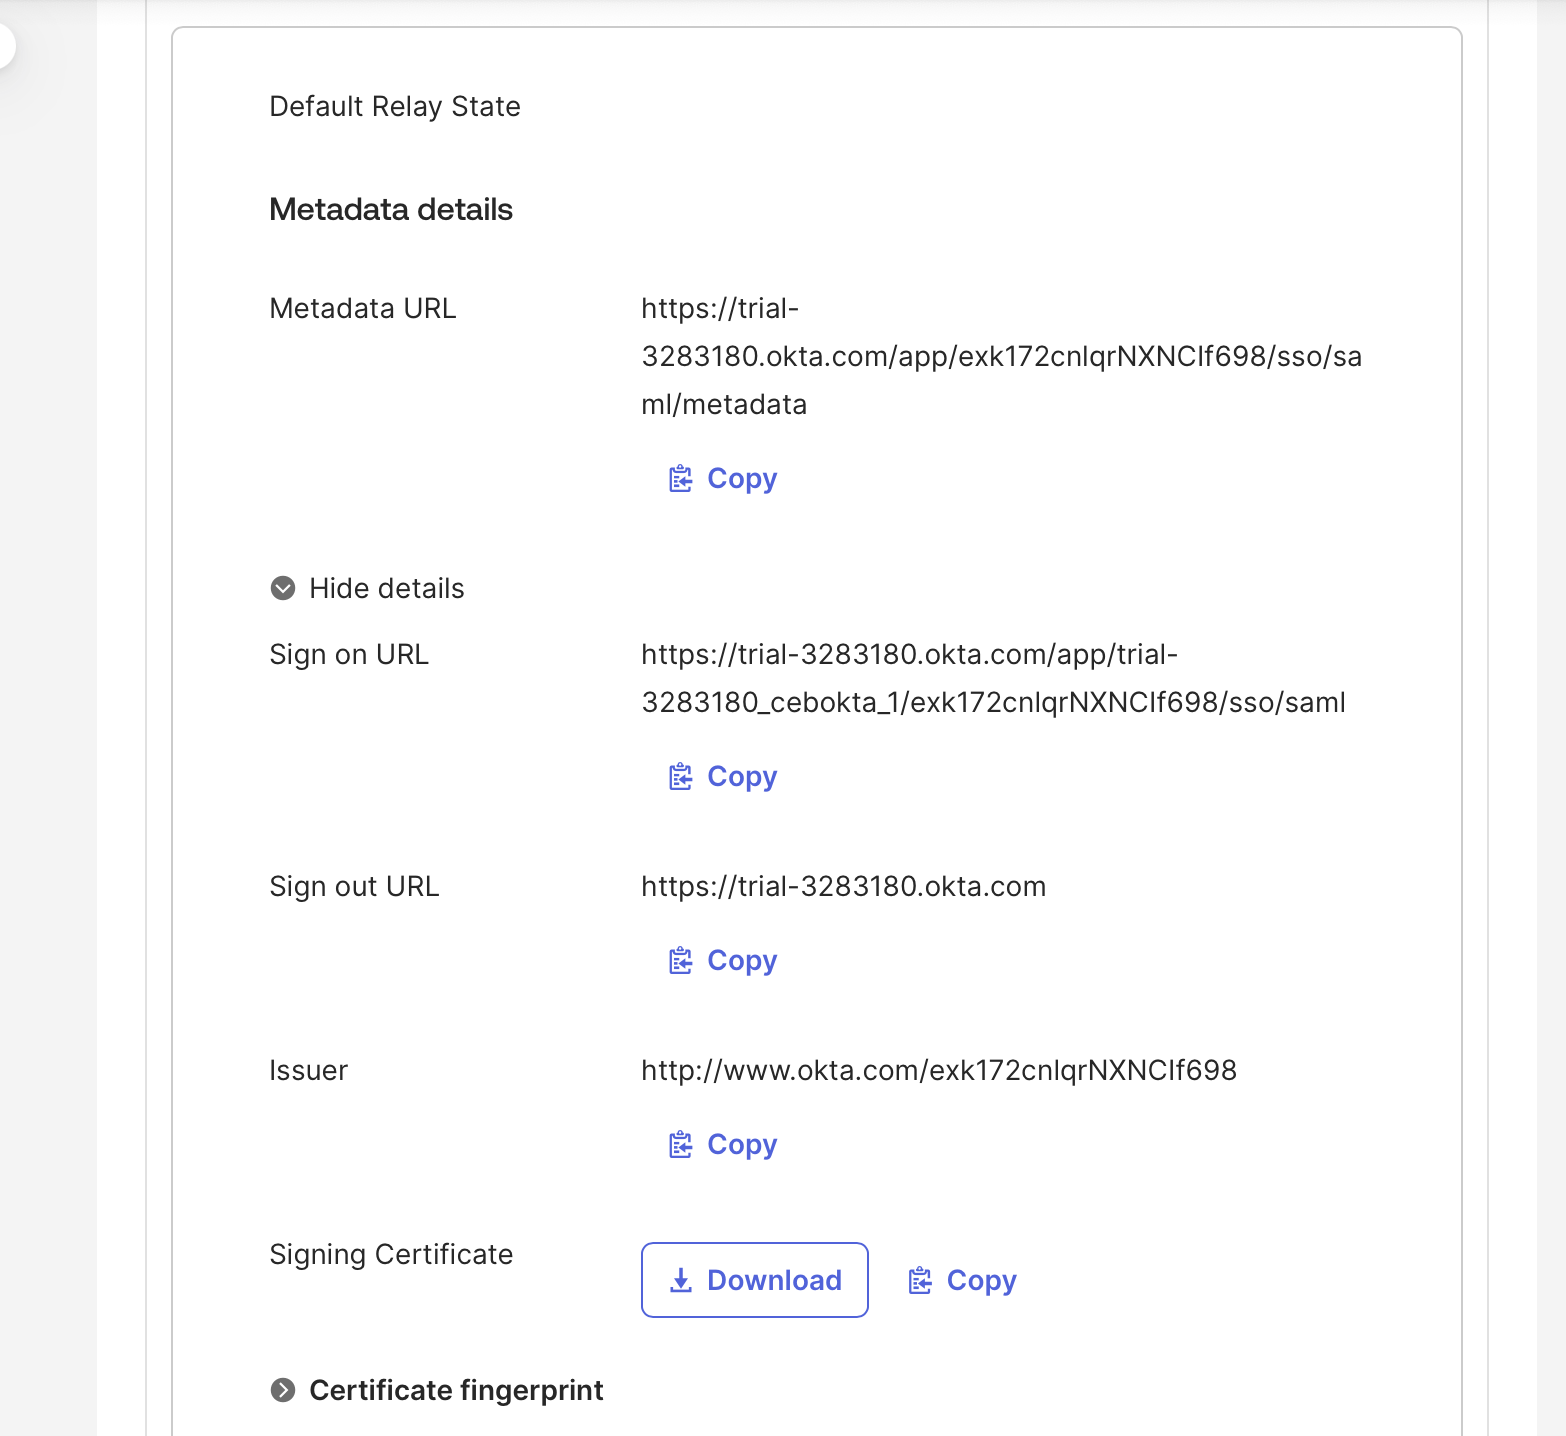
Figure 3.8 — Okta Sign on URL, Issuer, and Signing Certificate.
Step 5 — Configure SAML in Ceburu
In Ceburu Production, open the SAML 2.0 integration and enter the following values:
- Identity Provider Sign-In URL: paste the Okta Sign on URL
- Identity Issuer URL: paste the Okta Issuer
- SP Entity ID (optional): https://auth.ceburuai.com/
- Identity Provider X.509 Certificate: paste the Okta Signing Certificate
- Password Authentication:
- Enable it if the customer wants both password login and SAML.
- Disable it if the customer wants SAML-only login.
Then save the integration and make sure it is enabled.
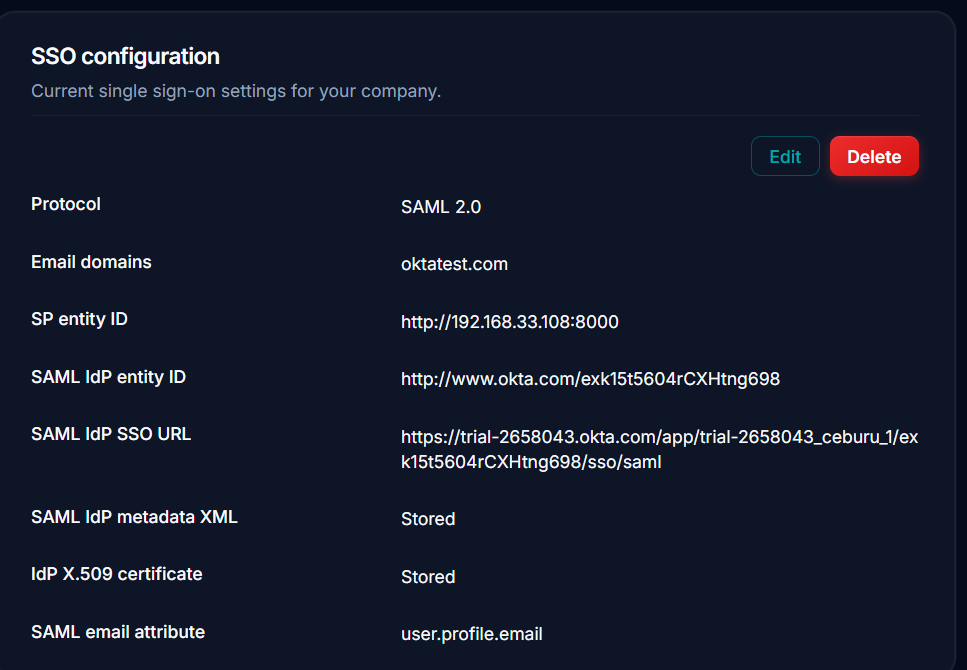
Figure 3.9 — Example Ceburu SAML configuration for an Okta connection.
Step 6 — Sign in to Ceburu with SSO
- Open the Ceburu login page.
- Choose Single Sign-On (SSO).
- Enter the work email (or the organisation's SSO identifier).
- You are redirected to Okta to authenticate.
- After successful authentication, you are redirected back into Ceburu.
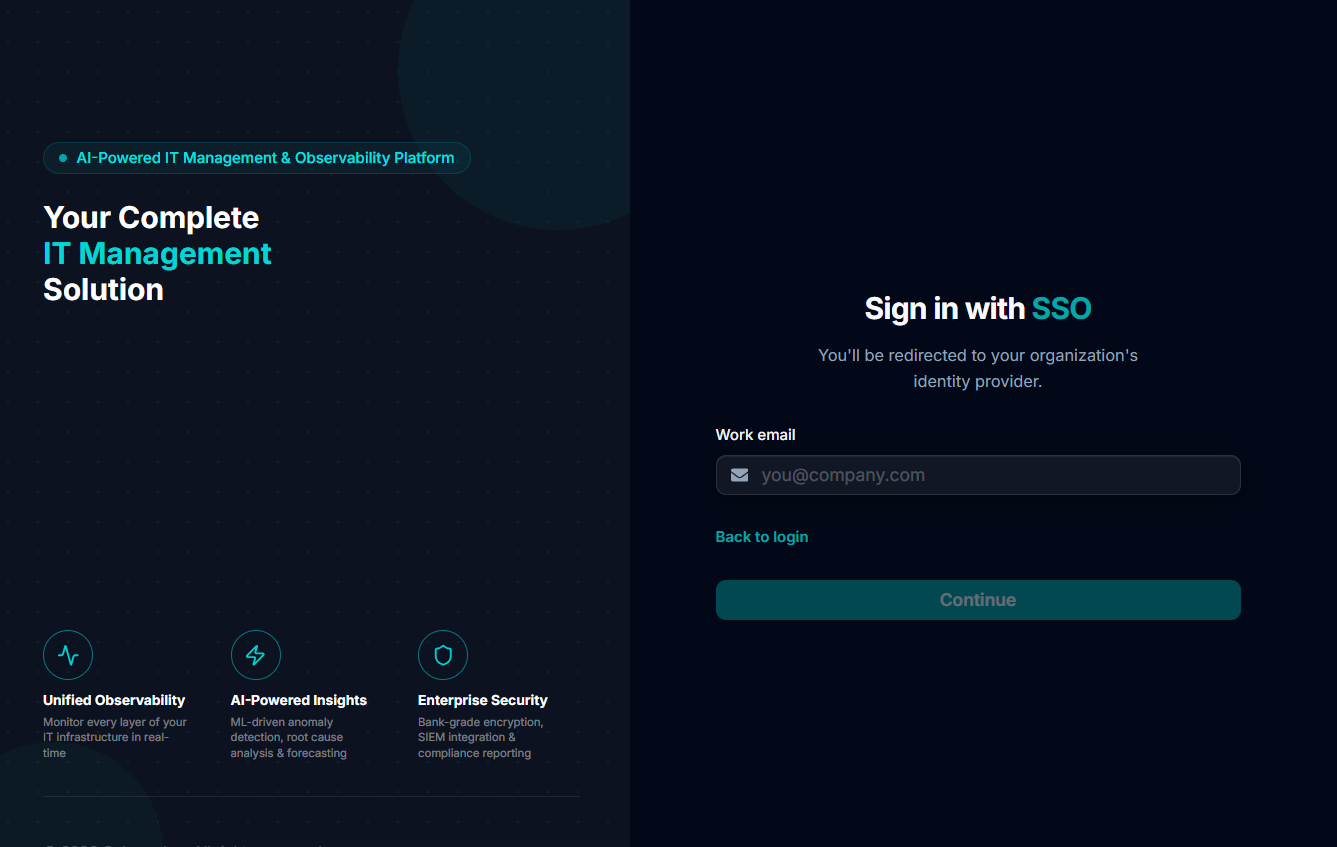
Figure 3.10 — Authenticating with Okta.
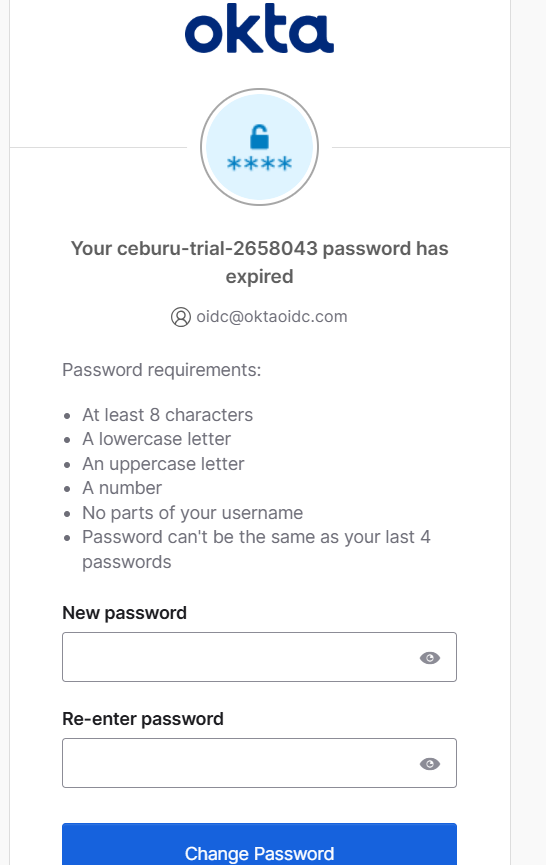
Figure 3.11 — Redirected back into Ceburu after successful authentication.
4. Okta — OpenID Connect (OIDC)
Step 1 — Create the OIDC application and assign users
- Create or open the Okta OIDC application.
- Assign the required users or groups to the application.
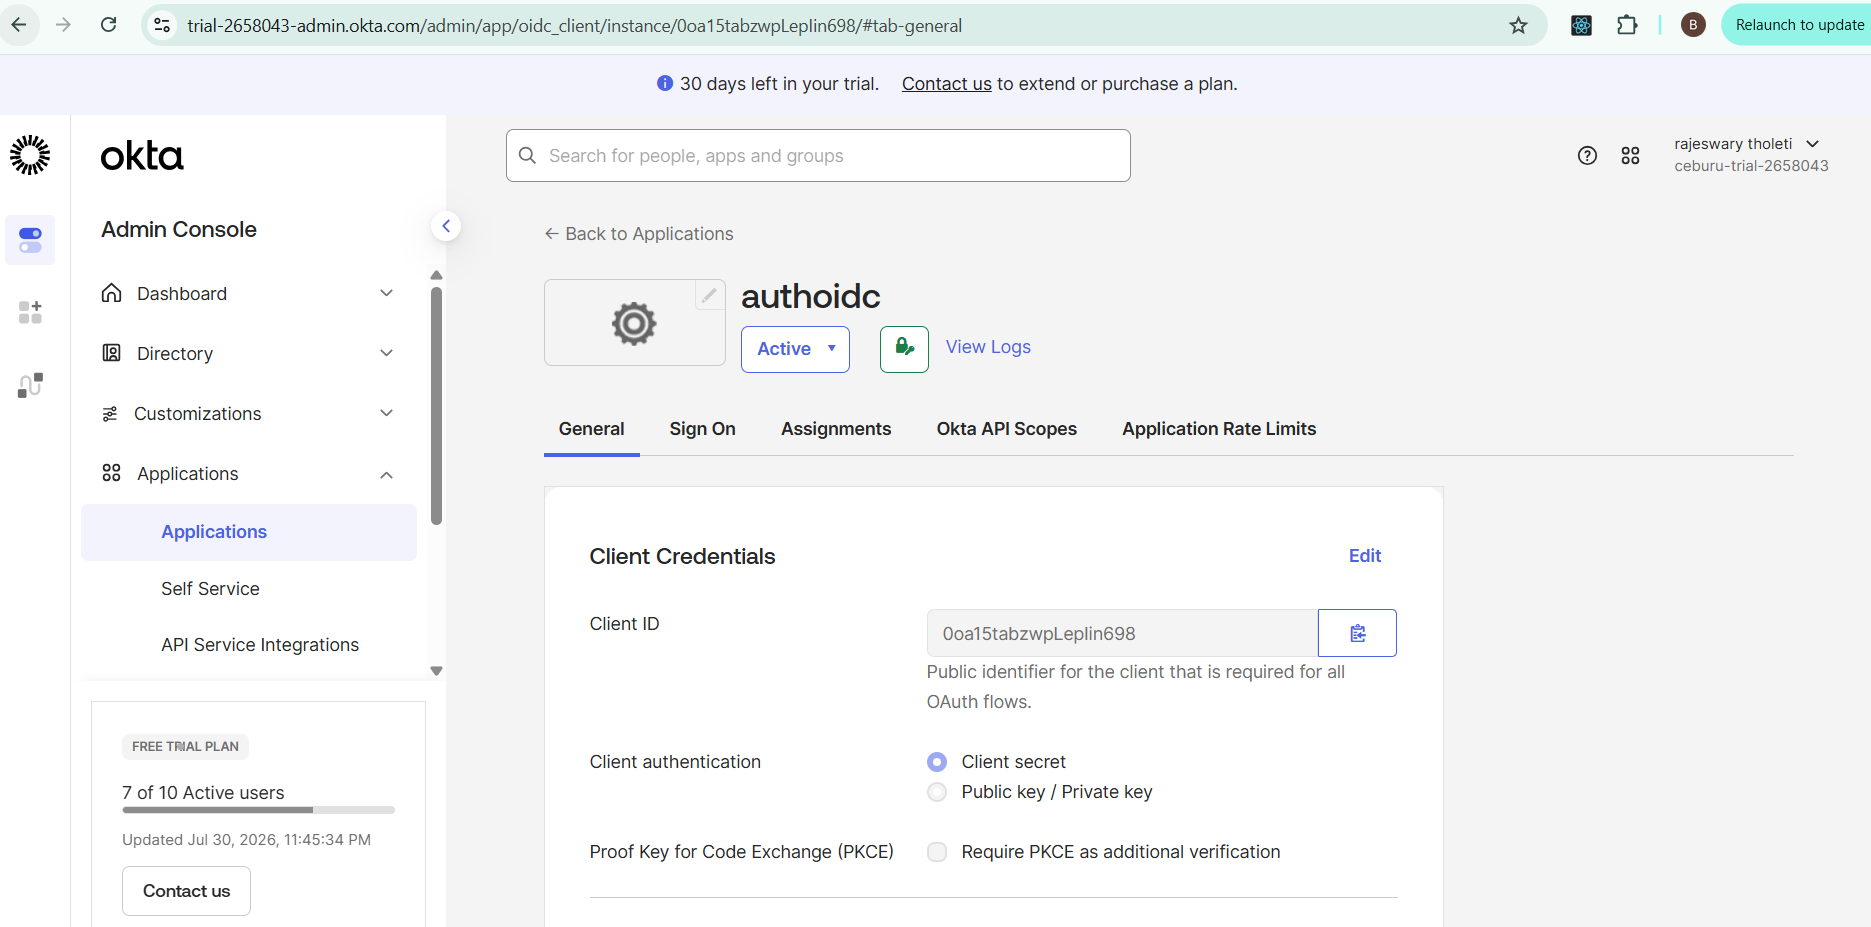
Figure 4.1 — The Okta OIDC application.
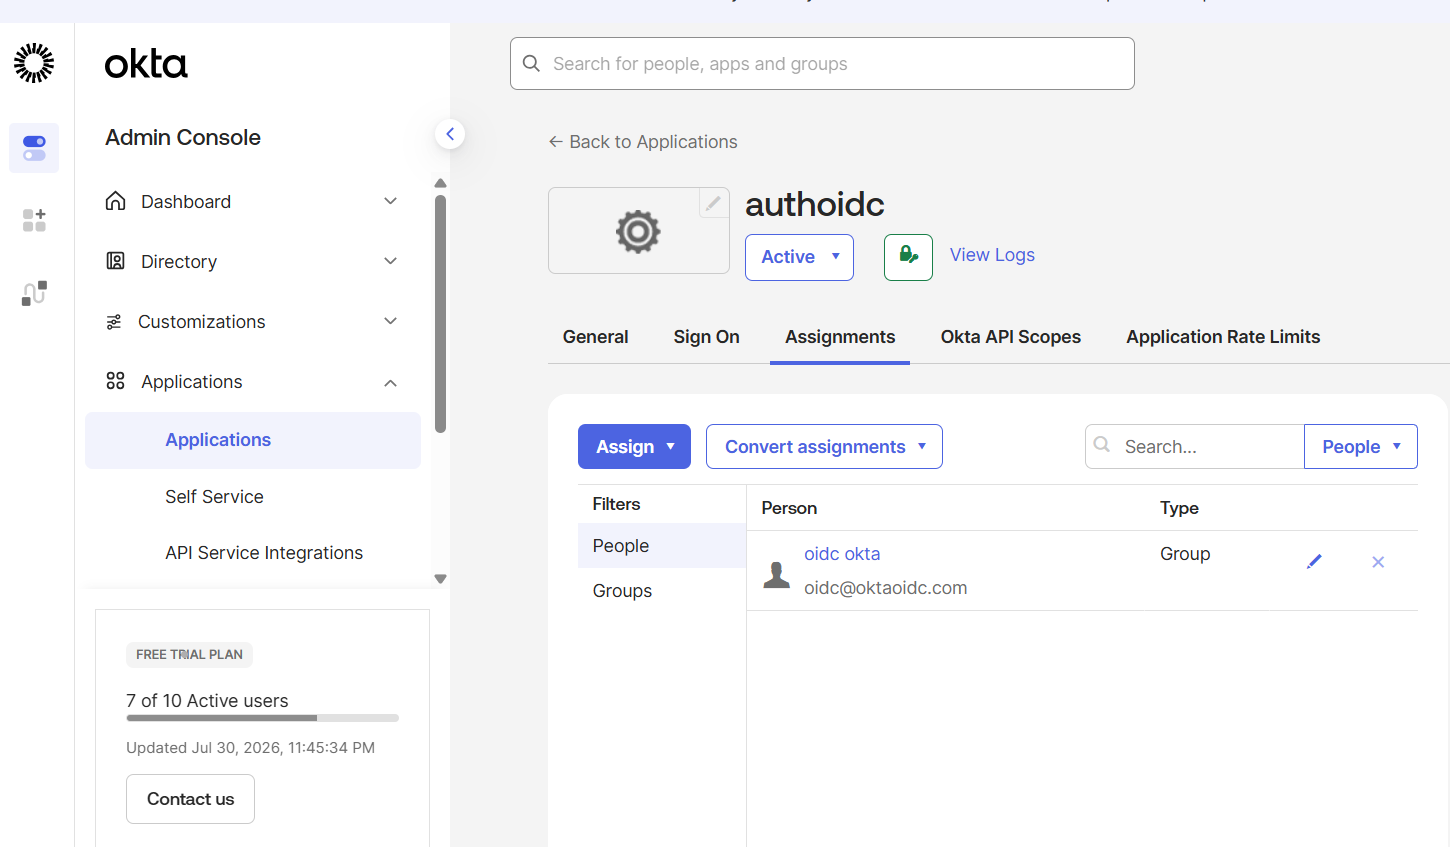
Figure 4.2 — Assigning users or groups to the application.
Step 2 — Check the authorization server access policies
The /oauth2/default authorization server does not automatically allow all applications. It evaluates every authorization request against its Access Policies.
- Open Security → API → Authorization Servers → default.
- Make sure an Access Policy and rule allow the application.
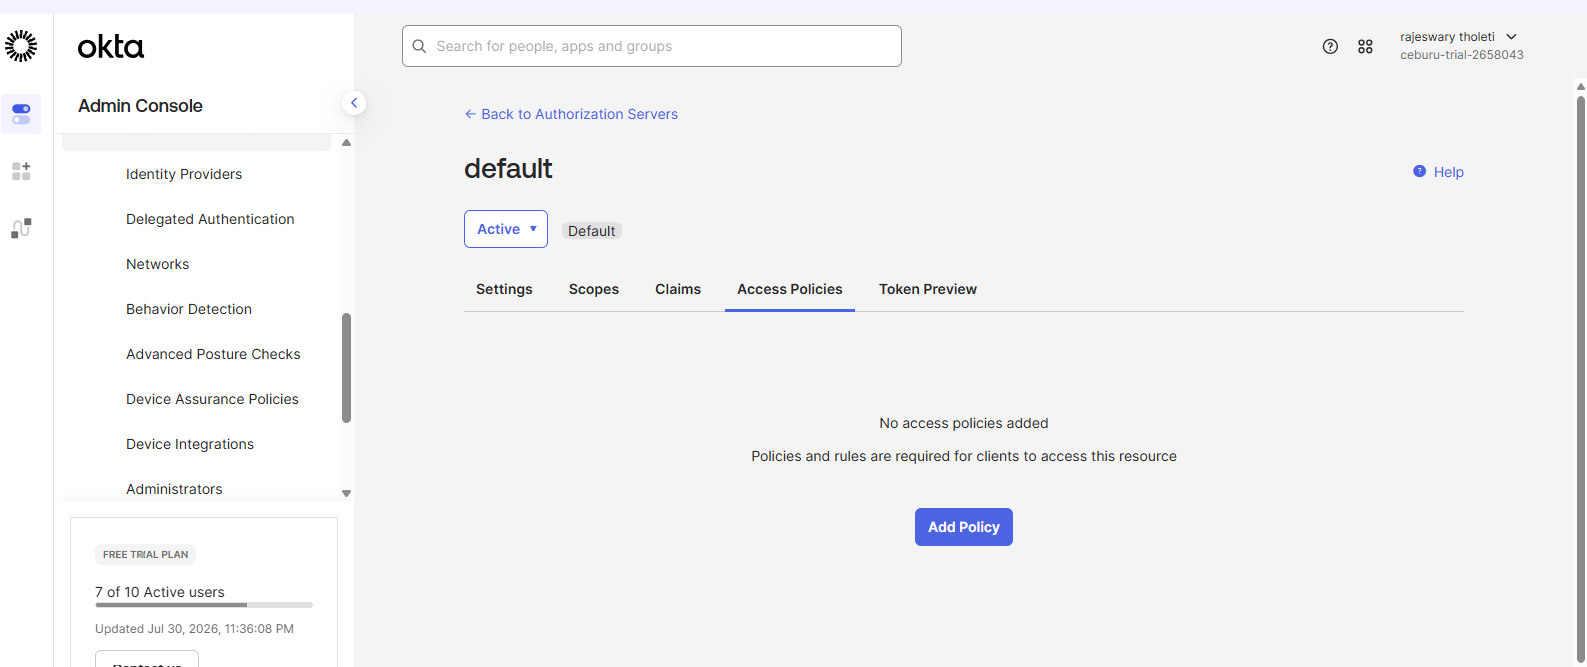
Figure 4.3 — Access Policies on the default authorization server.
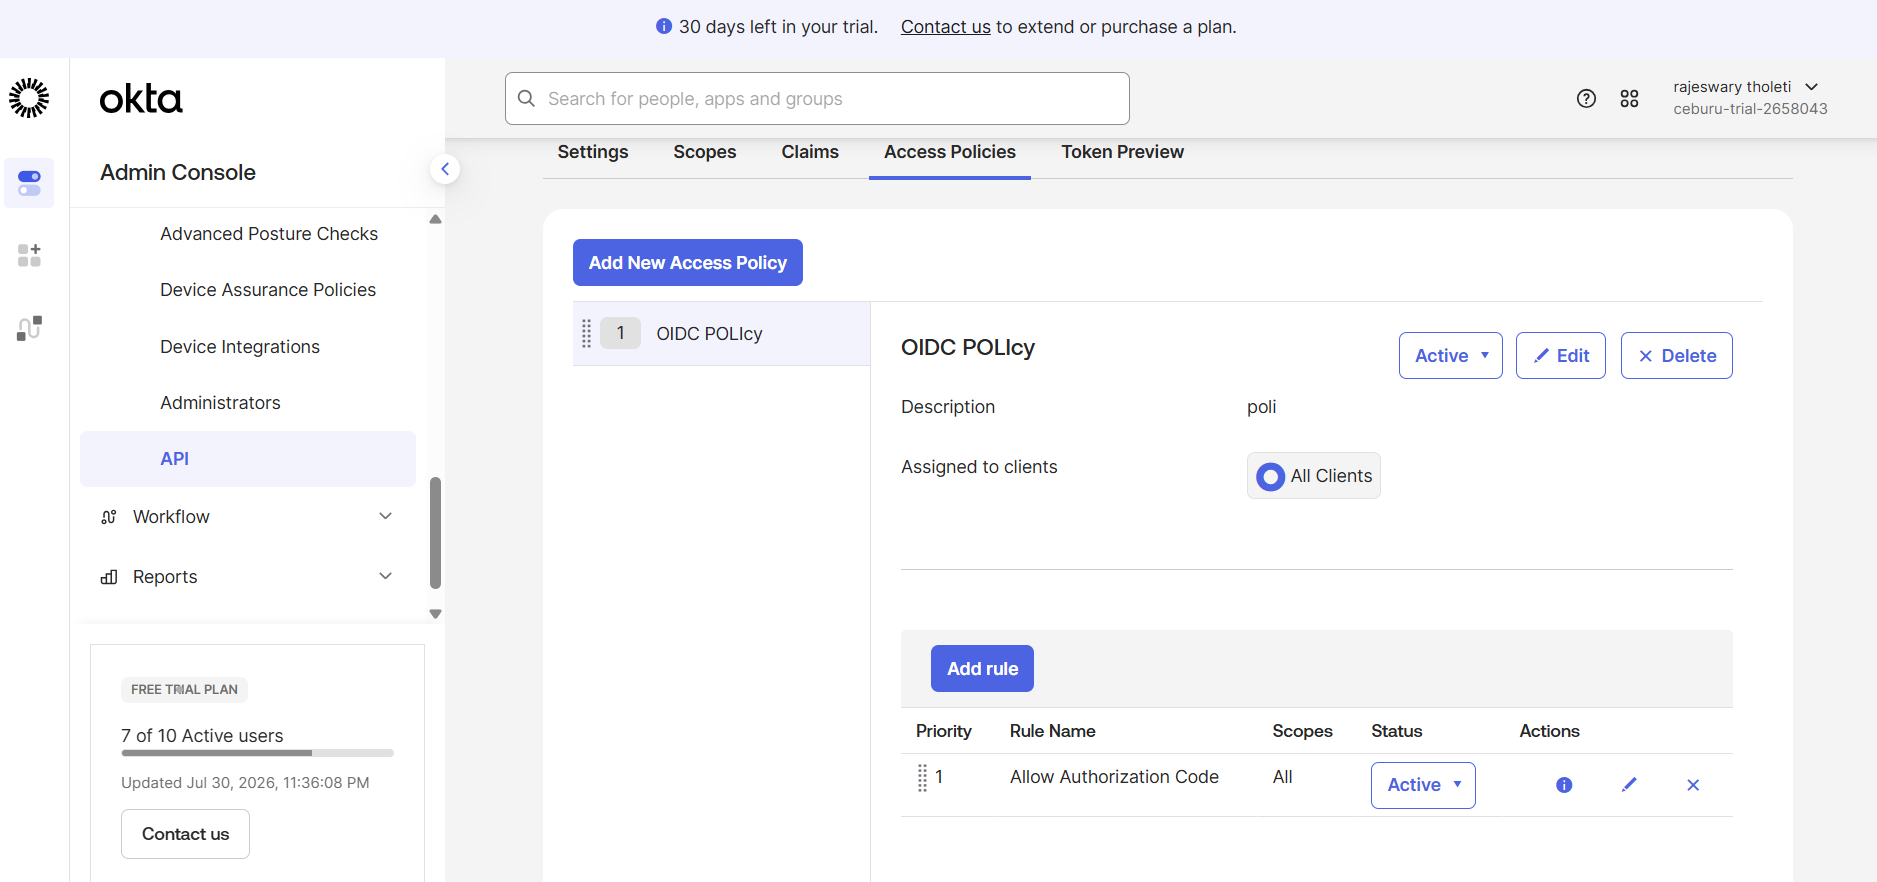
Figure 4.4 — An access policy rule that allows the application.
Step 3 — Get the issuer and endpoint values
Use the OpenID Discovery document to obtain the issuer and endpoint values for Ceburu.
Discovery URL format:
https://<your-okta-domain>/oauth2/default/.well-known/openid-configuration
Example:
https://trial-2658043.okta.com/oauth2/default/.well-known/openid-configuration
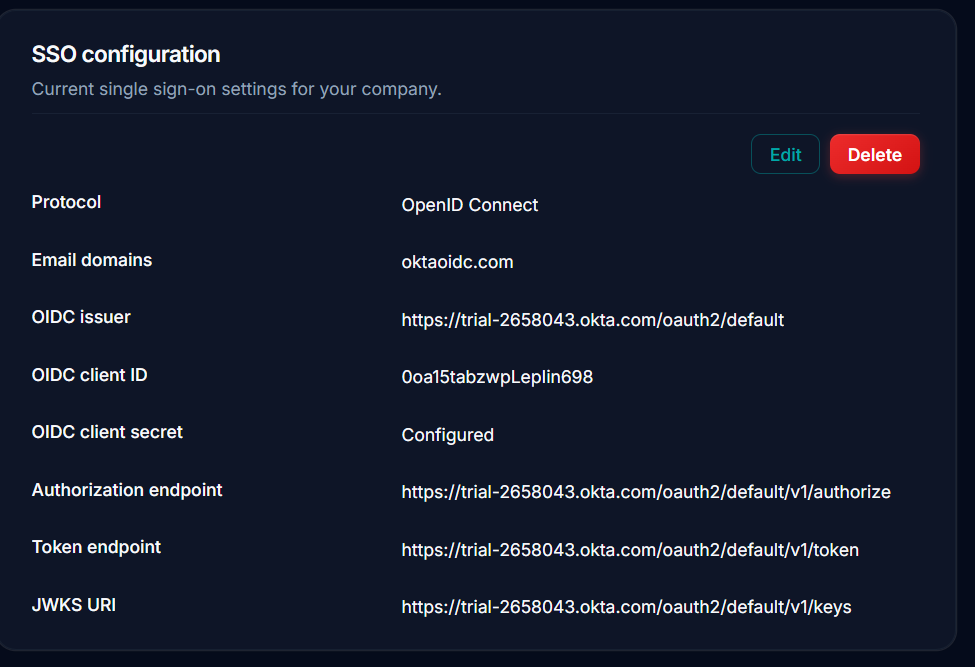
Figure 4.5 — The Okta OpenID Discovery document.
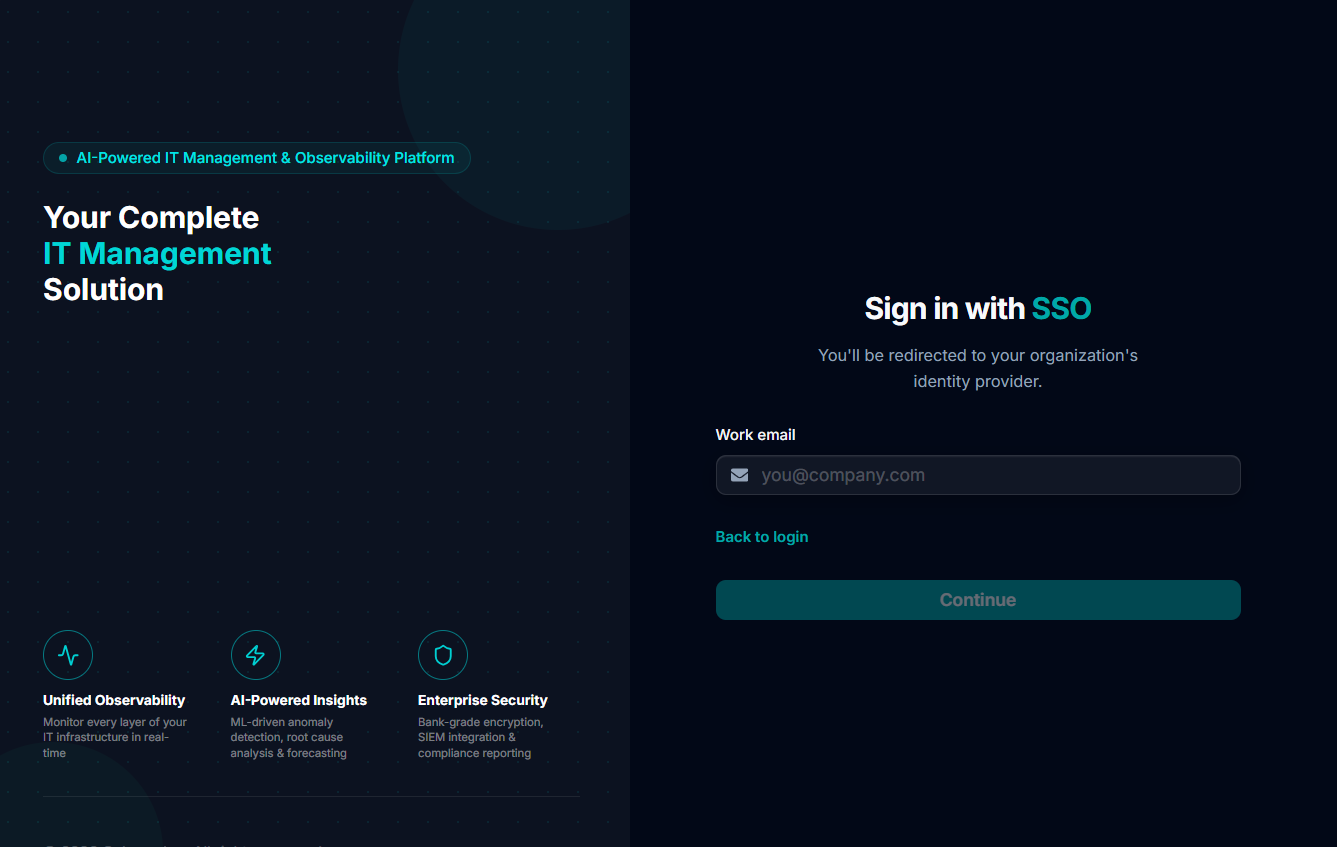
Figure 4.6 — Ceburu OIDC configuration using the Okta endpoint values.
5. Microsoft Entra ID — SAML 2.0
Step 1 — Open the Enterprise Application and choose SAML
- Create or open the Enterprise Application for Ceburu.
- Go to Enterprise applications → the Ceburu application → Single sign-on.
- Choose SAML.
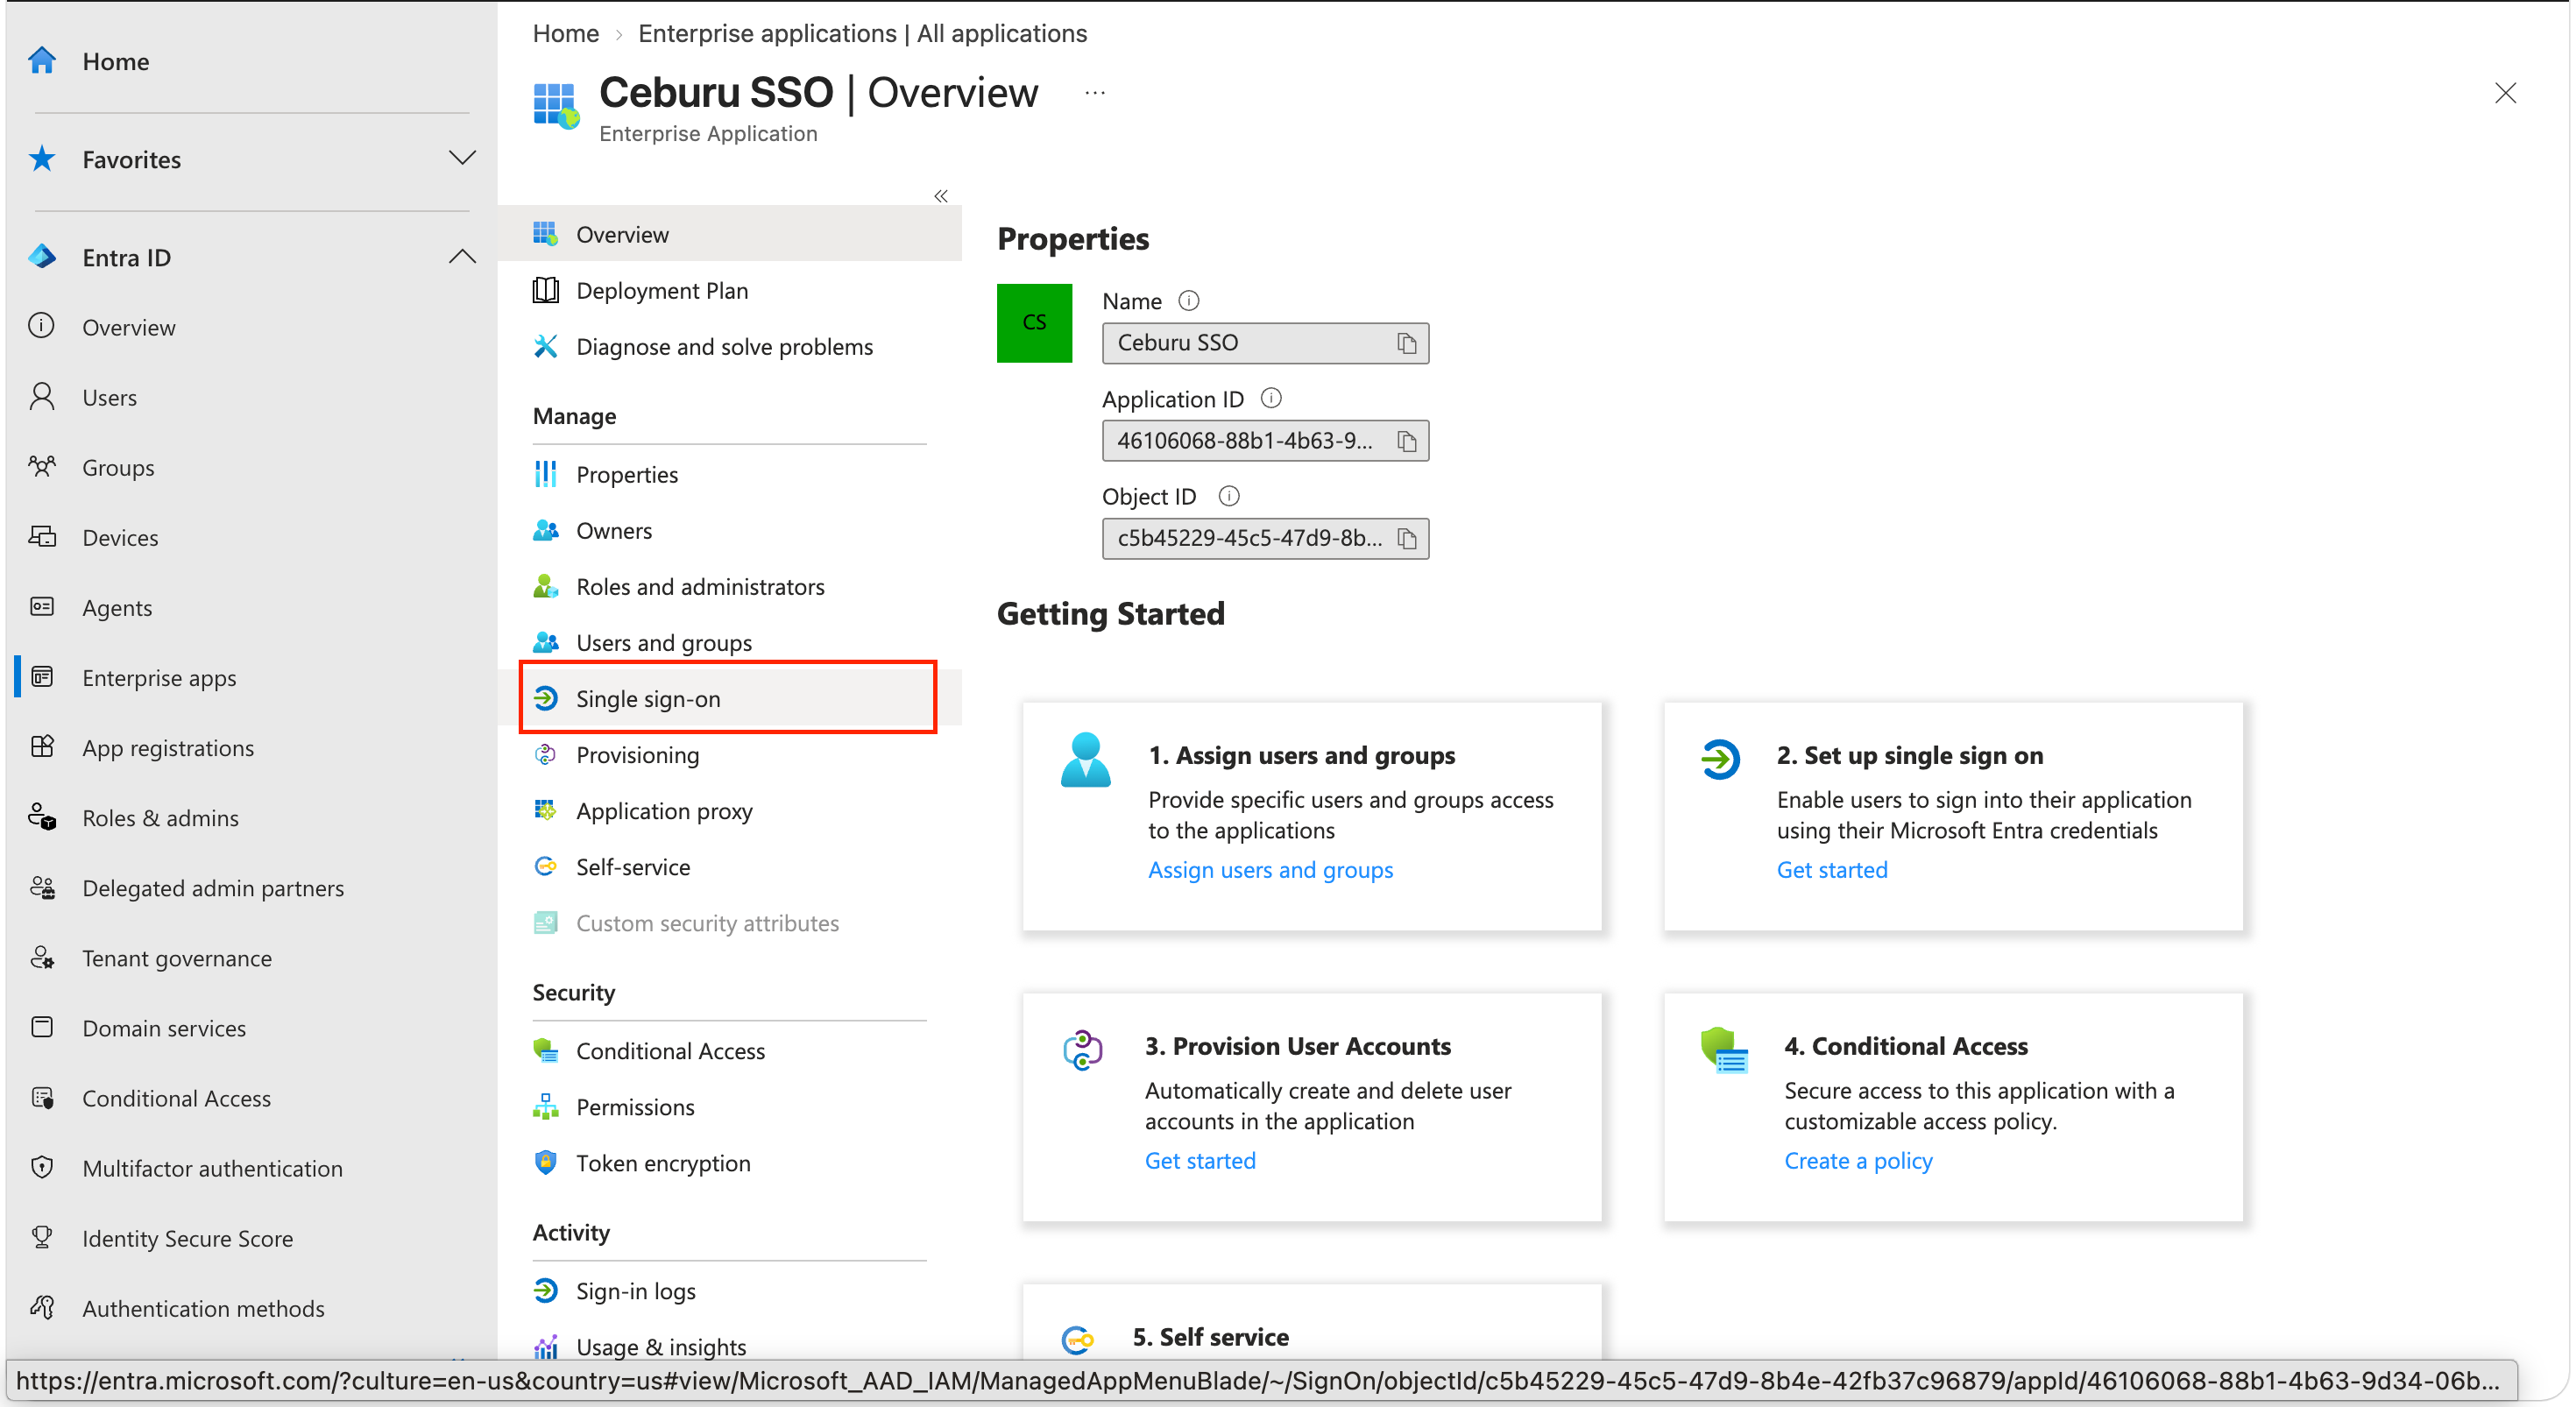
Figure 5.1 — Selecting SAML as the single sign-on method.
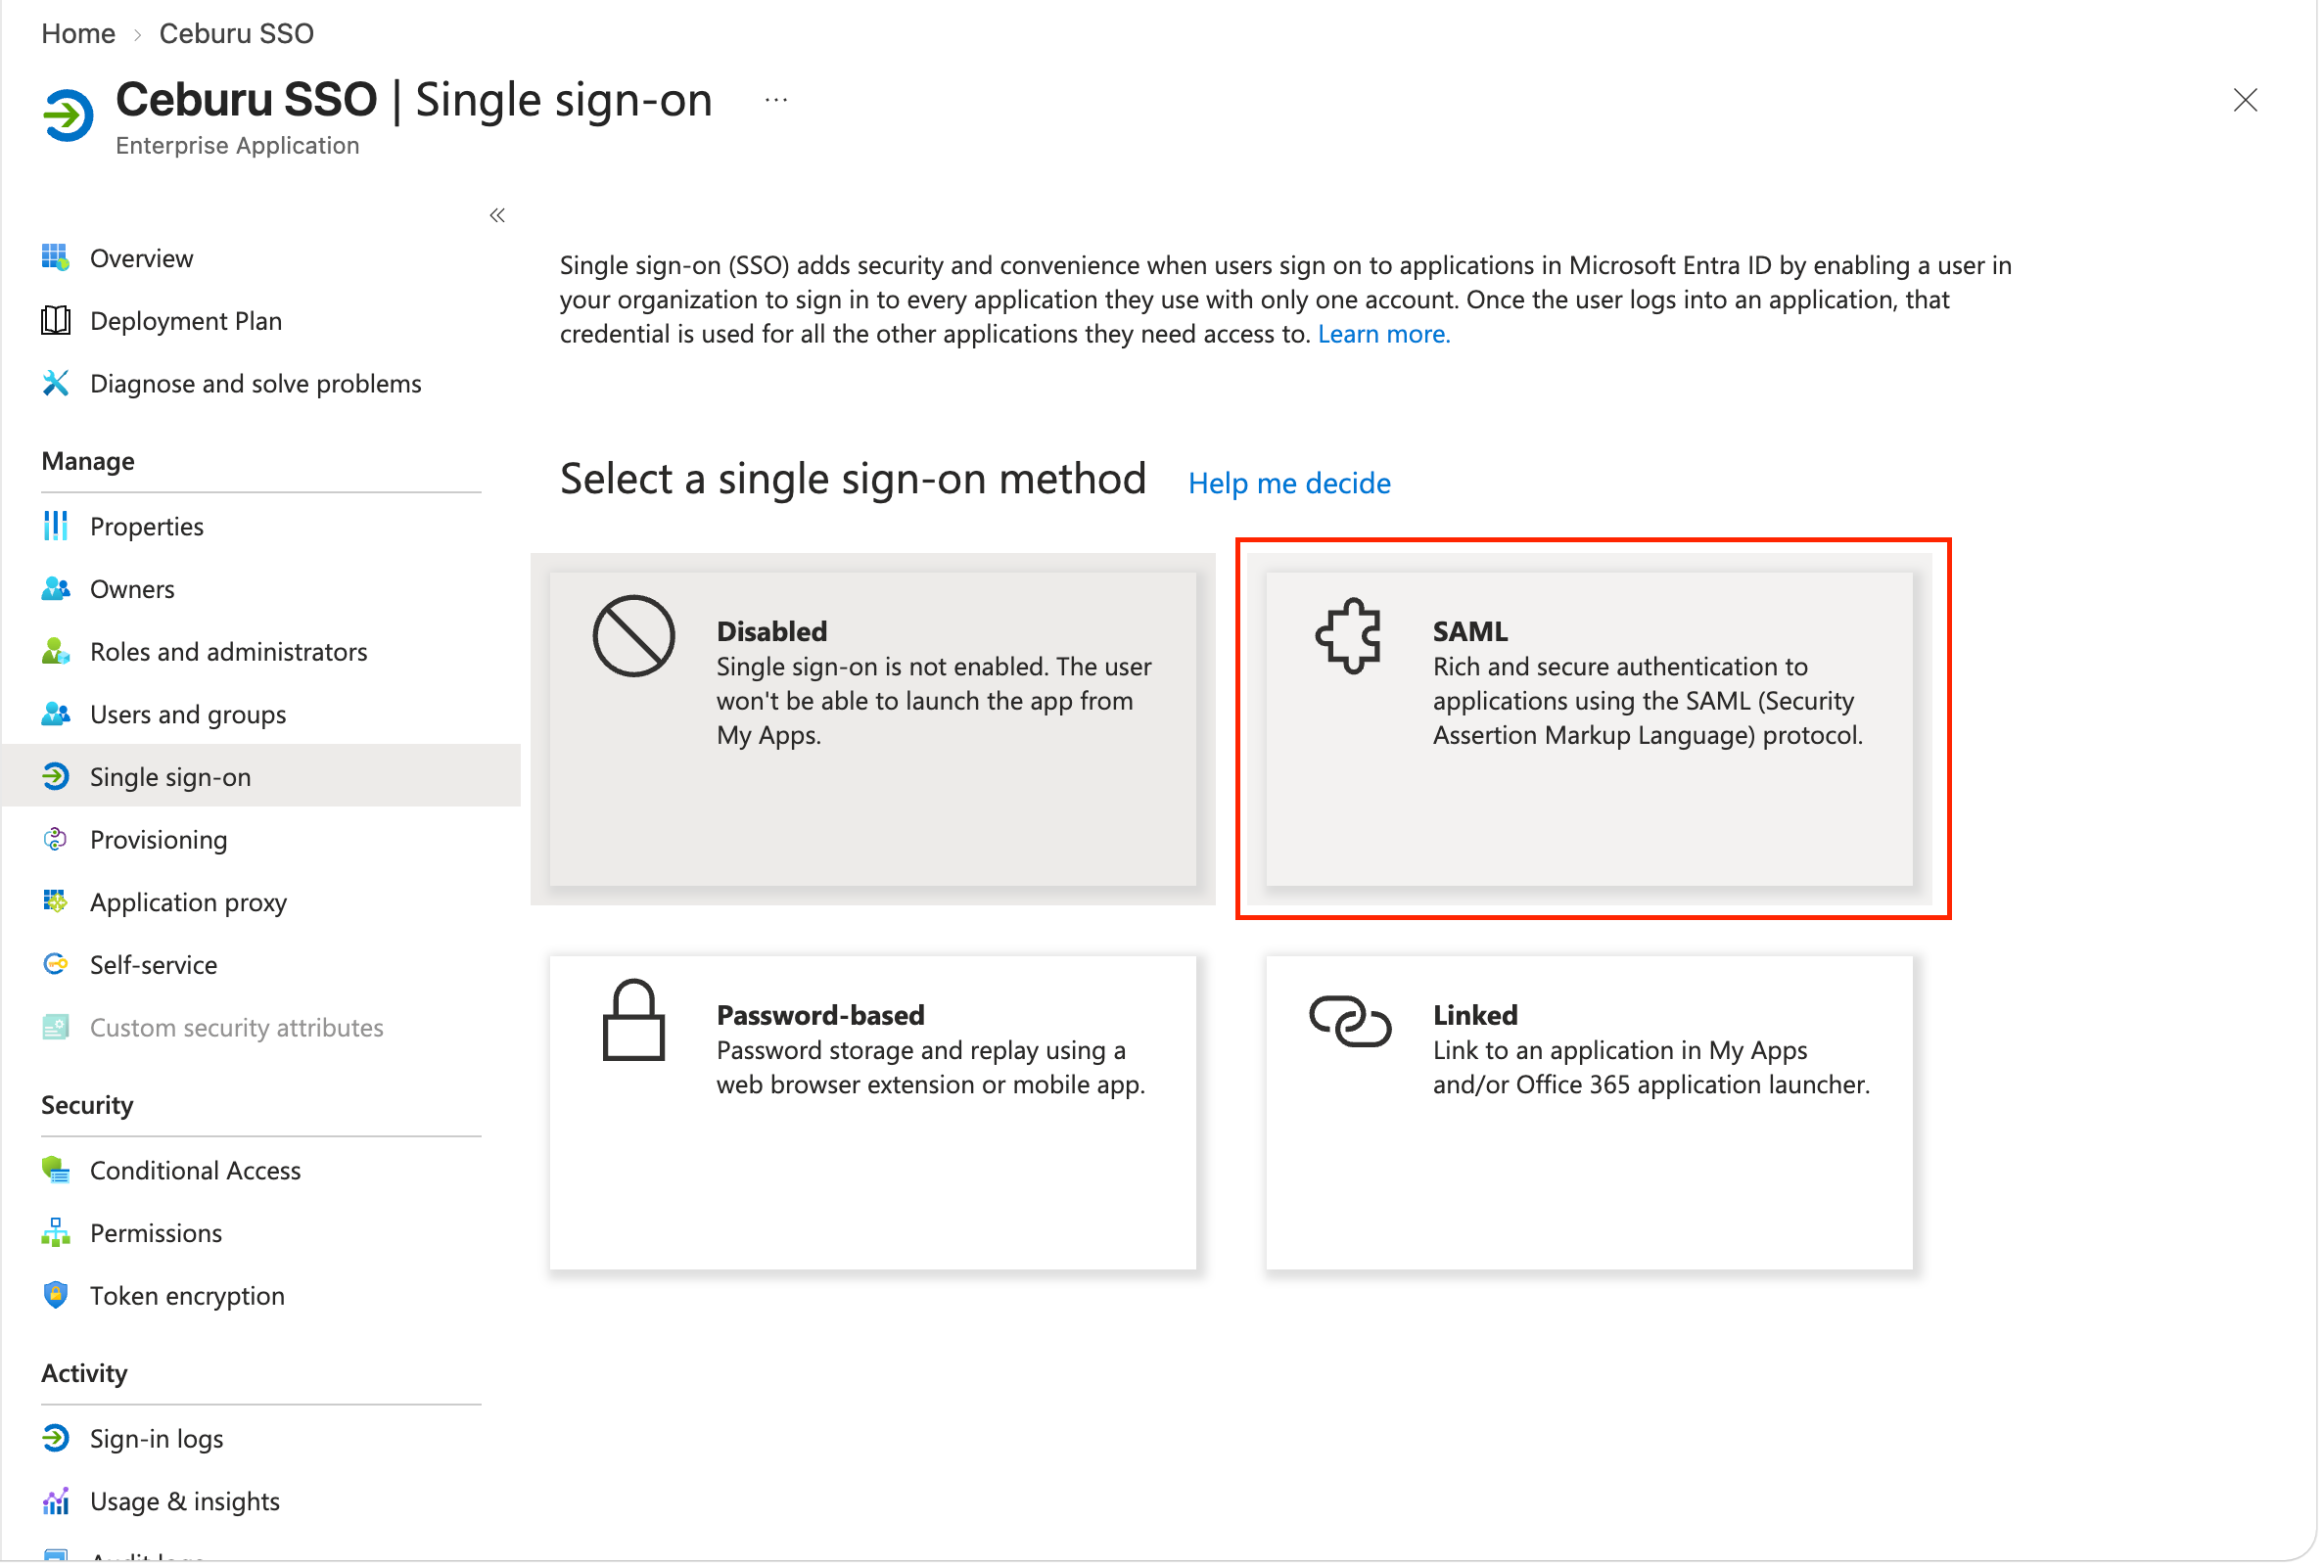
Figure 5.2 — The SAML-based sign-on overview page.
Step 2 — Complete the Basic SAML Configuration
Configure the Basic SAML Configuration section with the Ceburu Identifier / Entity ID and Reply URL / ACS URL, then click Save.
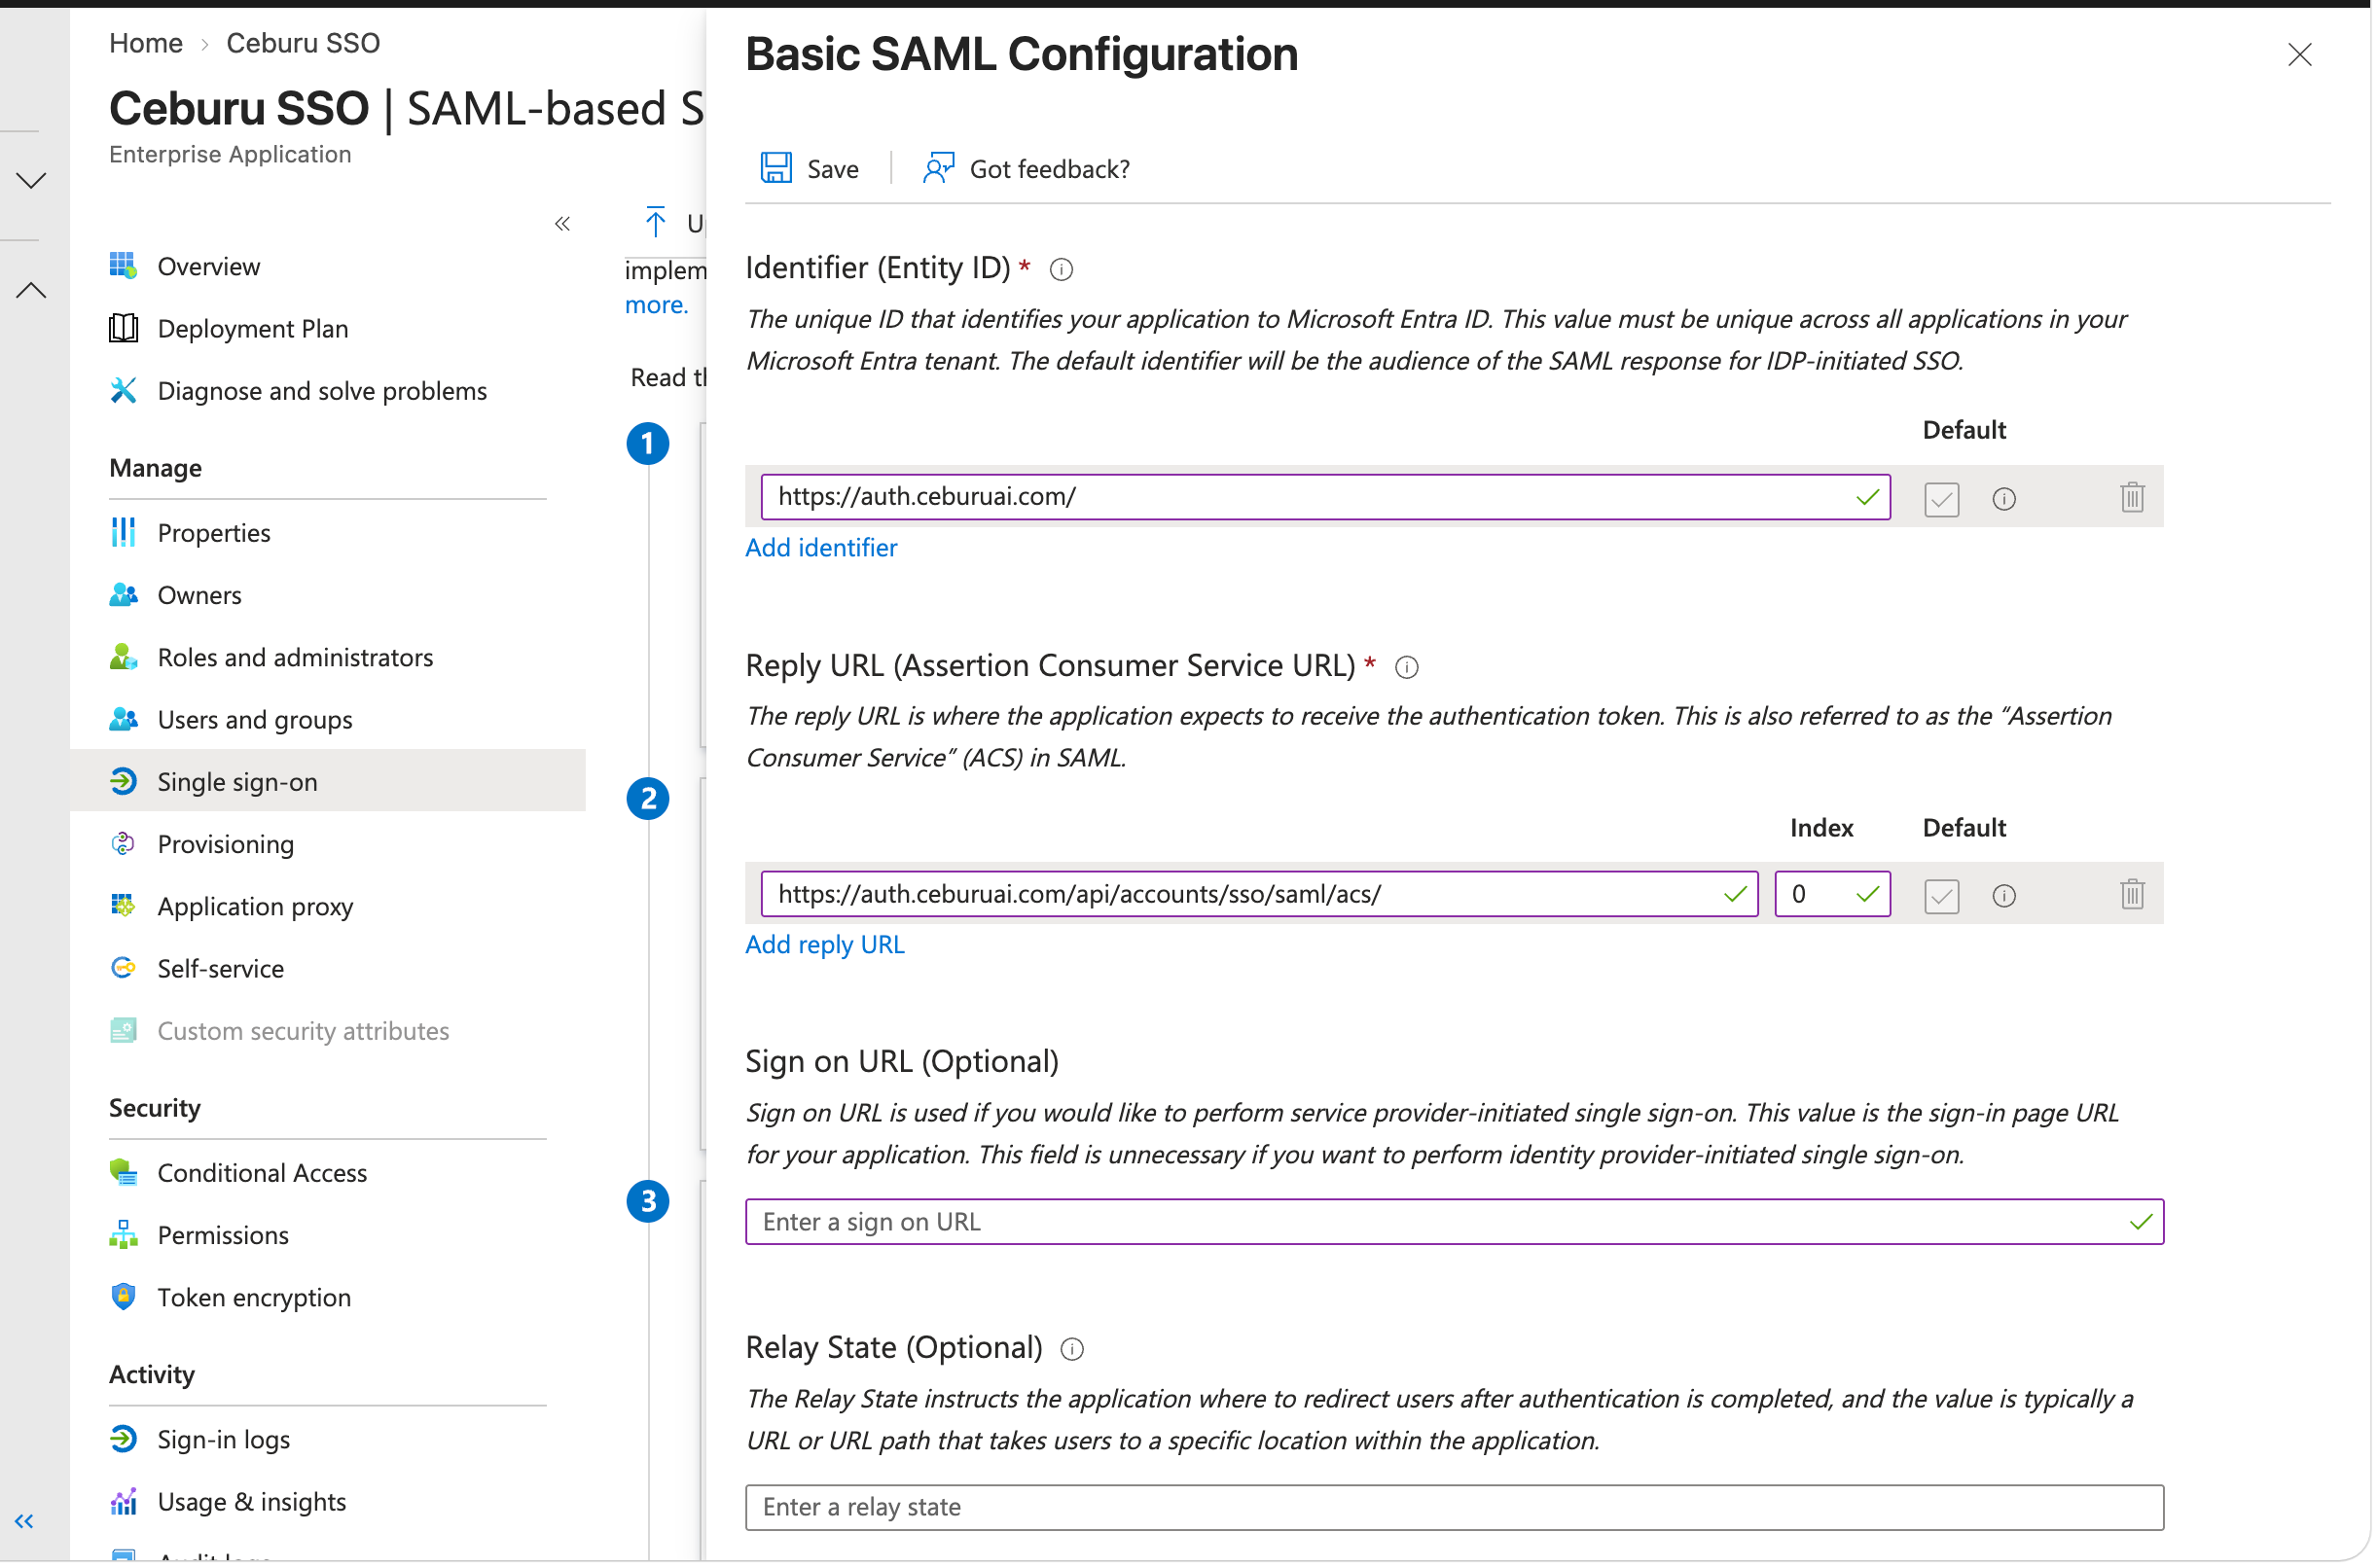
Figure 5.3 — Basic SAML Configuration with the Ceburu Identifier and Reply URL.
Step 3 — Configure Attributes & Claims
In Attributes & Claims, add the required claims. These are used for JIT user creation in Ceburu.
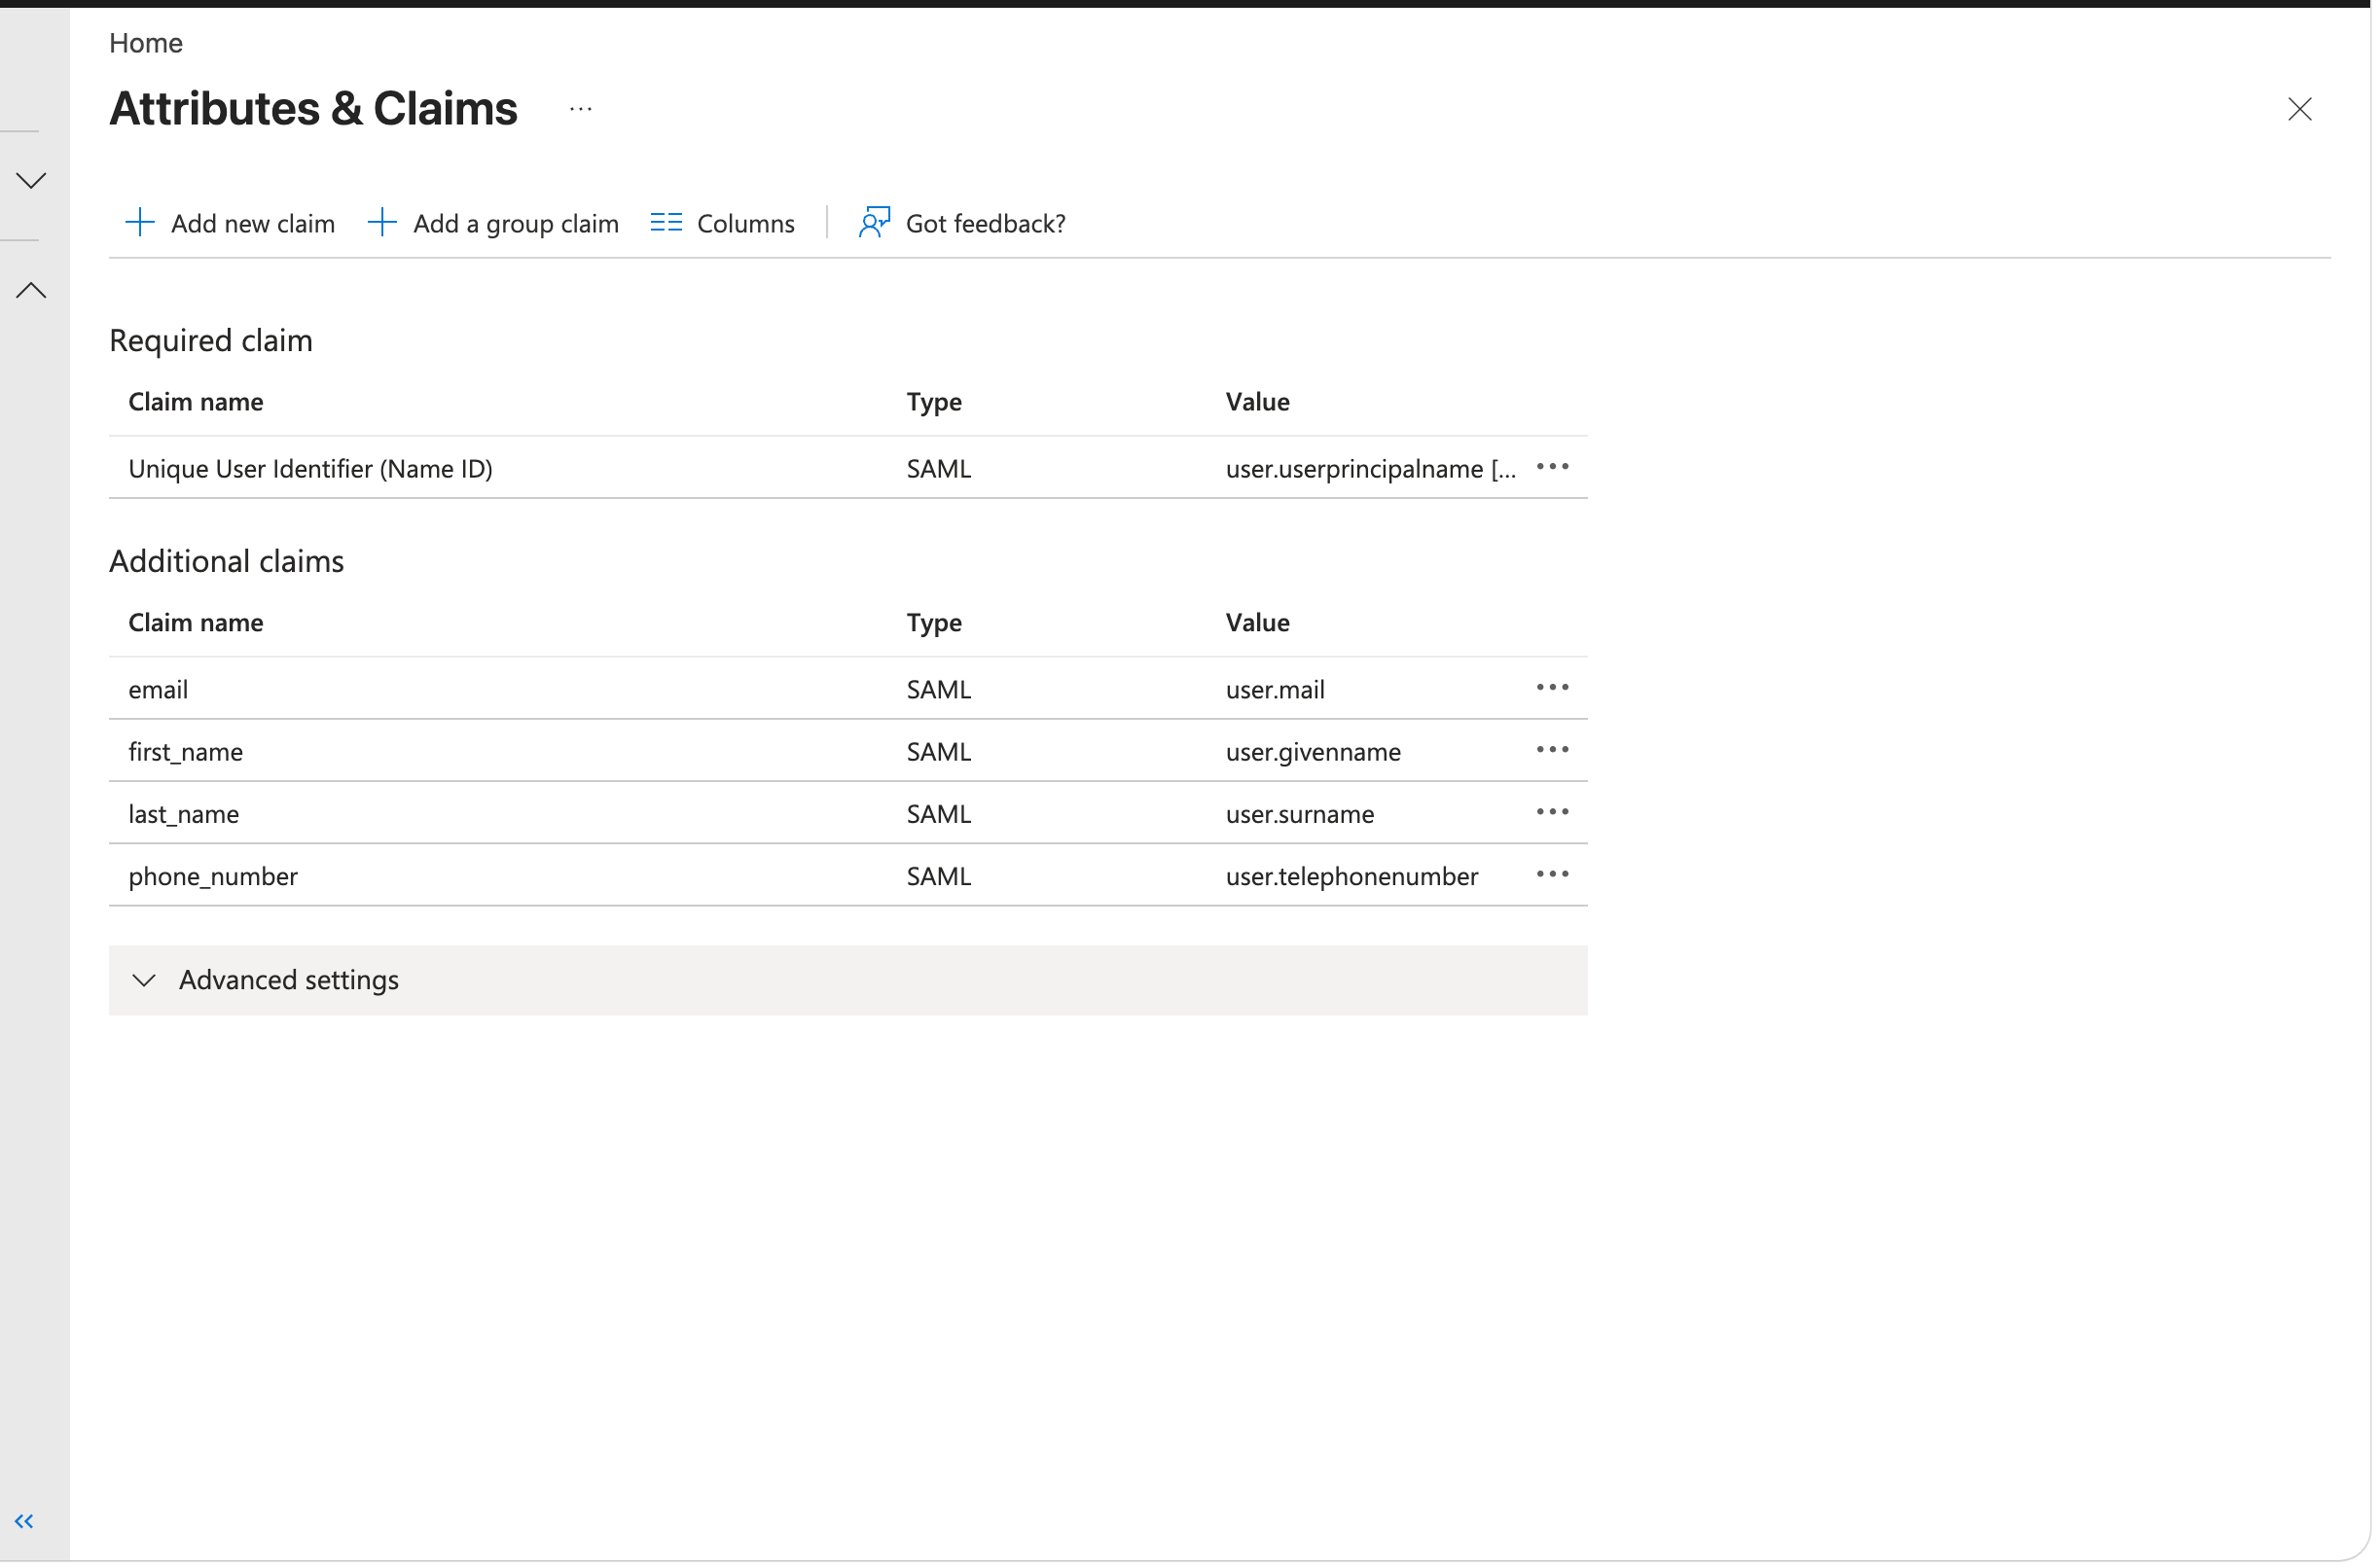
Figure 5.4 — Attributes & Claims configured in Microsoft Entra ID.
Step 4 — Copy the Entra ID values into Ceburu
Copy the Login URL, Microsoft Entra Identifier / Issuer, and Certificate from Entra ID and paste them into the Ceburu Portal SSO configuration.
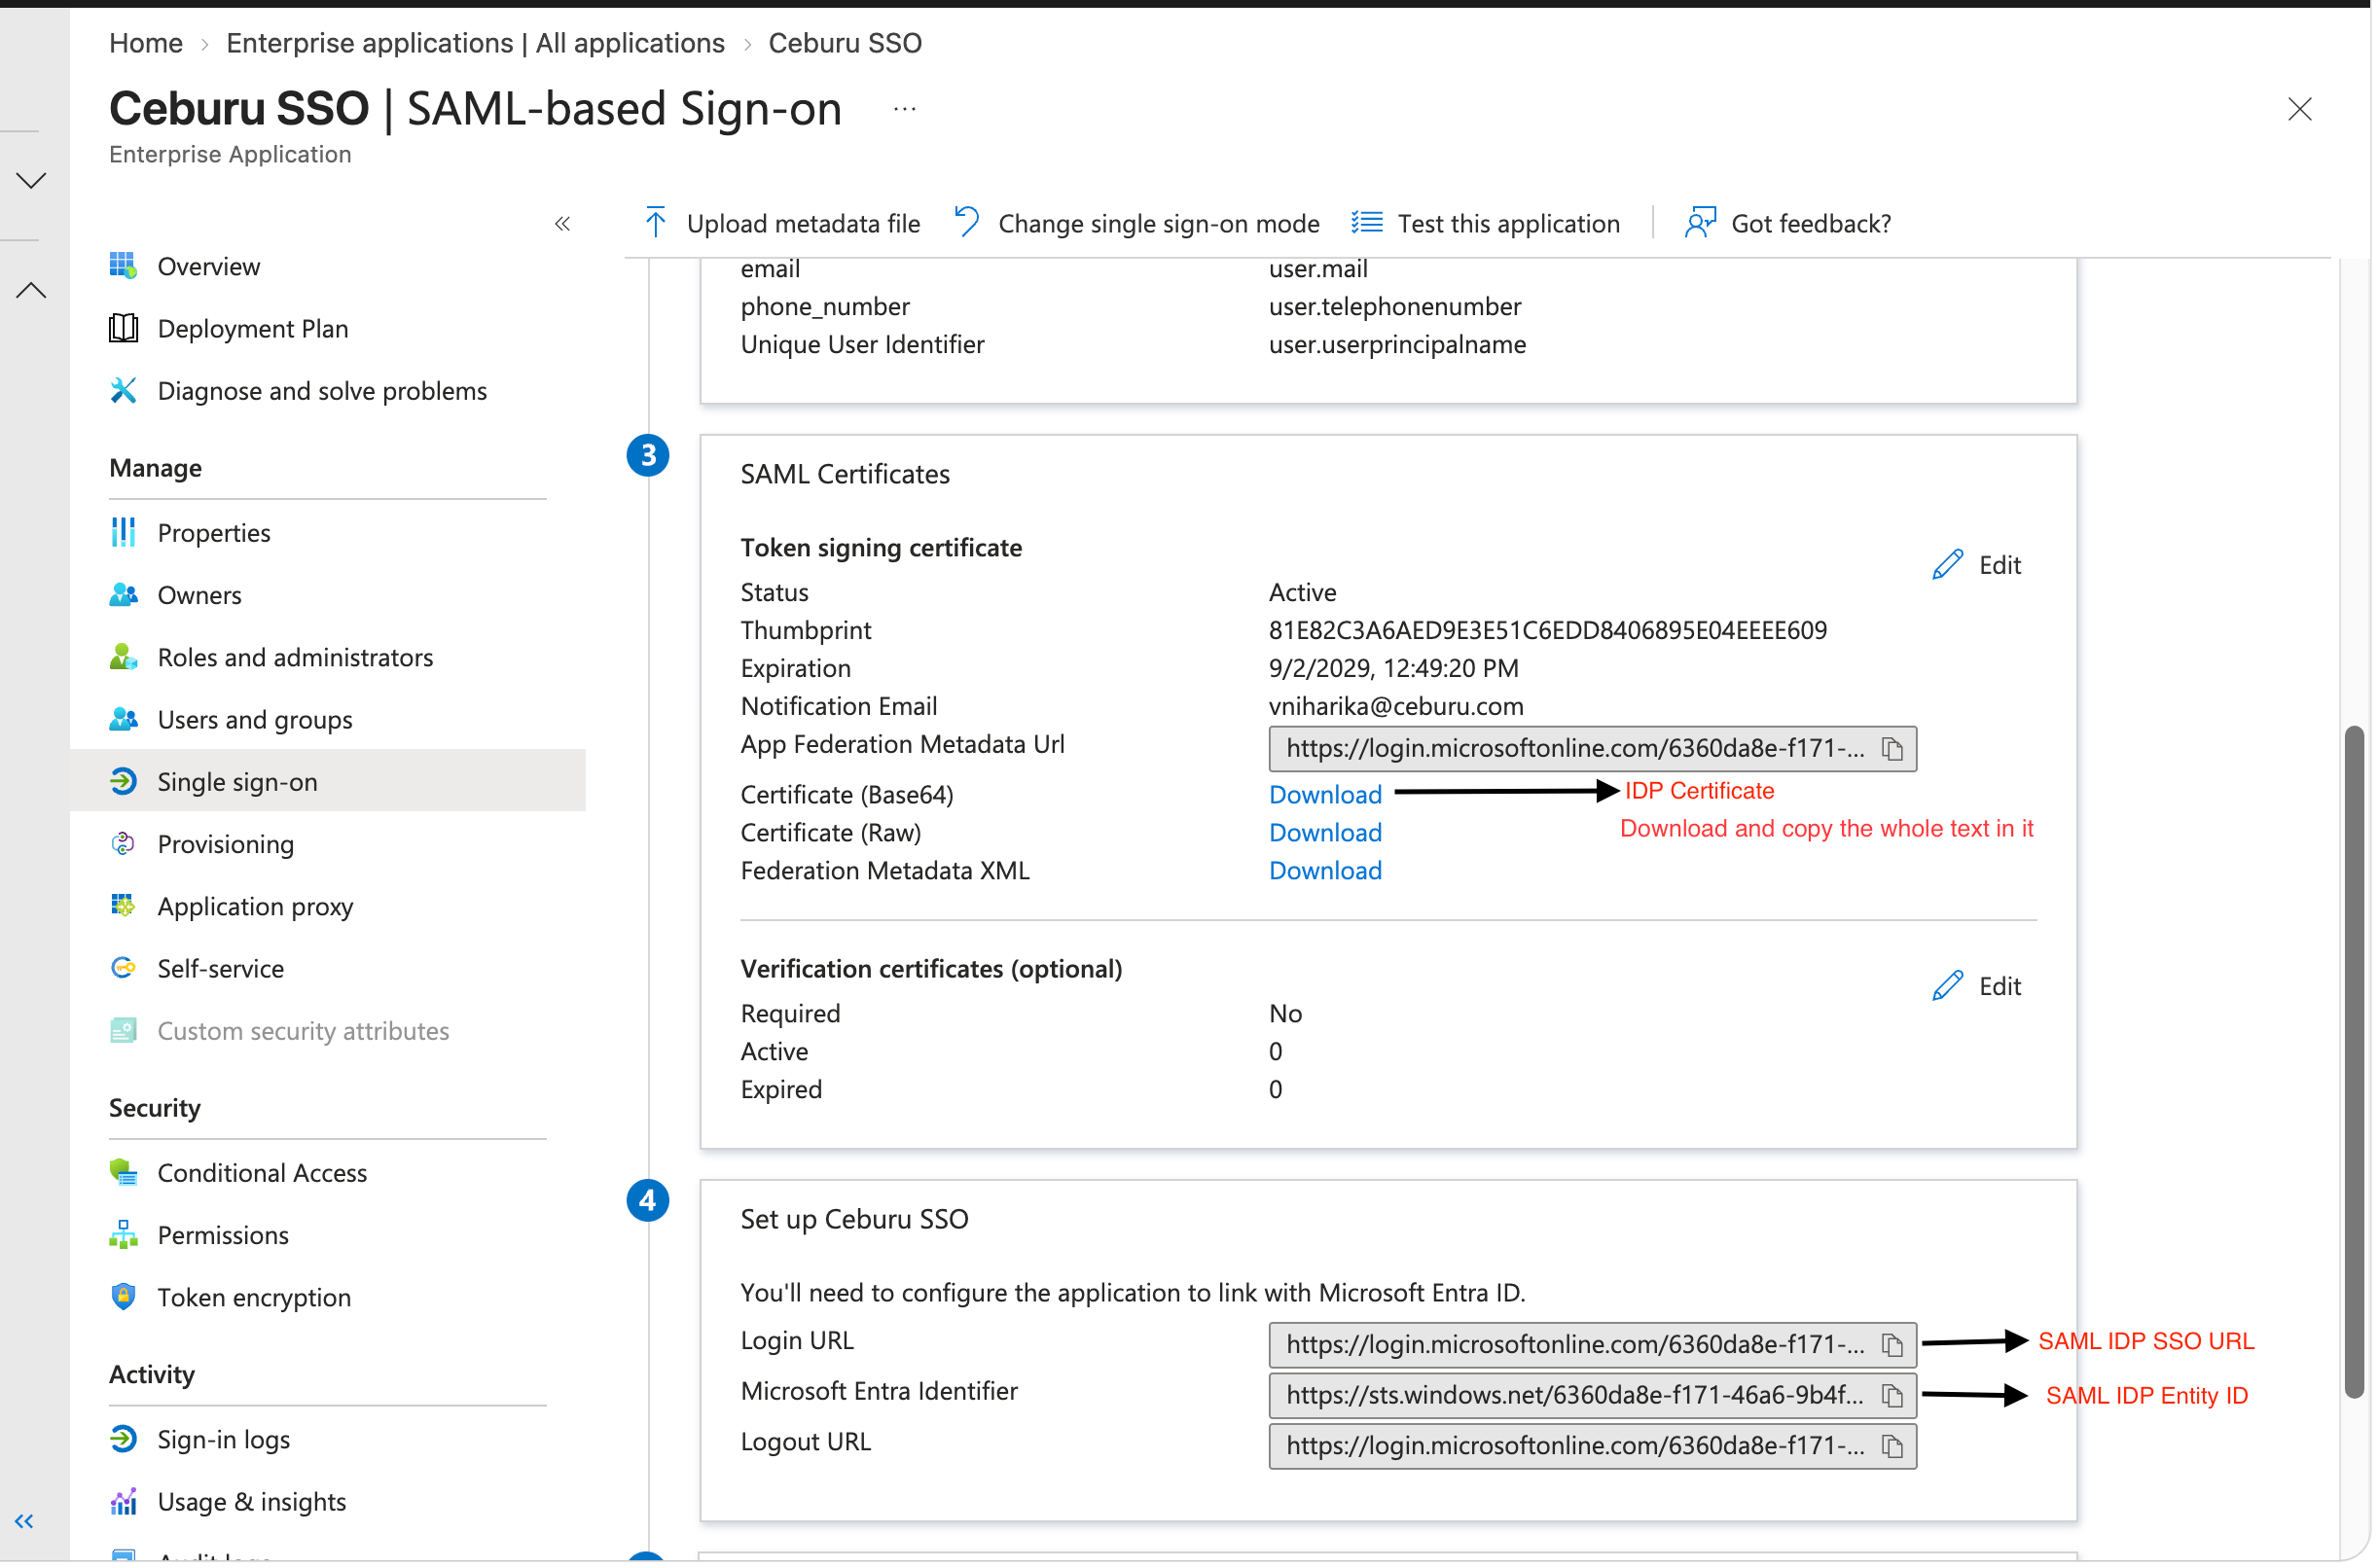
Figure 5.5 — Login URL, Microsoft Entra Identifier, and certificate in Entra ID.
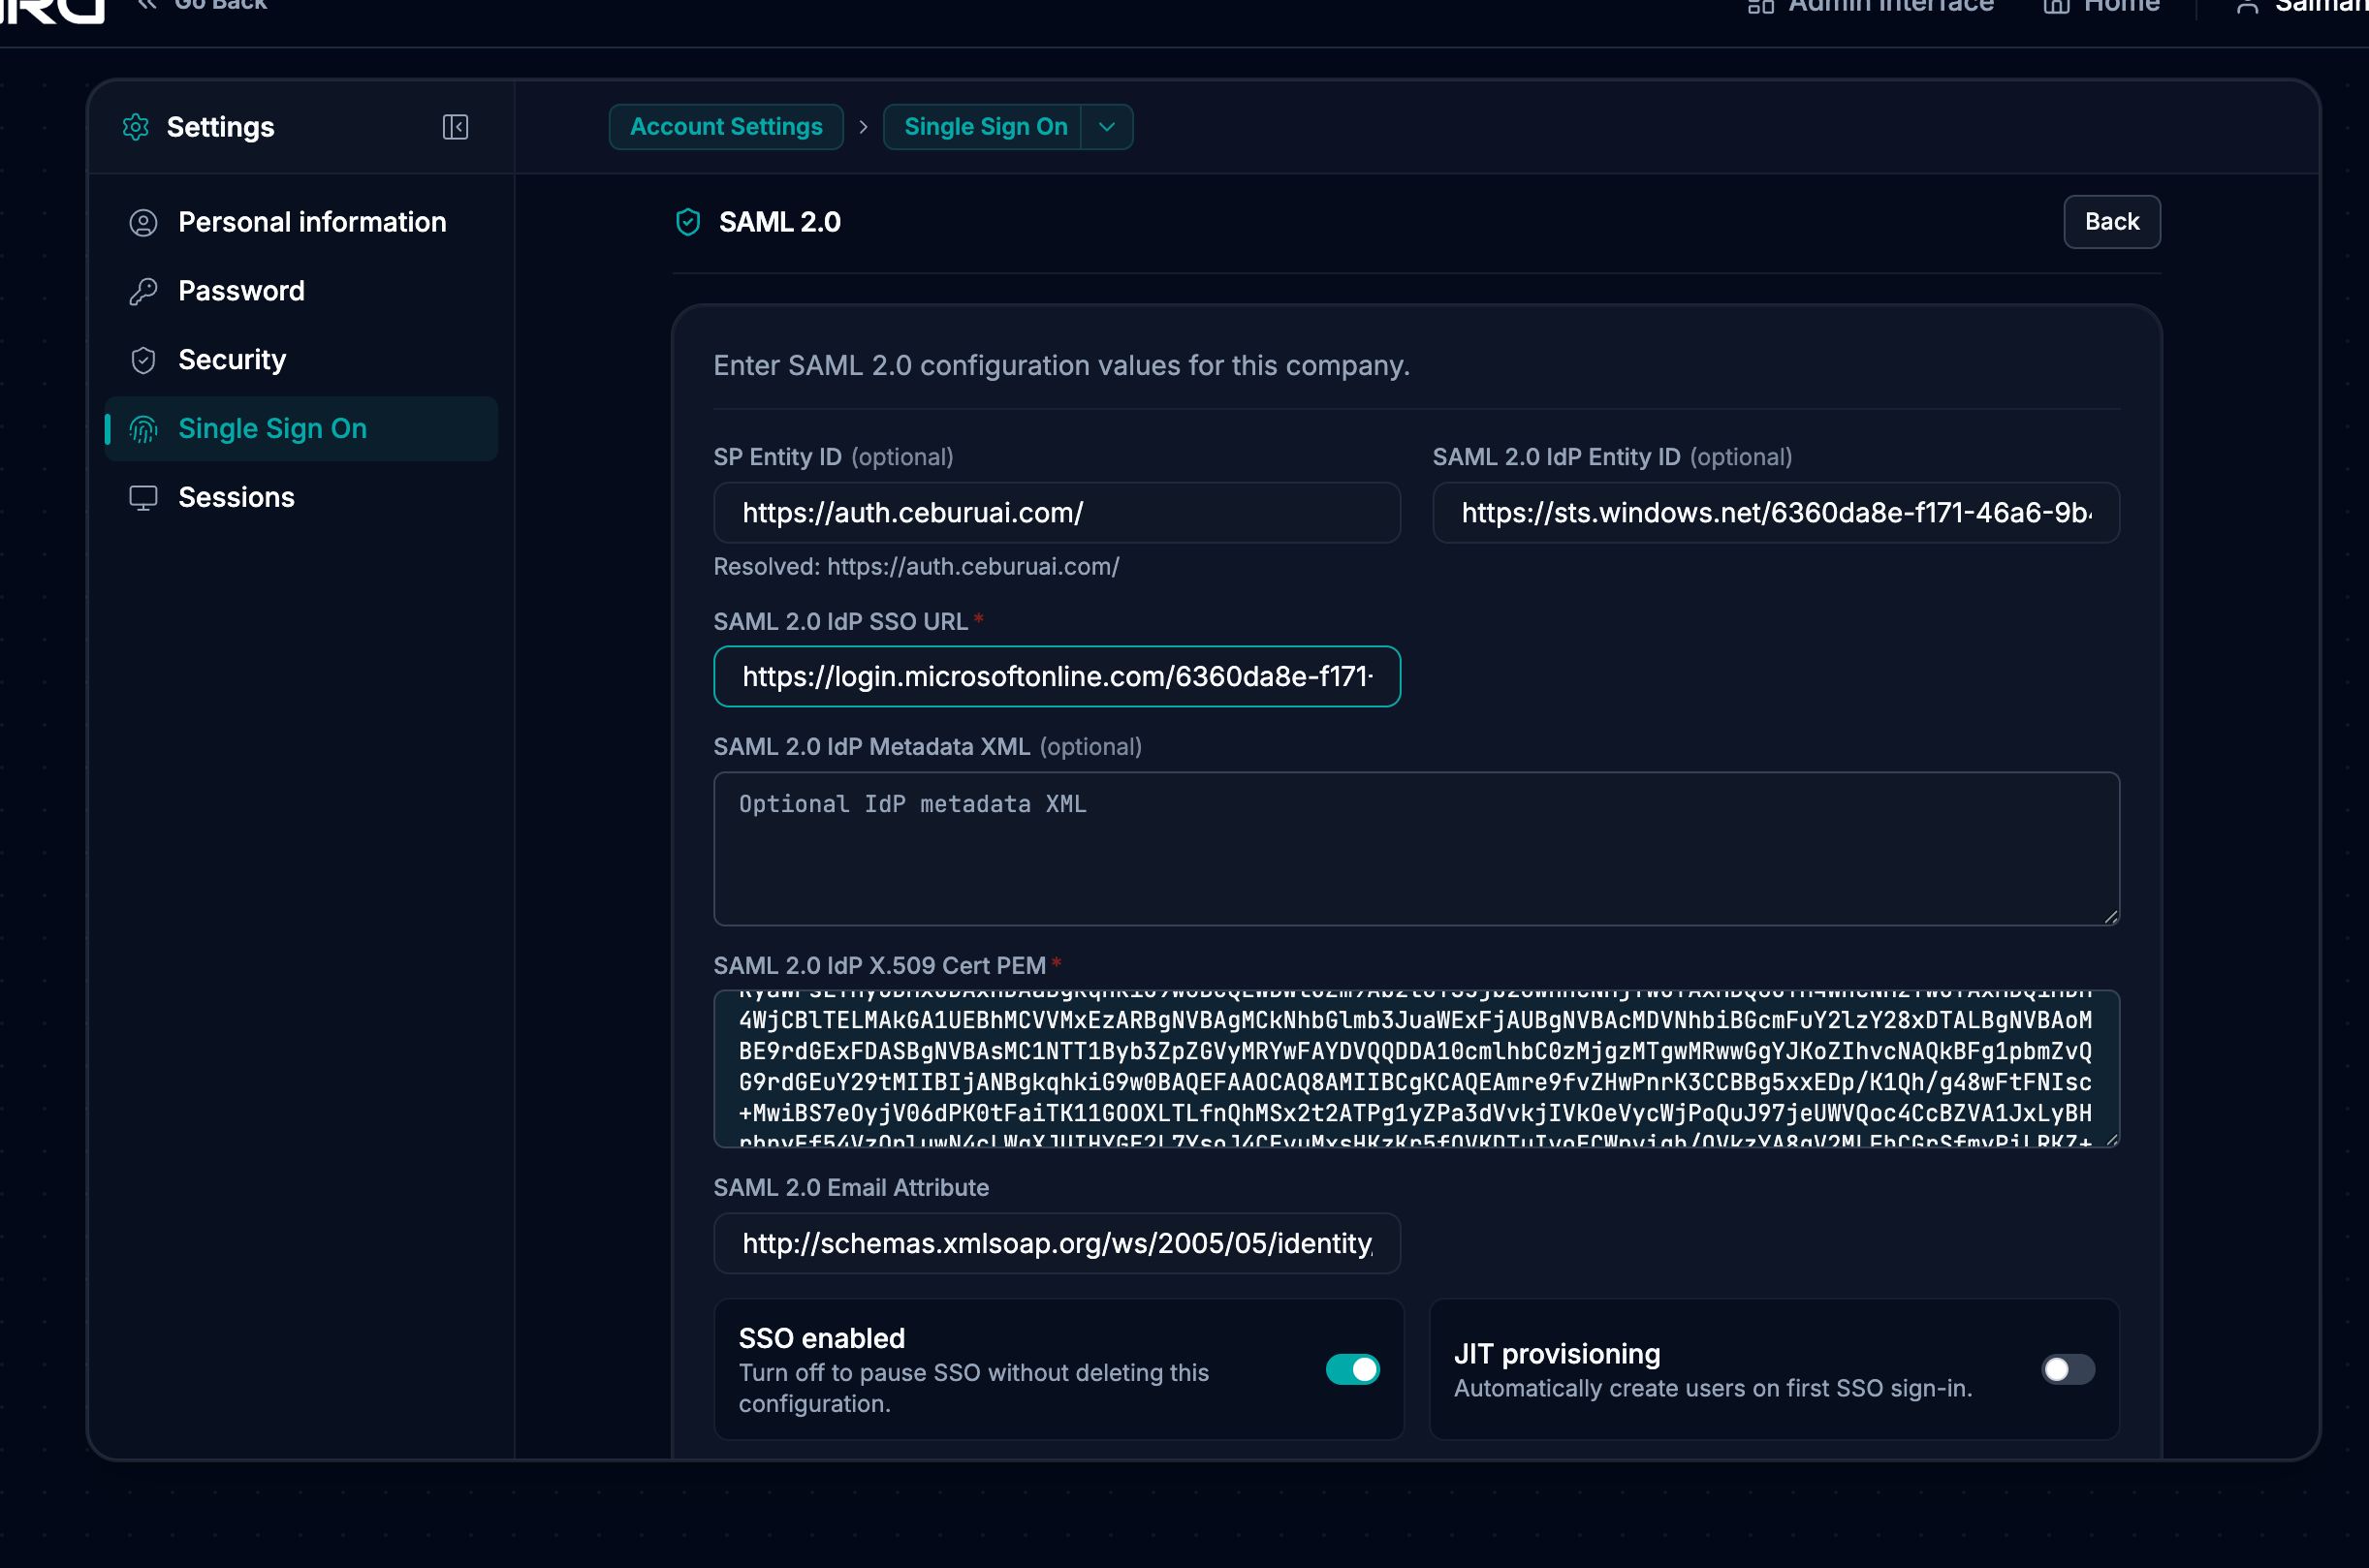
Figure 5.6 — Microsoft Entra ID SAML values and the corresponding Ceburu SAML configuration.
After Setup
6. How Users Sign In with SSO
- Open the Ceburu login page.
- Select Single Sign-On (SSO).
- Enter the user's work email address.
- Ceburu redirects the user to the configured Identity Provider.
- The user authenticates with Auth0, Okta, or Microsoft Entra ID.
- After successful authentication, the Identity Provider redirects the user back to Ceburu.
Note: The work email is used to identify the organisation and its configured SSO connection.
7. User Onboarding After SSO Is Enabled
There are two onboarding methods: administrator invitation and Just-In-Time (JIT) provisioning.
Option 1: Administrator Invitation (recommended)
- A Ceburu administrator opens User Management / Invite Users.
- Enter the user's profile information.
- Select the user's role and group and complete the required fields.
- Create the invitation.
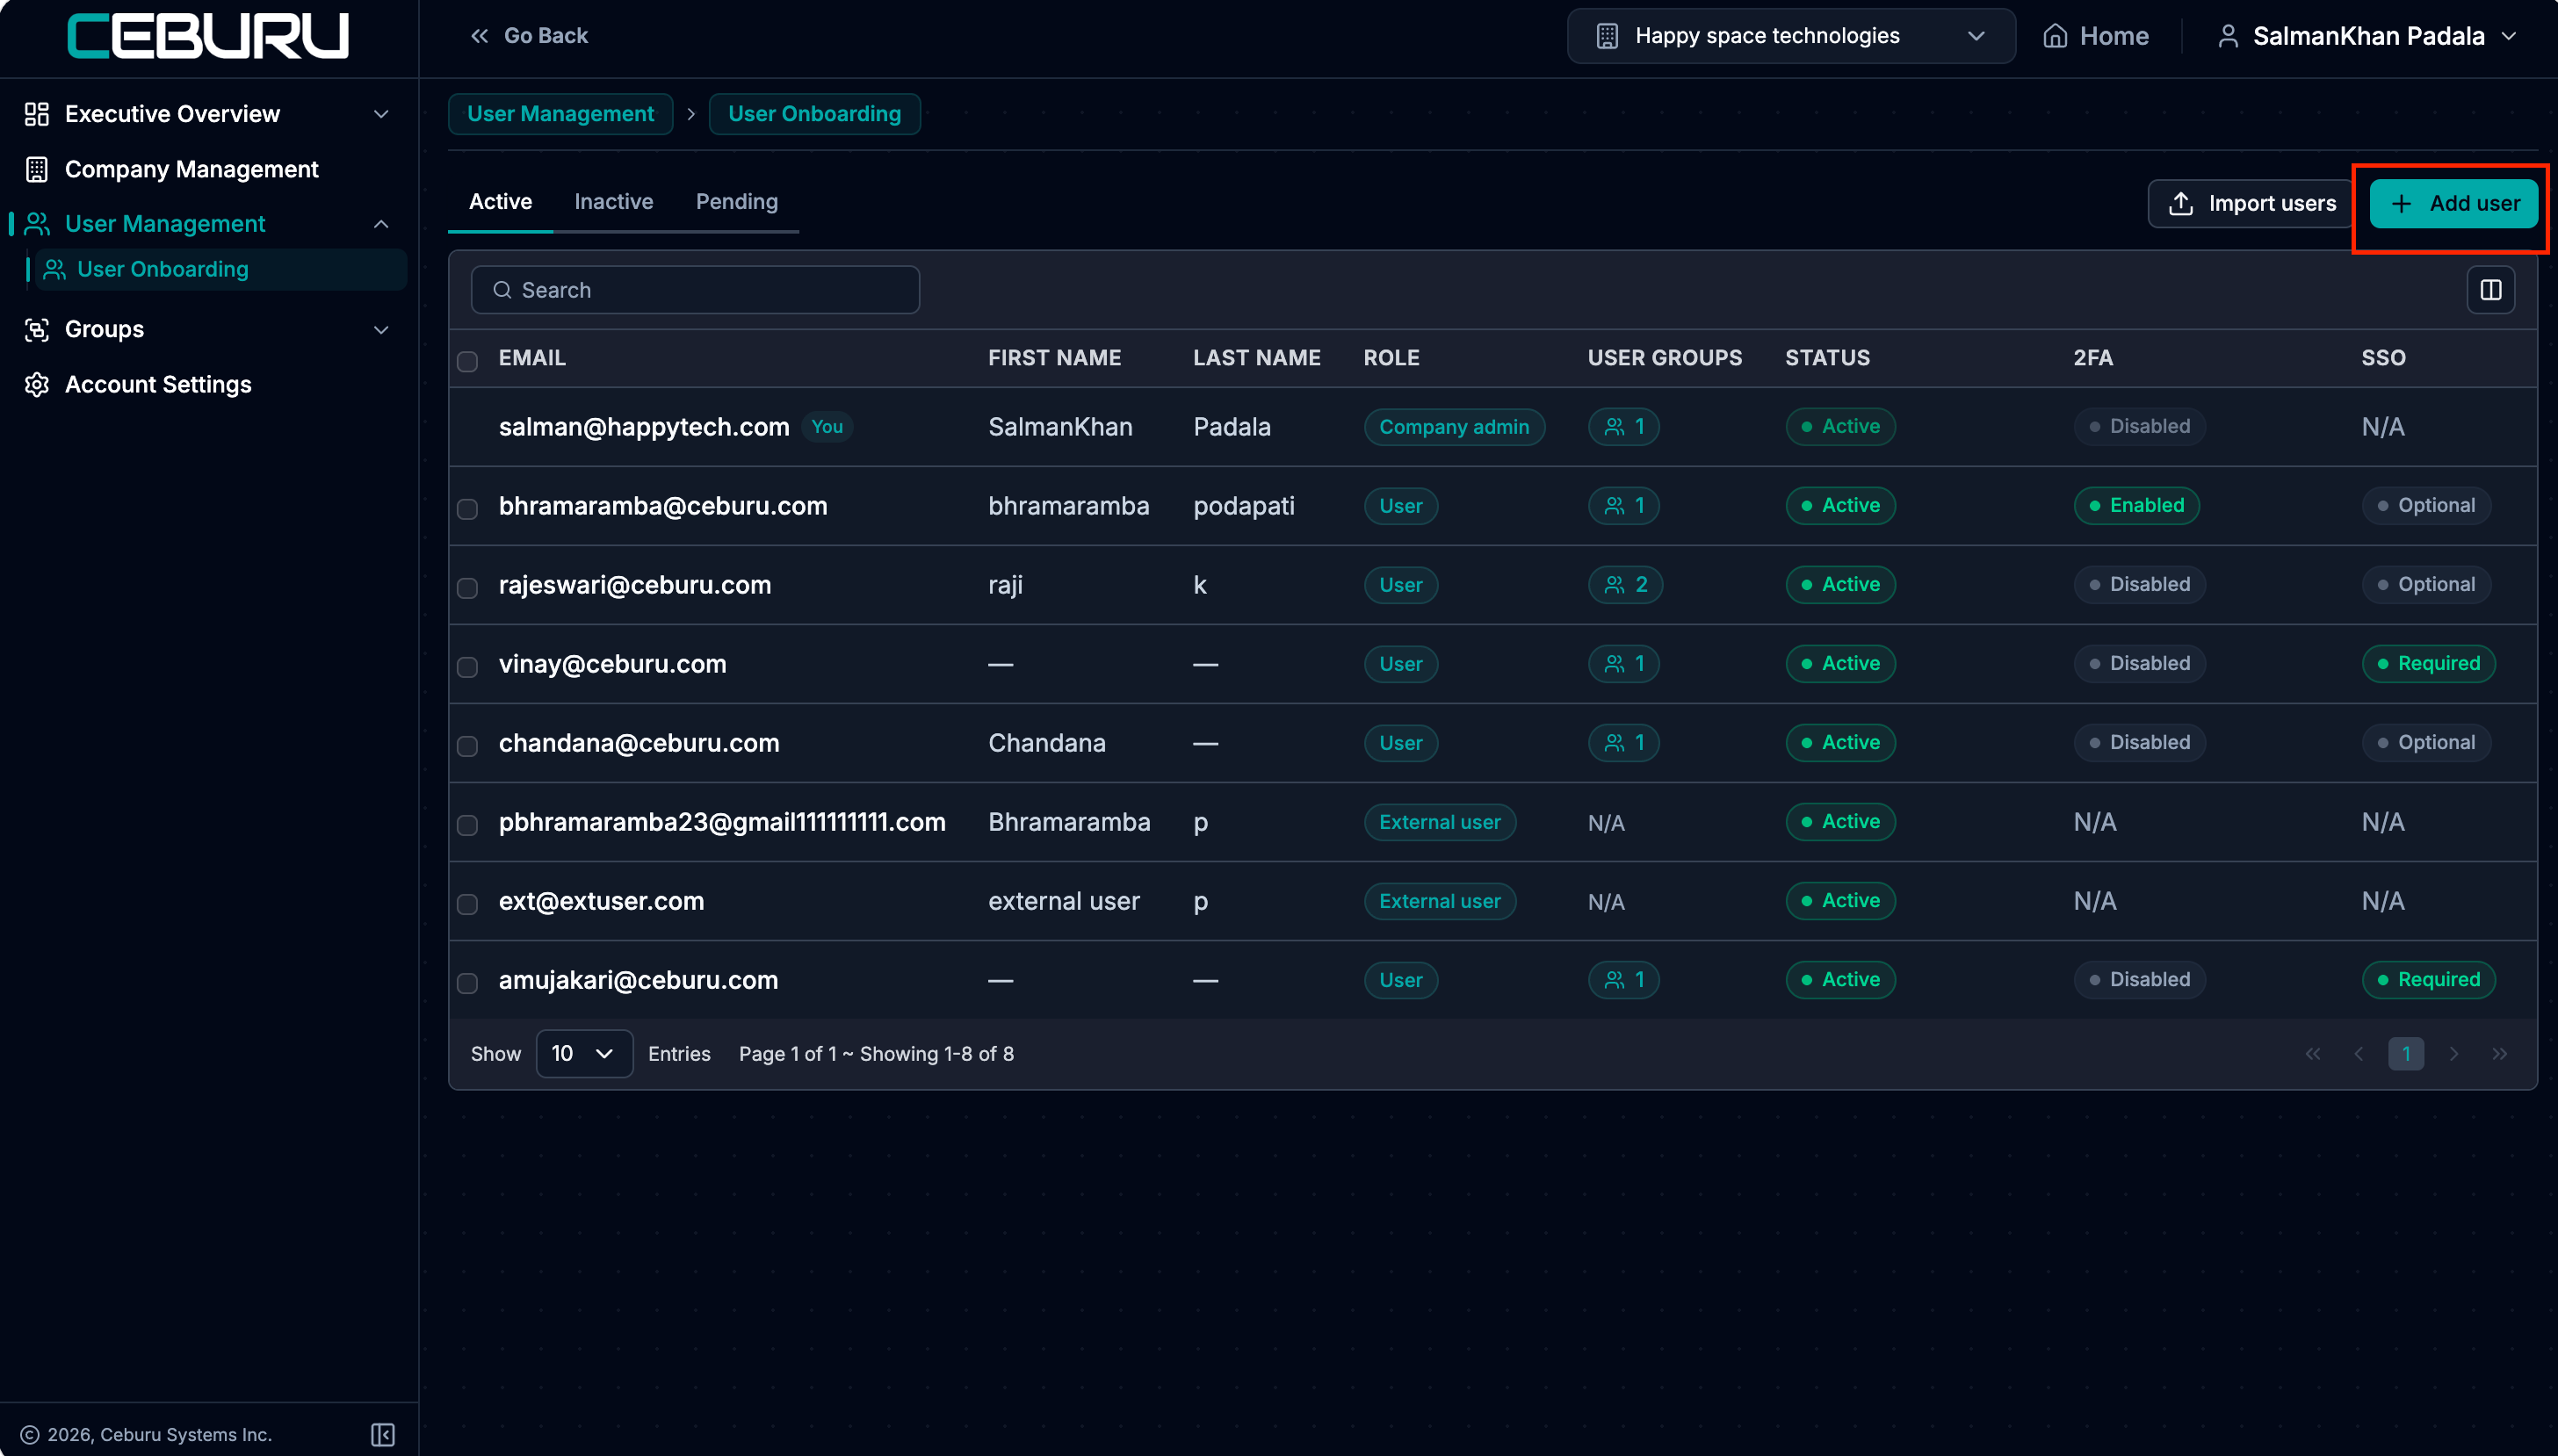
Figure 7.1 — Ceburu User Management / Invite Users.
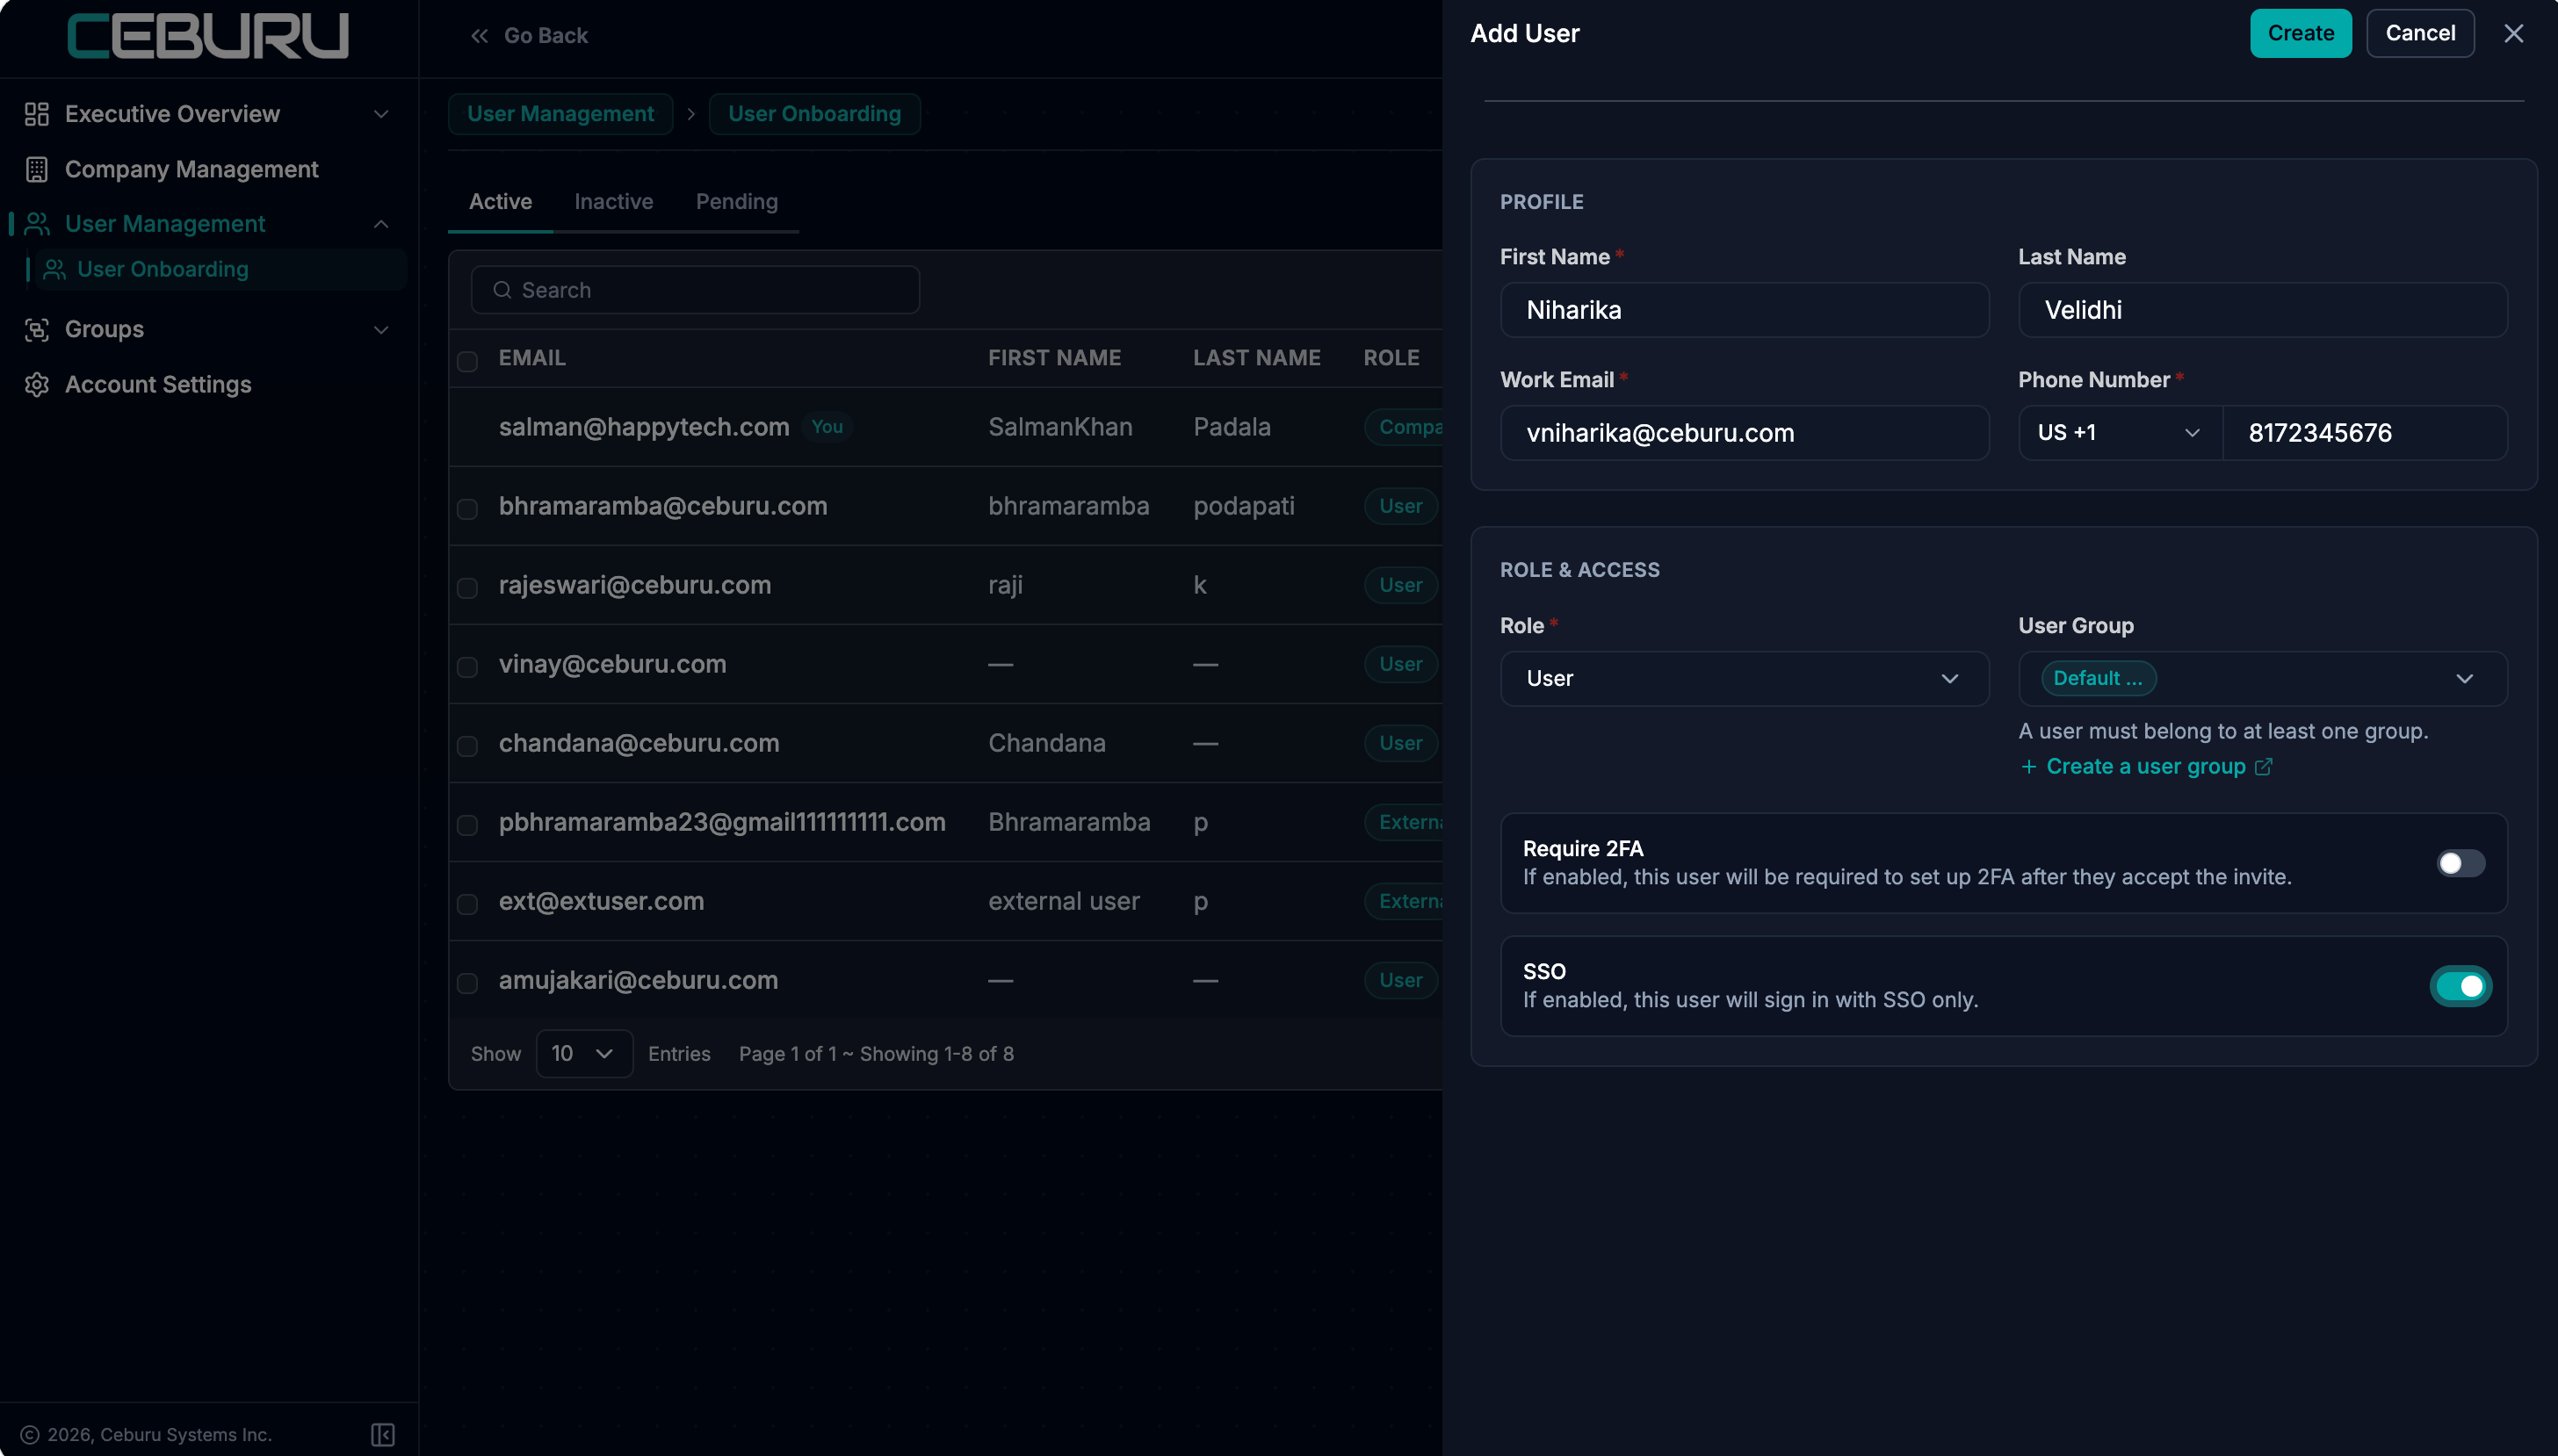
Figure 7.2 — Entering the user's profile, role, and group.
- The user receives a Ceburu invitation email.
- The user opens the invitation link and signs in using SSO with the work email.
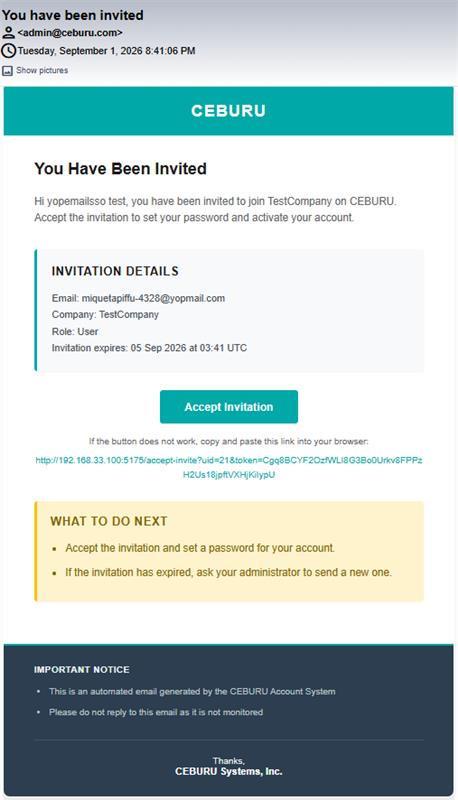
Figure 7.3 — Example Ceburu invitation email. The user can continue with SSO after opening the invitation.
Option 2: JIT Provisioning
JIT provisioning automatically creates a Ceburu user the first time the person successfully signs in through SSO, without an administrator sending an invitation first.
- Open the Ceburu SSO configuration.
- Enable JIT provisioning.
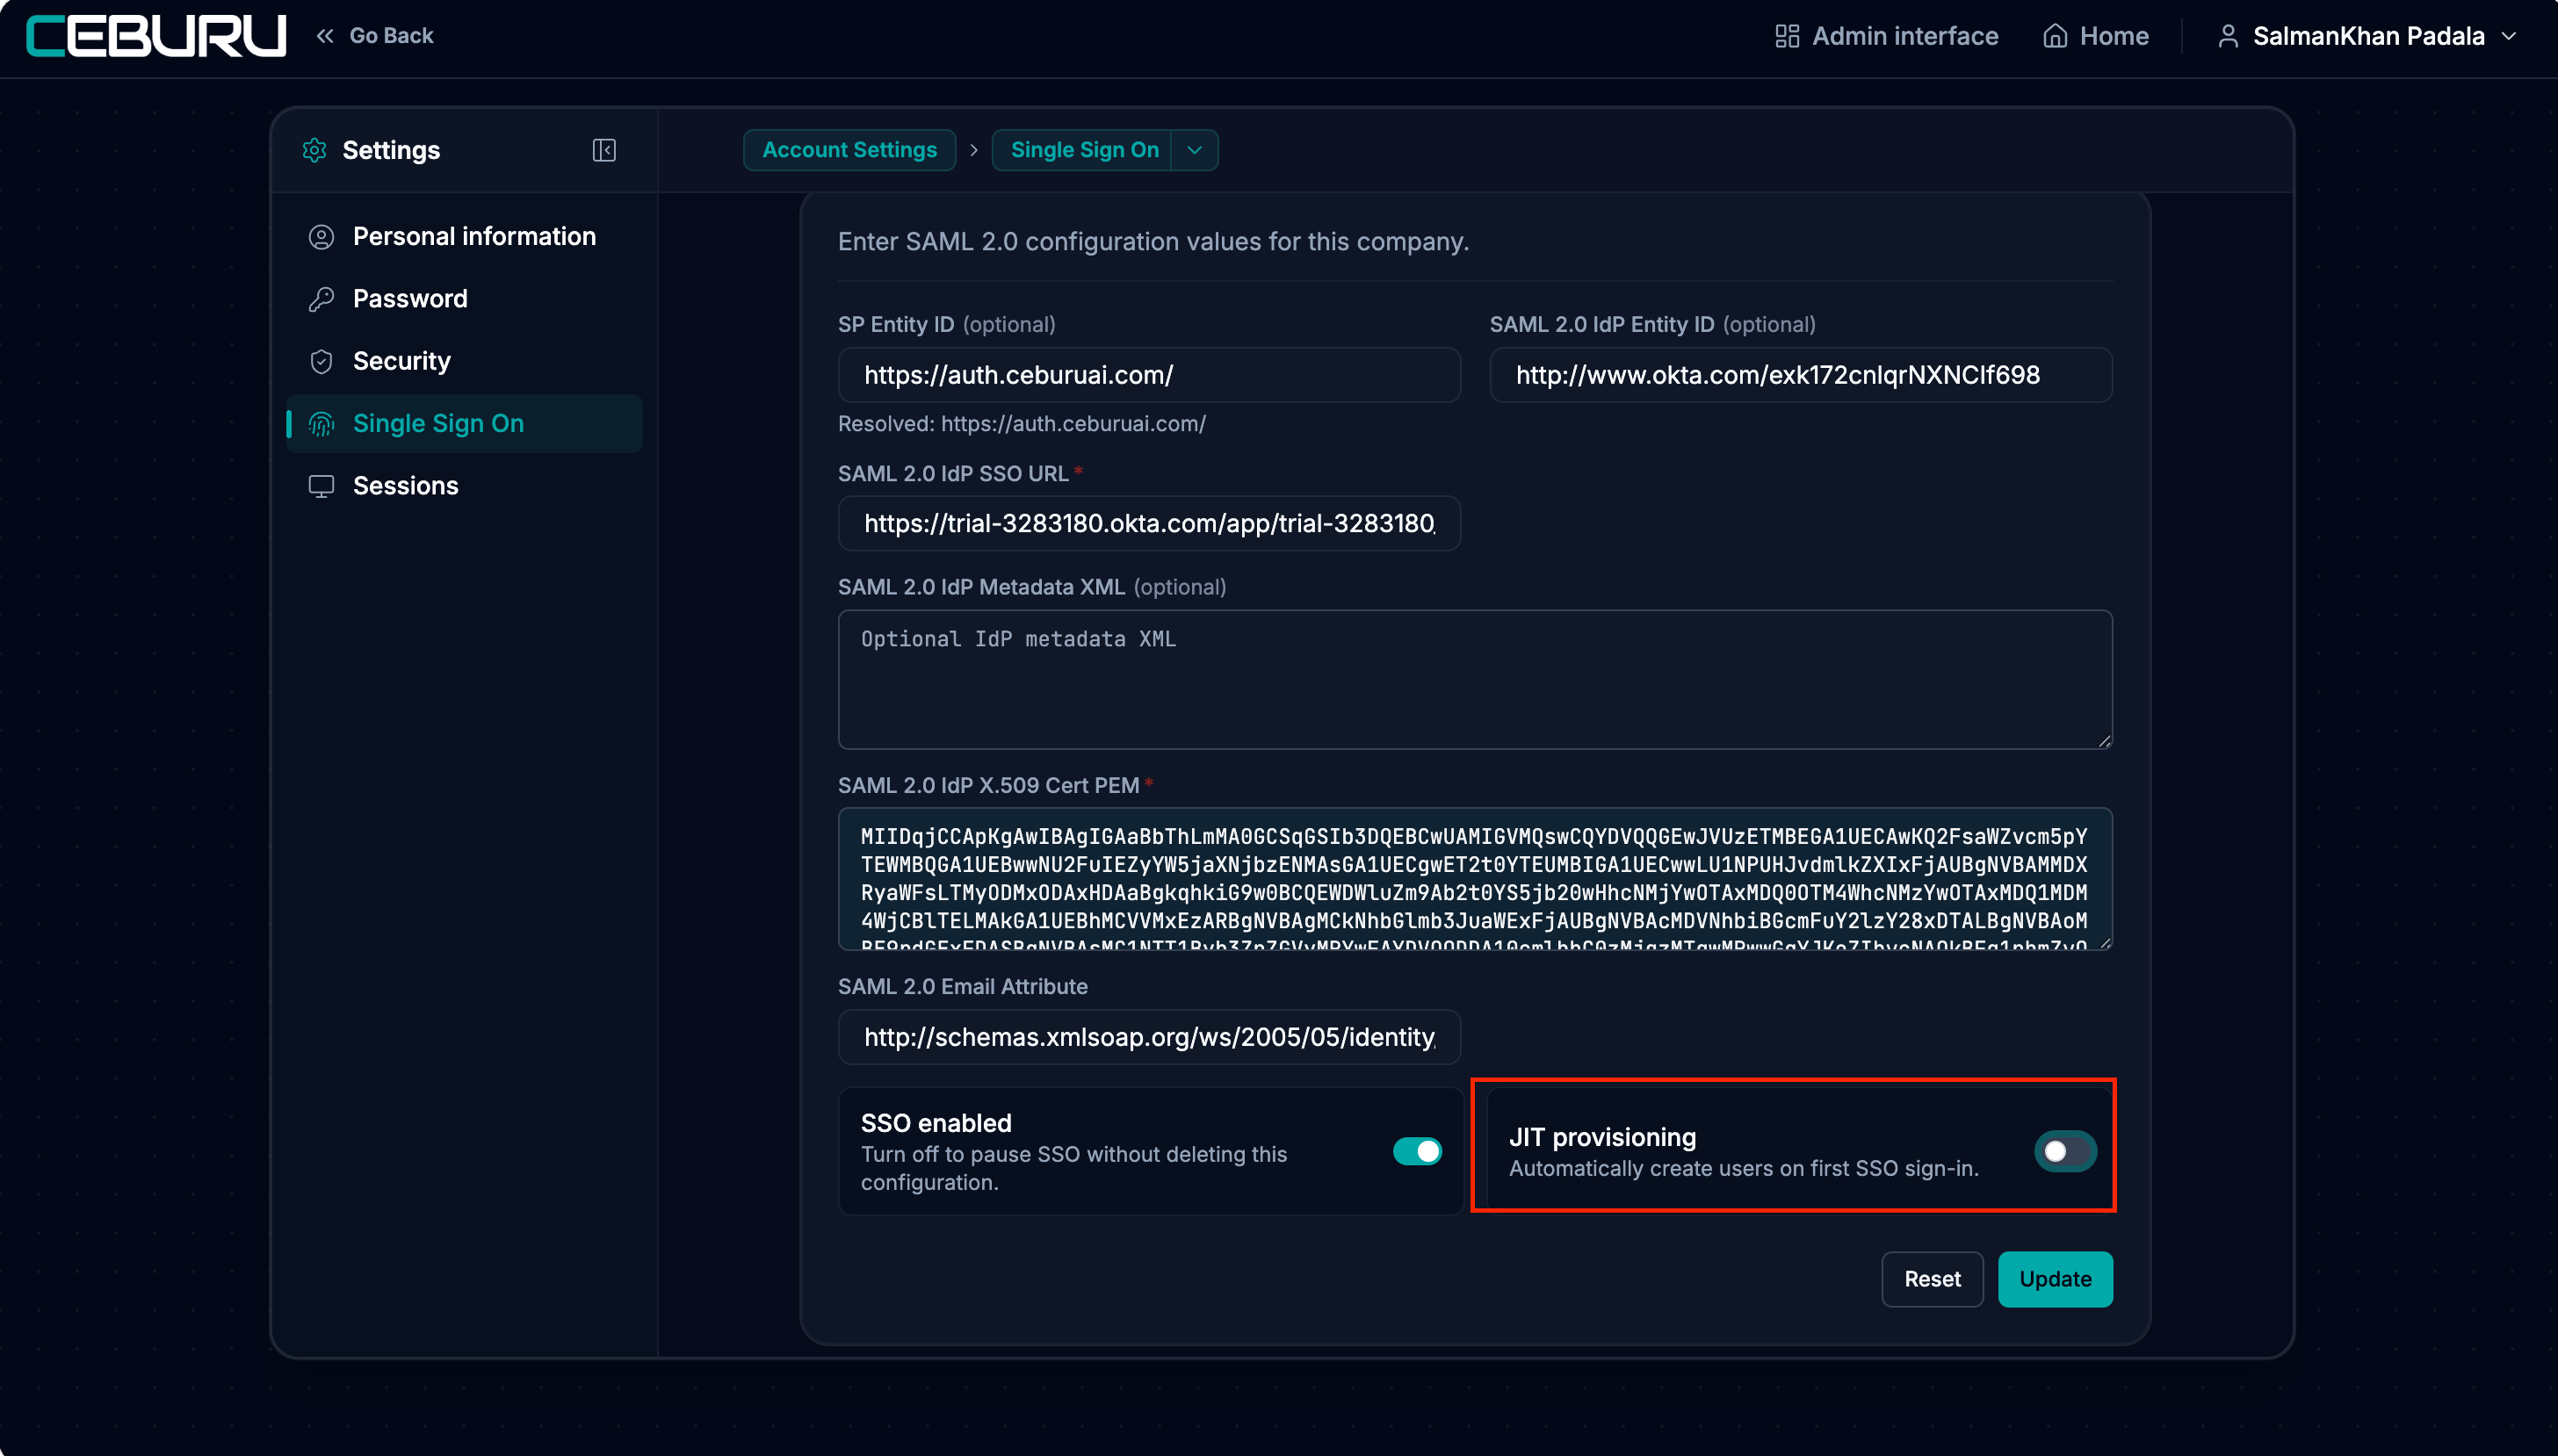
Figure 7.4 — Enabling JIT provisioning in the Ceburu SSO configuration.
3.Enter the organisation's email domain, for example company.com.
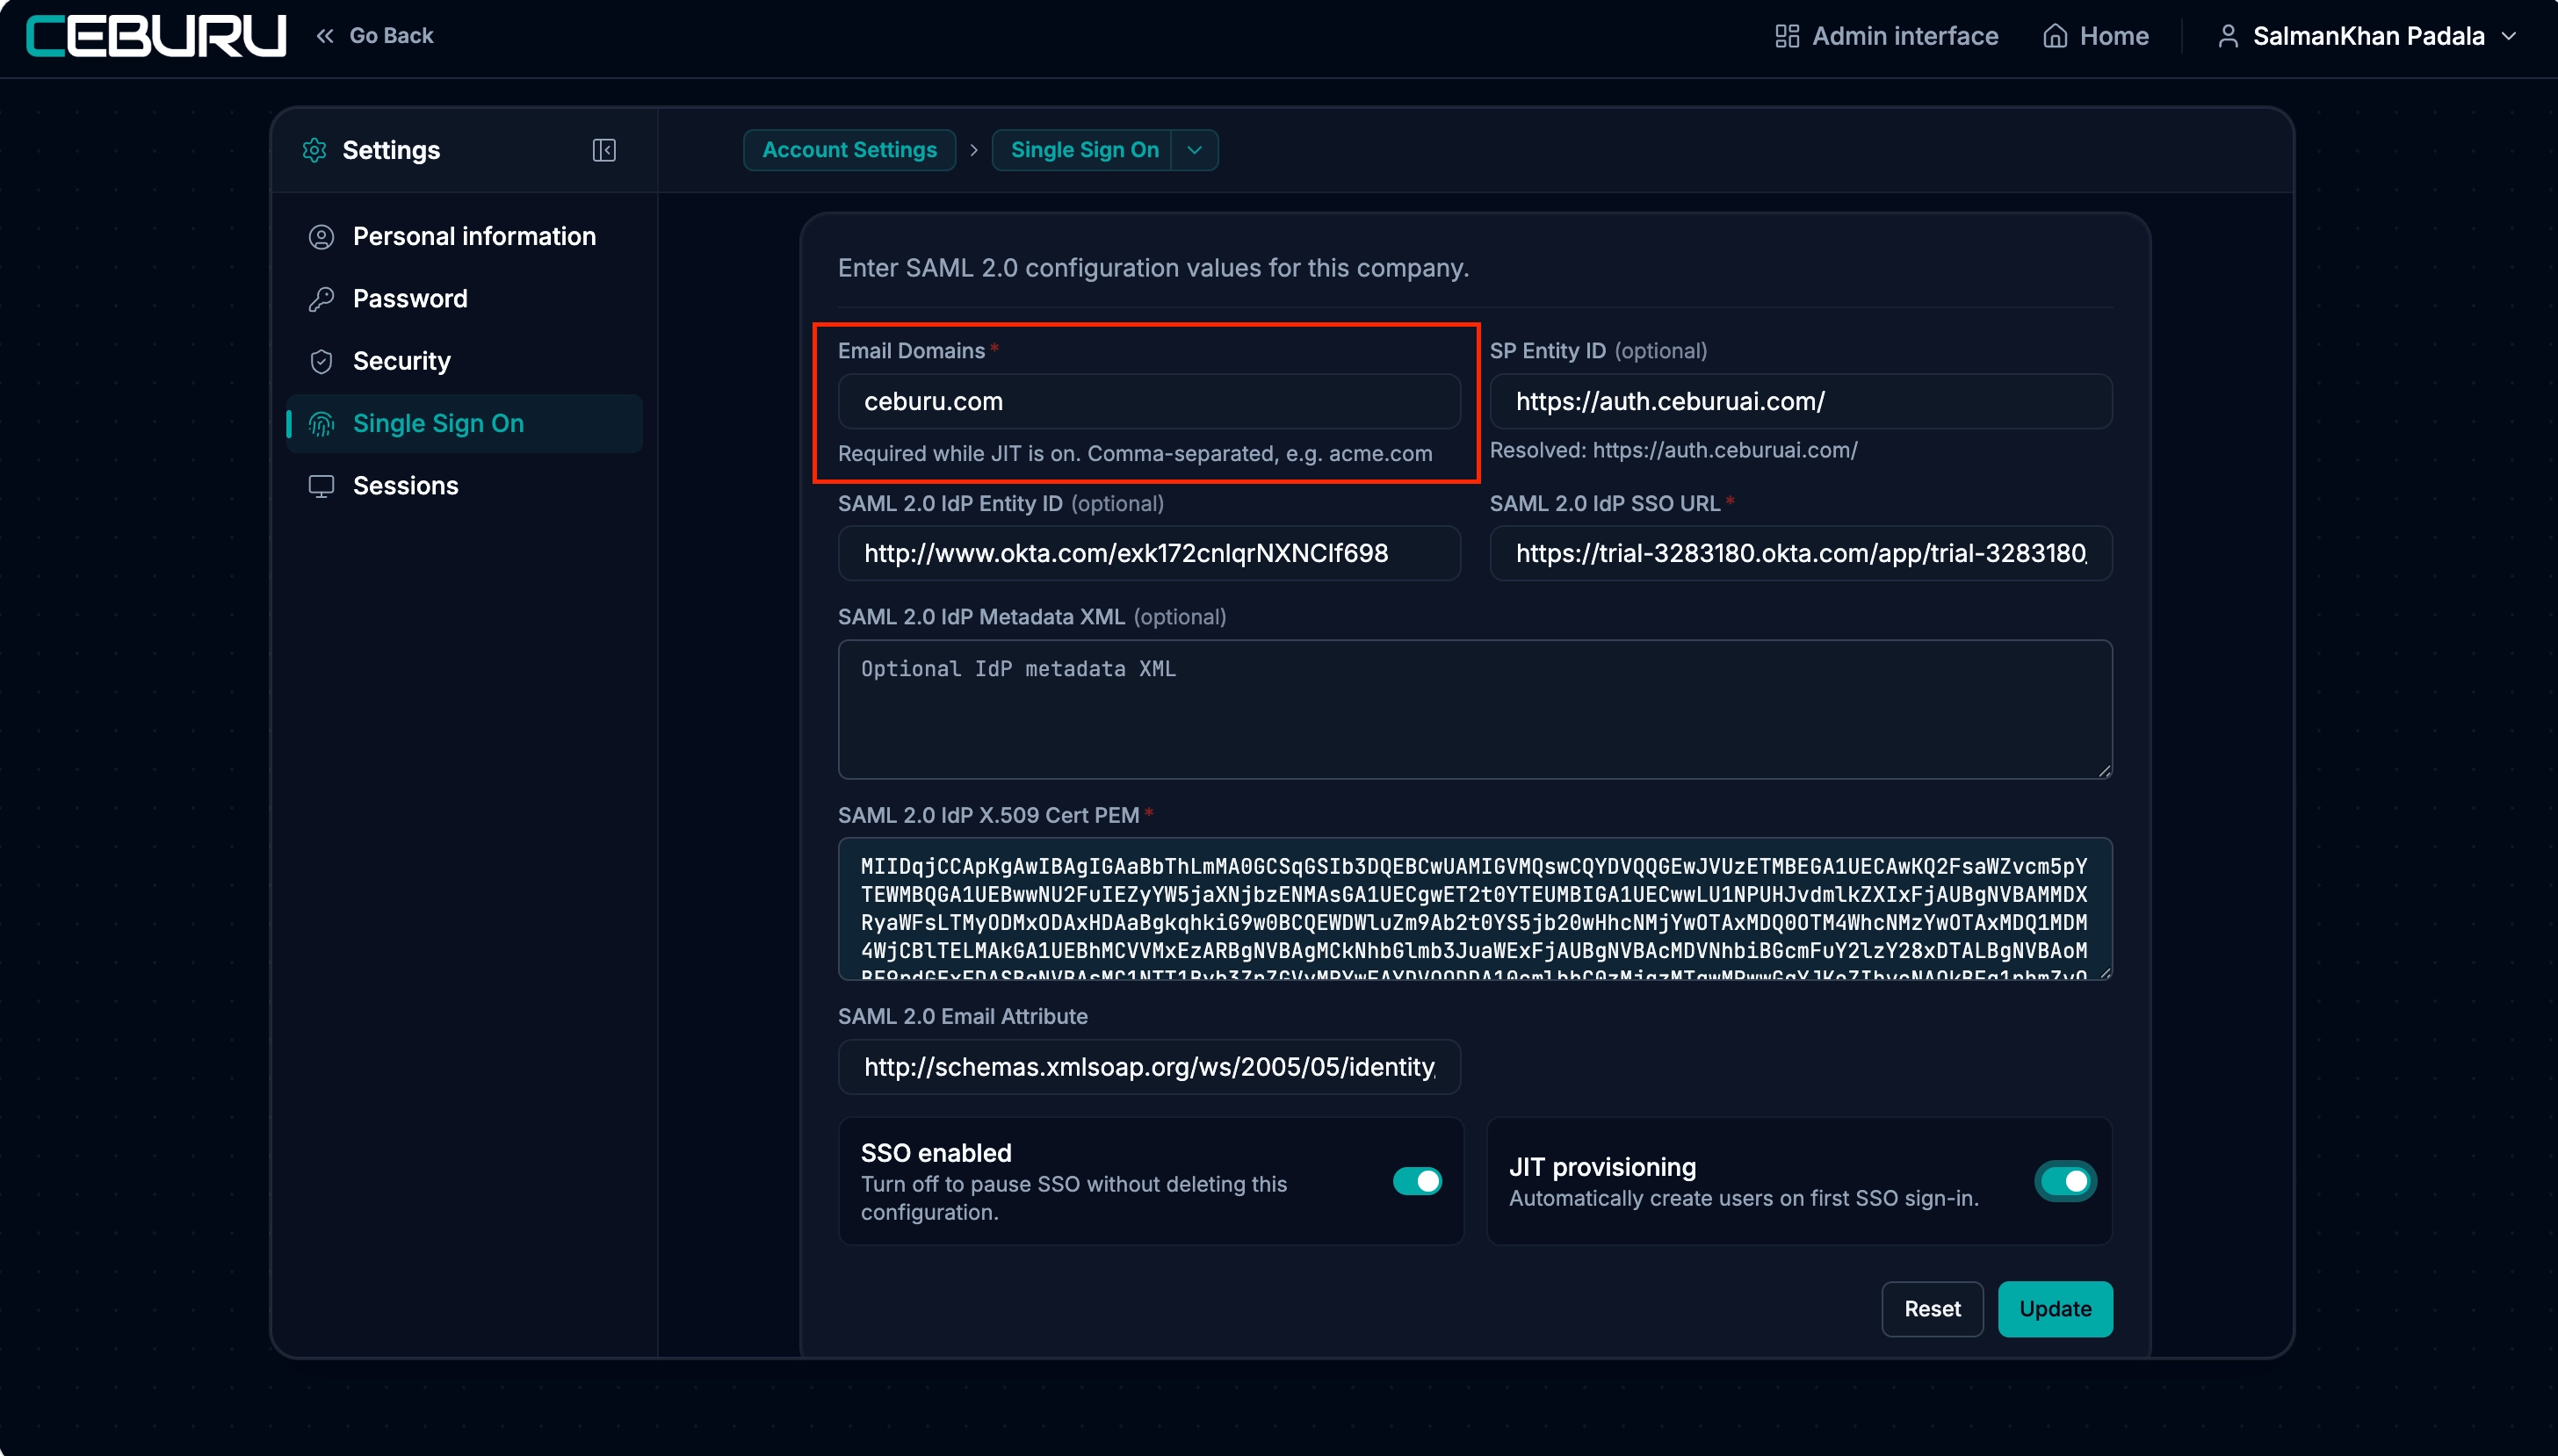
Figure 7.5 — Entering the organisation email domain for JIT provisioning.
4. Make sure the Identity Provider sends the required claims or attributes.
5. Save the SSO configuration.
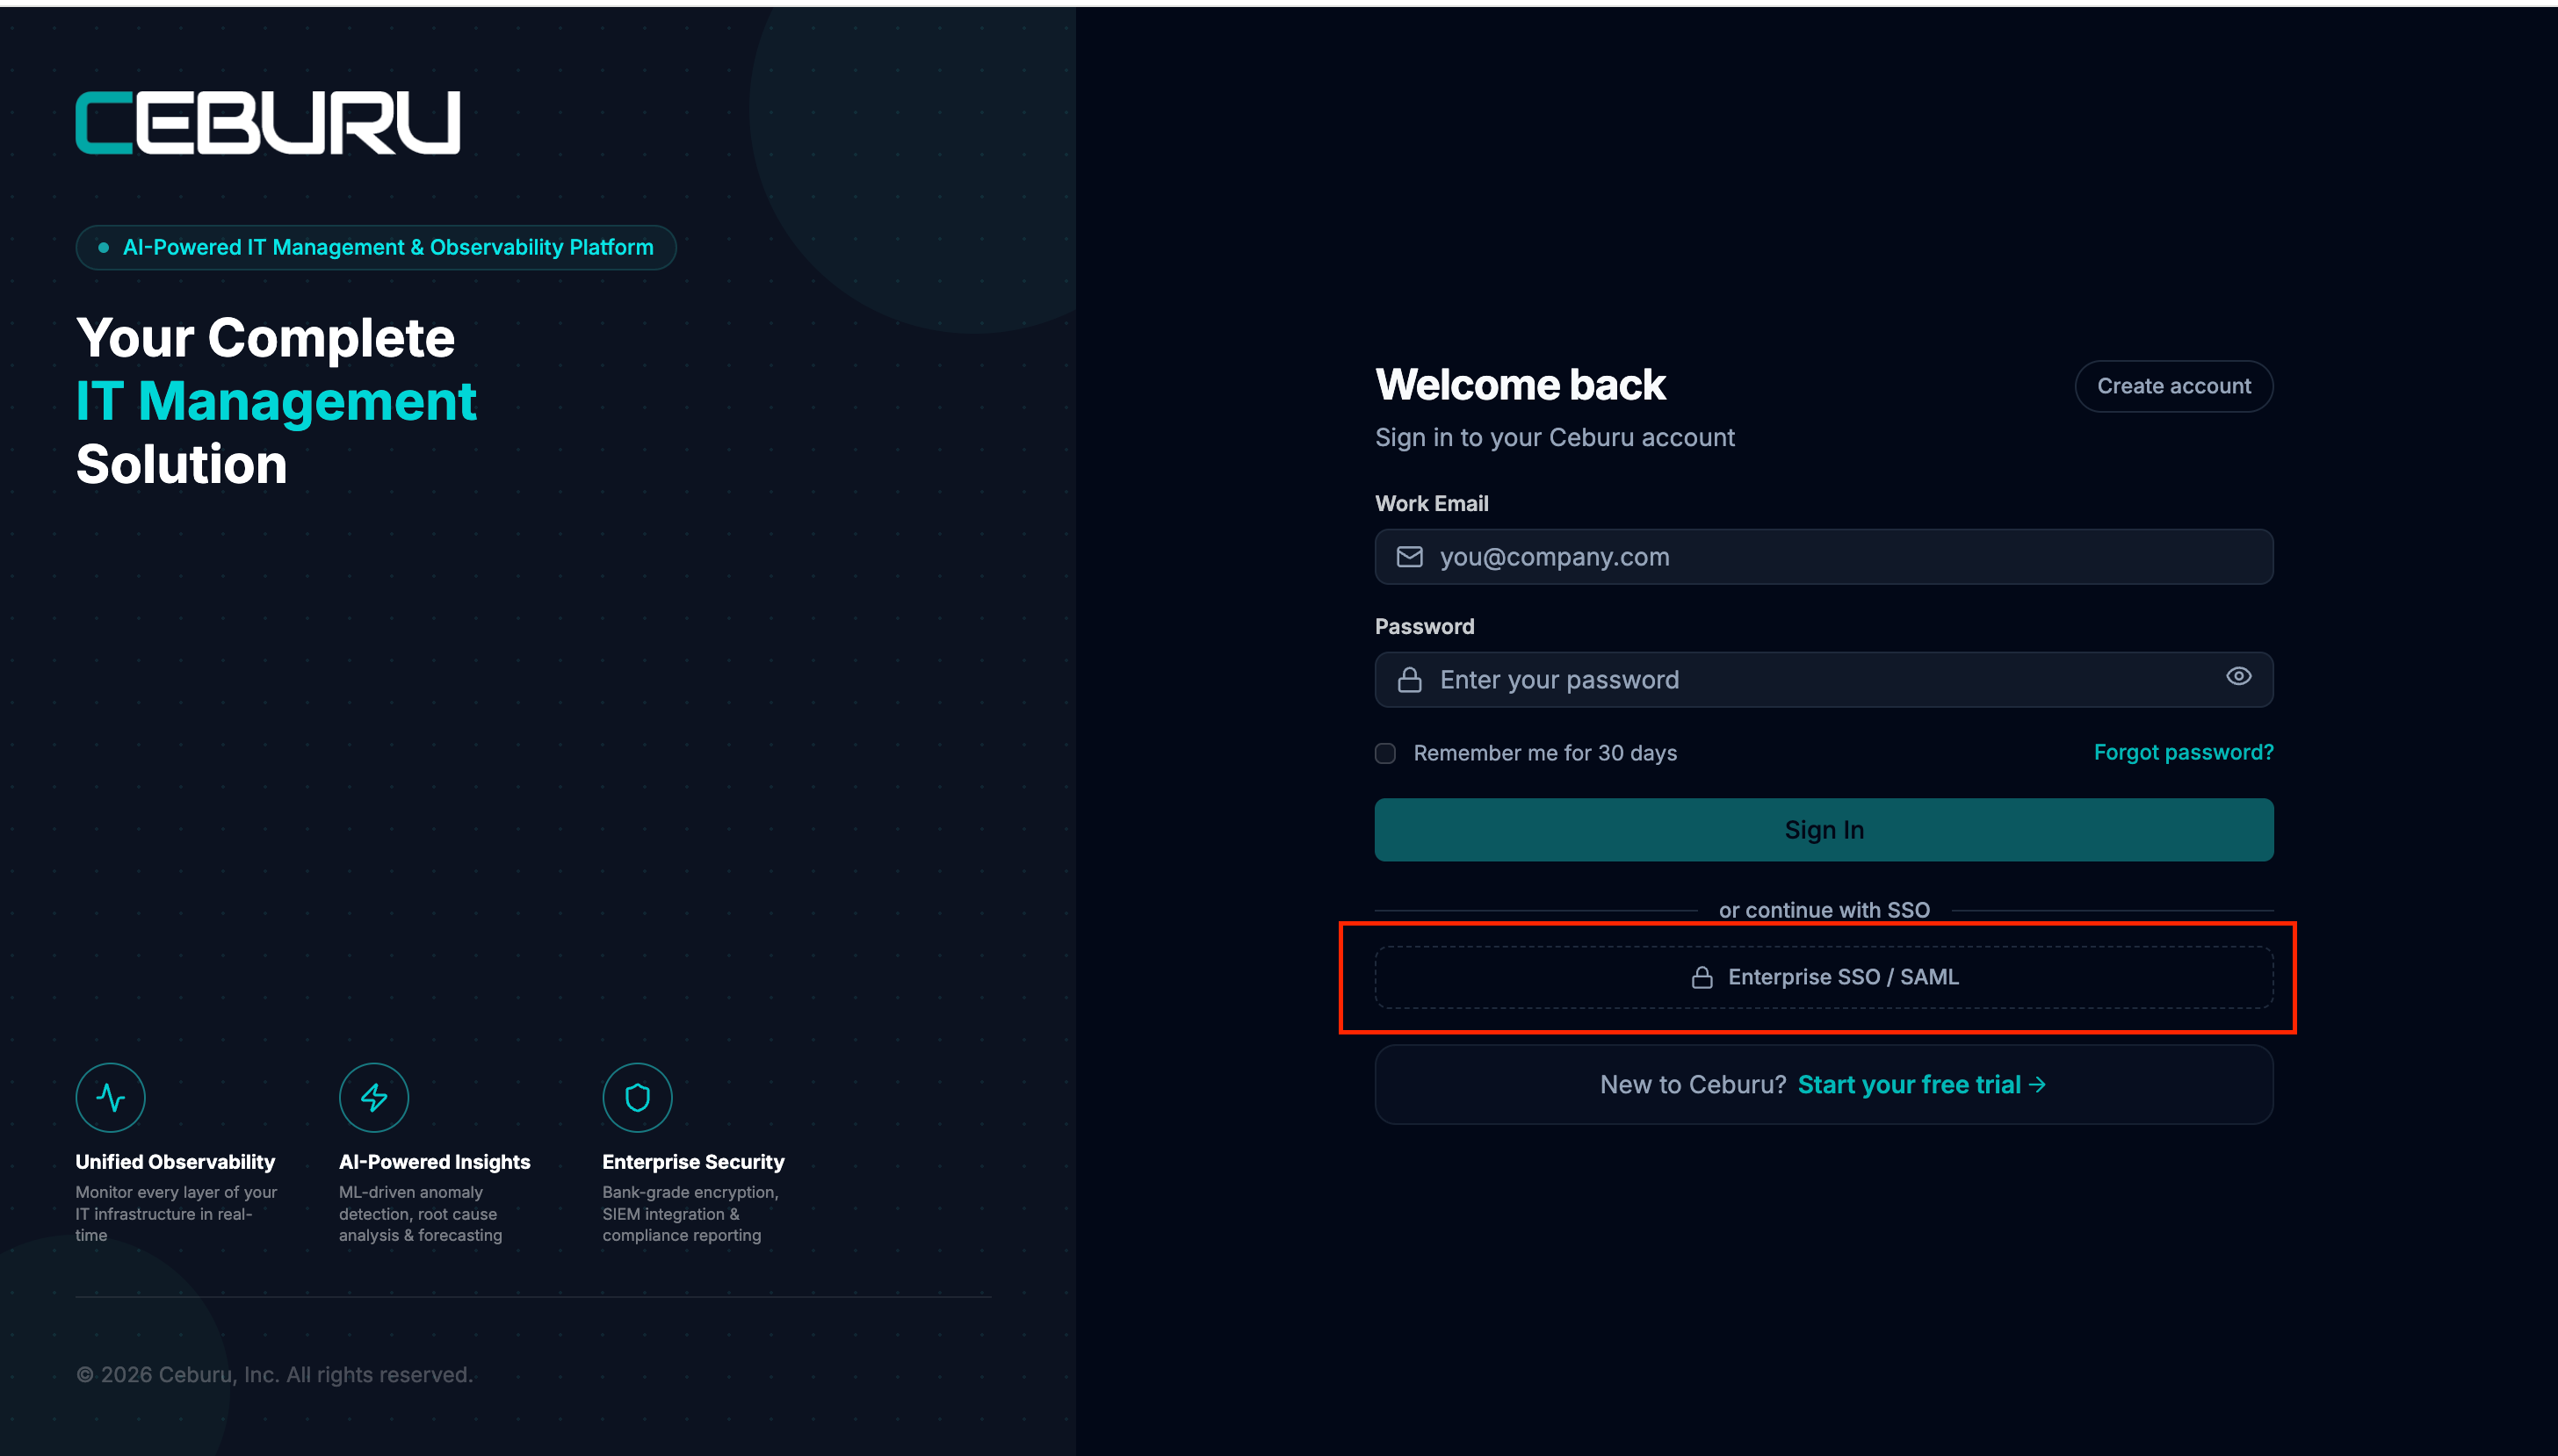
Figure 7.6 — A first-time SSO user created automatically through JIT.
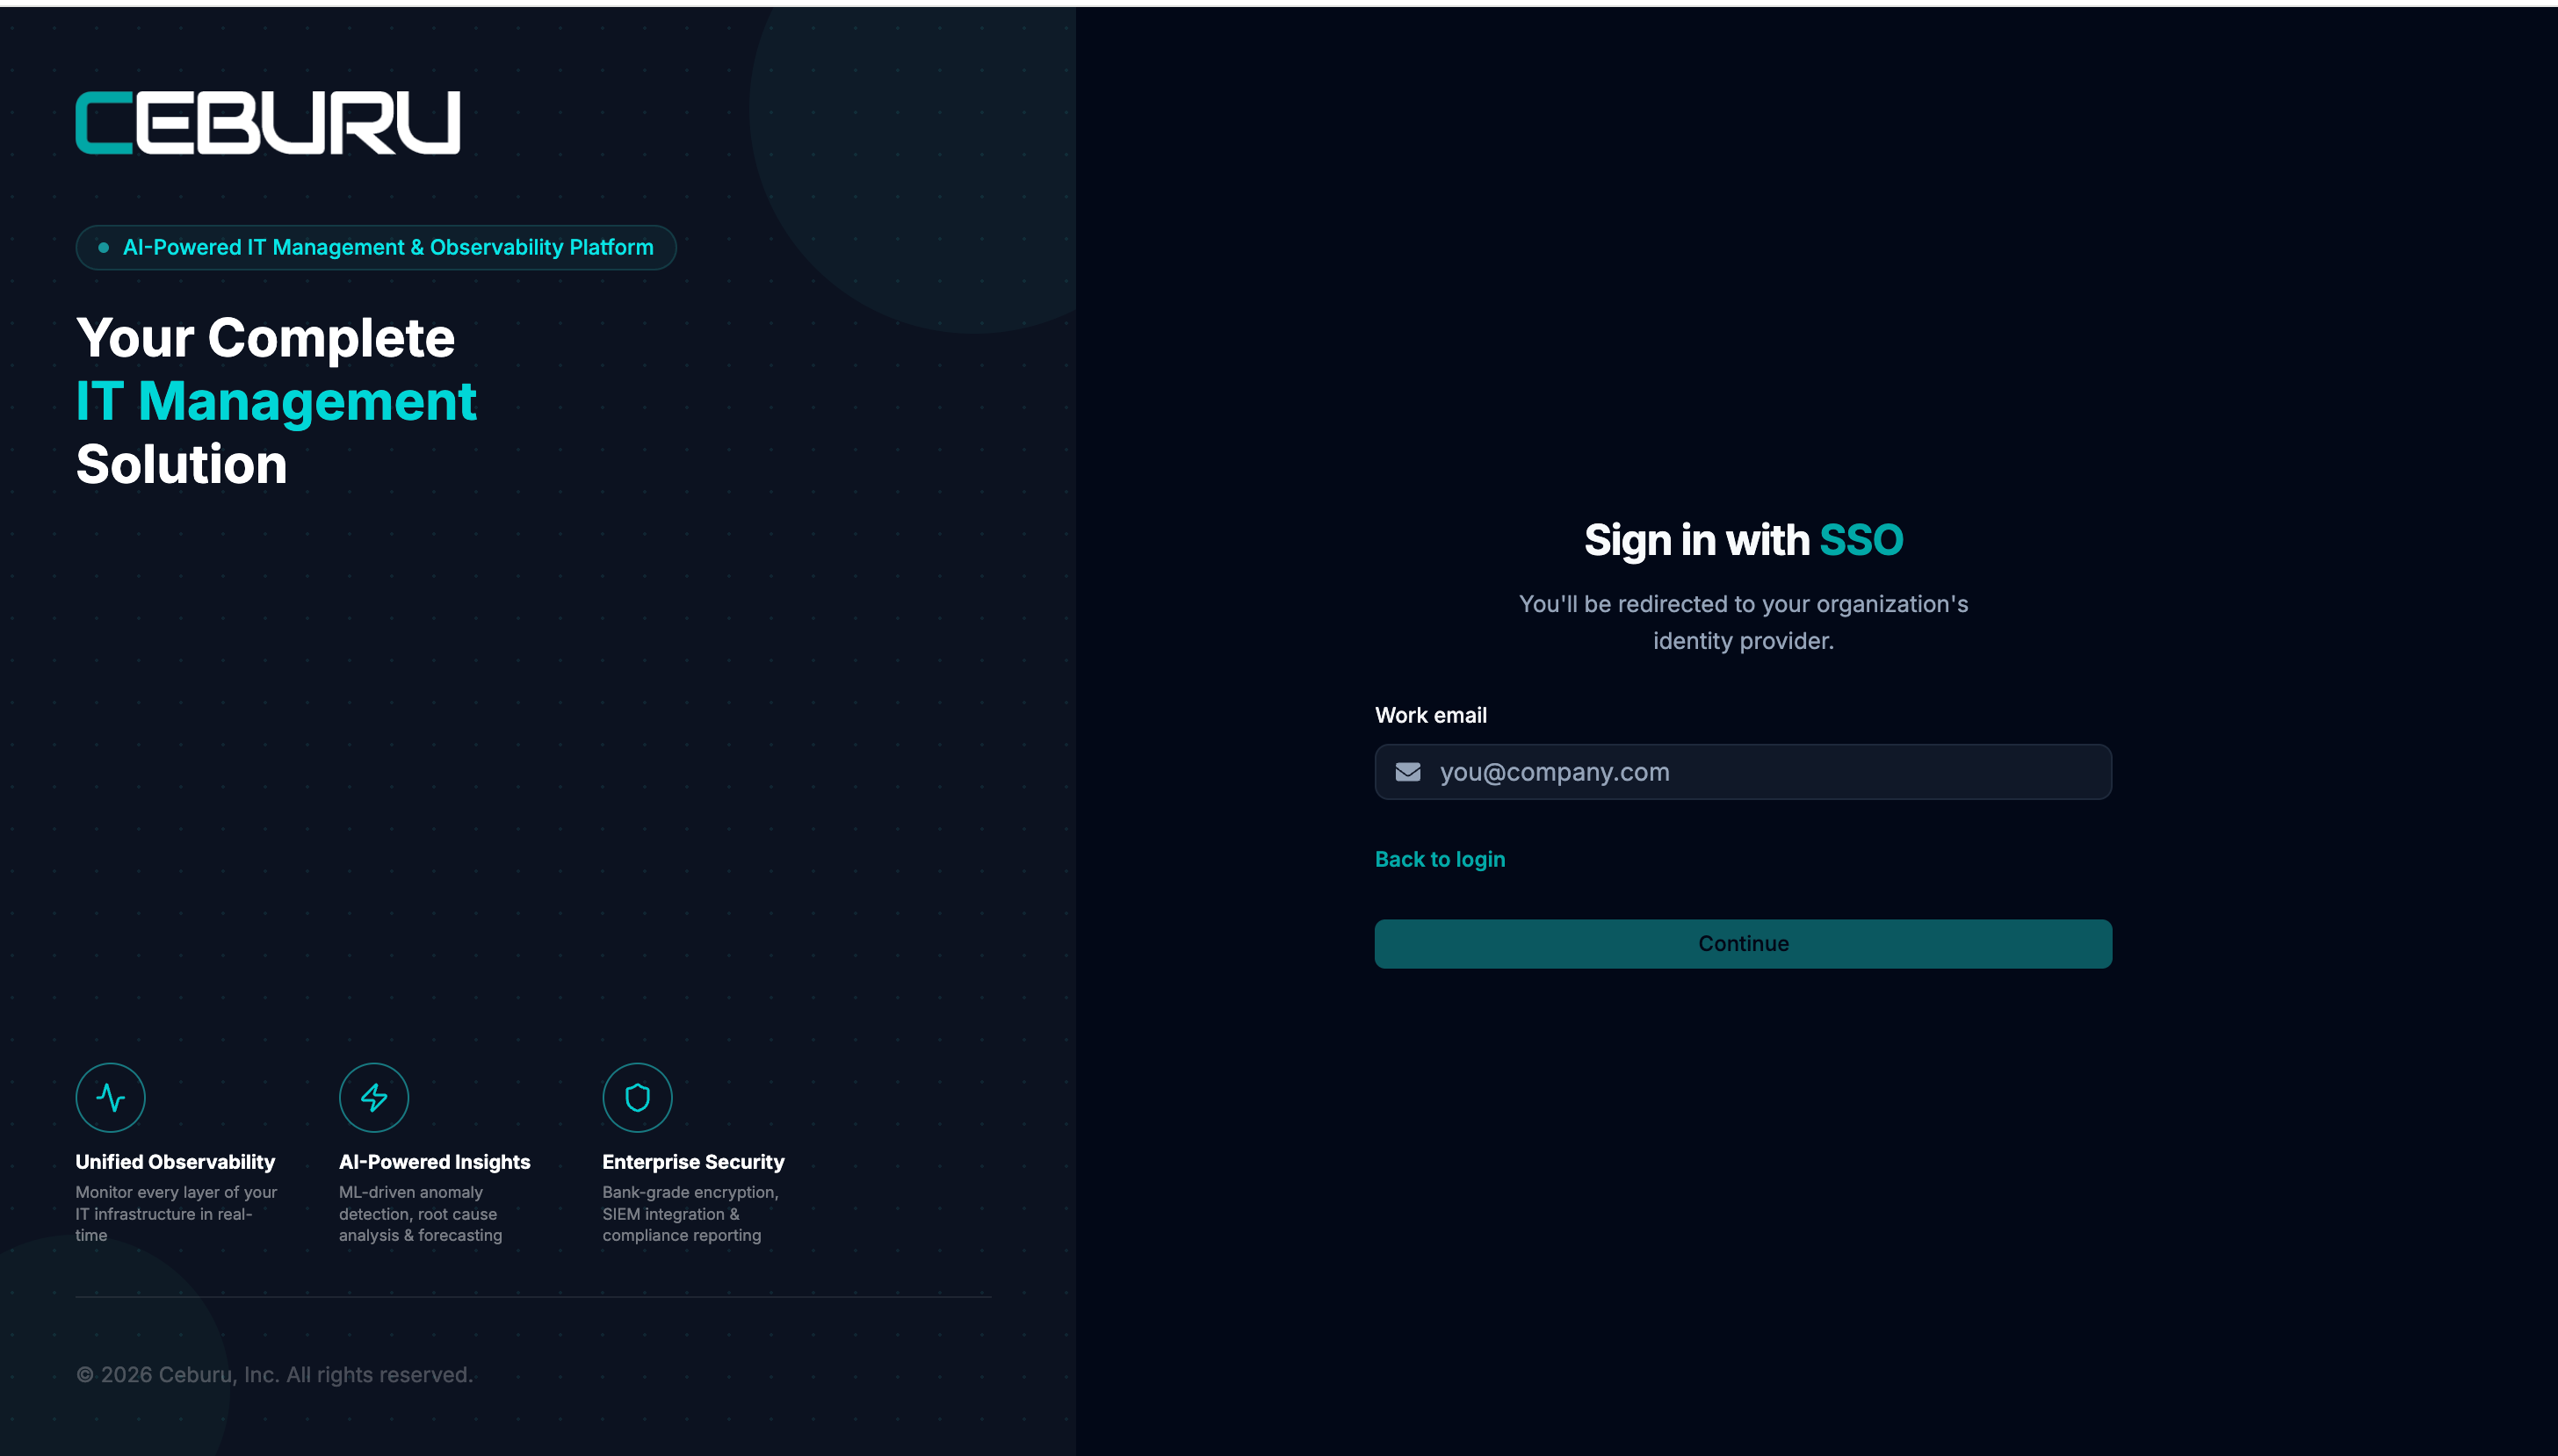
Figure 7.7 — User logging in through work email
What happens on the first JIT login
- The user signs in through SSO using a work email that matches the configured organisation domain.
- Ceburu creates the user automatically.
- The user is added to the Default group.
- An administrator should place the user in the correct groups so the user receives the appropriate access and module visibility.
Important: JIT provisioning works best when users share the configured organisation email domain. A user with a different email domain will not be created through JIT.
8. Quick Reference
| Provider | Protocol | Main Configuration Items |
|---|---|---|
| Auth0 | SAML 2.0 | SAML2 Web App addon, ACS URL, Issuer, Sign-In URL, X.509 certificate |
| Auth0 | OIDC | Callback URL, Client ID, Client Secret, Issuer, Authorization endpoint, Token endpoint, JWKS URI |
| Okta | SAML 2.0 | ACS URL, SP Entity ID, Sign on URL, Issuer, Signing certificate, attribute statements |
| Okta | OIDC | OIDC application, assignments, /oauth2/default Access Policies, OpenID Discovery document |
| Microsoft Entra ID | SAML 2.0 | Enterprise Application, Basic SAML Configuration, Attributes & Claims, Login URL, Issuer, Certificate |
Was this article helpful?
That’s Great!
Thank you for your feedback
Sorry! We couldn't be helpful
Thank you for your feedback
Feedback sent
We appreciate your effort and will try to fix the article