Ceburu On-Prem Application Requirements:
A minimum of two machines is required: one Windows and one Linux workstation or server, with the following specifications:
Windows machine:
- Option 1: Windows 10 or later with 16 CPU cores and 32 GB of memory, 500 Gb to 1TB Disk space in depending on the size of the network.
- Option 2: Windows Server 2022 or later with 16 CPU cores and 32 GB of memory.
- Windows machine must have active internet access during installation to download required components, updates, and dependencies.
- VPN access must be configured and available for the probe or Windows machine.
Linux machine:
- Linux Server with 16 CPU cores and 32 GB of memory, 500 GB 1 TB Disk space in /var folder depending on the size of the network with sudo access.
- Linux machine must have active internet access during installation to download required components, updates, and dependencies.
System Requirement:
- Windows:
- Workstation -> 10 & above
- Windows Server -> 2012 & above
- Linux:
- Ubuntu -> 20.04 & above
- Redhat -> 7 & above
- System should have 1TB free storage in /var folder.
- System should have 32GB free RAM.
WinRM should be enabled:
- Test WinRM:
- Run the below command from the probe machine PowerShell.
- Test-Wsman <Client machine IP>
- Example:- Test-Wsman 192.168.1.9
- Run the below command from the probe machine PowerShell.
- If Enable the output be like this:

- If Not enabled the output be like this:

- Enable WinRM:
- Run the below command in the client machine powershell.
- Enable-PSRemoting
- Run the below command in the client machine powershell.
System requirement (On Prem(2 Servers))
SERVER | OS | MEMORY | STORAGE | CORES |
Application & ELK Server | Ubuntu Server 22.04 LTS and processor | 32 GB | 1 TB | 4 |
DB Server & Probe | Windows 10 or Windows Server 2019 and above | 16/32 GB | 1 TB | 4 |
System requirement (On Prem(3 Servers))
SERVER | OS | MEMORY | STORAGE | CORES |
Application Server | Ubuntu Server 22.04 LTS | 16 GB | 500 GB | 4 |
DB Server & Probe | Windows 10 or Windows Server 2019 and above | 16/32 GB | 1 TB | 4 |
ELK Server | Ubuntu Server 22.04 LTS and processor | 32 GB | 1 TB | 4 |
AIOps proxy (Optional) | RHEL latest version | 64 GB | 1 TB | 4 |
Note: For installation, we need remote access to all those servers
Configure URLs & Ports
# | Domain | IP | Types | Src.Port | Destination | Dest. Port | Protocol |
1 | portal.ceburu.com | 34.232.239.35 | Monitoring | Ephemeral | portal.ceburu.com | 7878 | API |
2 | portal.ceburu.com | 34.232.239.35 | Frontend | Ephemeral | portal.ceburu.com | 443 | Frontend |
URLs to be whitelisted in both Linux and Windows:
| SL.No | OS | URL | PORT | PROTOCOL |
|---|---|---|---|---|
| 1 | Ubuntu | portal.ceburu.com | 443, 7878 | TCP |
| ubuntu.com | 443 | TCP | ||
| debian.org | 443 | TCP | ||
| canonical.com | 443 | TCP | ||
| pypi.org | 443 | TCP | ||
| pythonhosted.org | 443 | TCP | ||
| 2 | Redhat | portal.ceburu.com | 7878 | TCP |
| redhat.com | 443 | TCP | ||
| pypi.org | 443 | TCP | ||
| pythonhosted.org | 443 | TCP | ||
| 3 | Oracle | portal.ceburu.com | 443, 7878 | TCP |
| oracle.com | 443 | TCP | ||
| pypi.org | 443 | TCP | ||
| pythonhosted.org | 443 | TCP |
Link to download the .zip file for On Prem installation :
https://portal.ceburu.com:7878/media/dependencies/Ceburu-Windows-Onprem.zip
Prerequisite:
Pre-Request for On-Prem Installation(With Commands)
- Windows Machine Requirements:
- Storage: Minimum 100 GB free space
- Memory: Minimum 16 GB free RAM
- Check Command:
- (Get-WmiObject -Class WIN32_OperatingSystem).FreePhysicalMemory
- Check Command:
- Operating System: Should be workstation Windows 10 and above OR Server Windows Server 2019 and above
- VPN access must be configured and available for the probe or Windows machine.
- Linux Machine Requirements:
- User Access: Must have SUDO access
- Check Command:
- sudo hostname
- Check Command:
- Storage: Minimum 500 GB free space in /var
- Check Command:
- df --block-size=1G --output=avail /var | tail -1 | xargs
- Check Command:
- Memory: Minimum 16 GB free RAM
- Check Command:
- free -h
- Check Command:
- Operating System: Should be RHEL 9 or Ubuntu 22.04
- Check Command:
- . /etc/os-release; echo $NAME $VERSION
- If RHEL, verify subscription status:
- sudo subscription-manager status
- Check Command:
- Execute Permissions: Required in the following directories: /var, /opt, /tmp, ~/
- Check Commands:
- findmnt -no SOURCE,TARGET,FSTYPE,OPTIONS -T /var
- findmnt -no SOURCE,TARGET,FSTYPE,OPTIONS -T /opt
- findmnt -no SOURCE,TARGET,FSTYPE,OPTIONS -T /tmp
- findmnt -no SOURCE,TARGET,FSTYPE,OPTIONS -T ~/
- Check Commands:
- User Access: Must have SUDO access
- Network Connectivity (Both Windows & Linux Servers)
- Check Commands:
- nc -zv -w 10 portal.ceburu.com 7878
- nc -zv -w 10 portal.ceburu.com 443
- Check Commands:
- Enable WinRM via group policy in Active Directory.
- During installation, both machines must have internet connectivity.
The probe machine and all associated subnets must be part of Active Directory.
Internal Port Management:
Network Monitoring : Open Port 20050 & Port 20051 (UDP) for internal communication between proxy and node.
DNS Monitoring : Open Port 20052 (UDP) for Internal communication between proxy and node.
IIS Monitoring : Open Port 8220 (TCP) for Internal communication between metricbeat(node) and Elasticsearch(probe) which is configured in the probe.
Suricata: Open Port 5044 (TCP) for Internal communication between suricata agent and logstash.
Log Explorer: Open Port 5140(UDP) for Internal communication between router/switch and aiops proxy.
Ceburu Application Monitoring: Open port 7878(TCP) for internal communication between probe and Application Server
Netflow Monitoring: Open port 4739(UDP) for internal communication between NetFlow collector and NetFlow Server
DBKPI, AIAPM, IIS Monitoring: Open port 9200(TCP) for internal communication between Probe & NetFlow Server
URL Whitelisting:
Please make sure that the following URLs are not blocked. If blocked, please open and whitelist them.
1. portal.ceburu.com
For data collection, we have 2 options:
Option 1 – Direct Flow - Forward the traffic to Netflow Server - Port 4739 (UDP). Configure the details in Settings -> Configuration -> NPM
Option 2 – Through Probe - Forward the traffic to the flow collector. Configure the flow collector in Settings -> Configuration -> NPM
Please follow the below steps before starting On-Prem installation
- Login to the windows machine for Probe & DB and check the IP. Make sure you have internet in this system
- SSH the Linux machine from above windows machine for Application & ELK and it should work.
- Make sure all machines Windows & Linux sharing same login/access credentials
- Make sure both machines should have live internet till completion of the installation.
- Linux machine should be Ubuntu 22.04 and above
- Windows machines should be workstation Windows 10 or above OR Server 2019 or above
- Linux machines should have SUDO access and Windows machines should have administrator rights.
Installation:
To download and install the Ceburu On-Prem file, follow the steps below:
Register and Create a Company:
- For detailed instructions on registering and creating a company, refer to the guide titled "Creating a Company Account."
Activate the Company:
- Once your company is created with Monitoring Type set to On-Prem, activate the company account.
- Upon first login, you will be prompted to change your password.
Log in to the Ceburu Portal:
- Visit https://portal.ceburu.com.
- Use your company login credentials to access the portal and proceed with the setup.
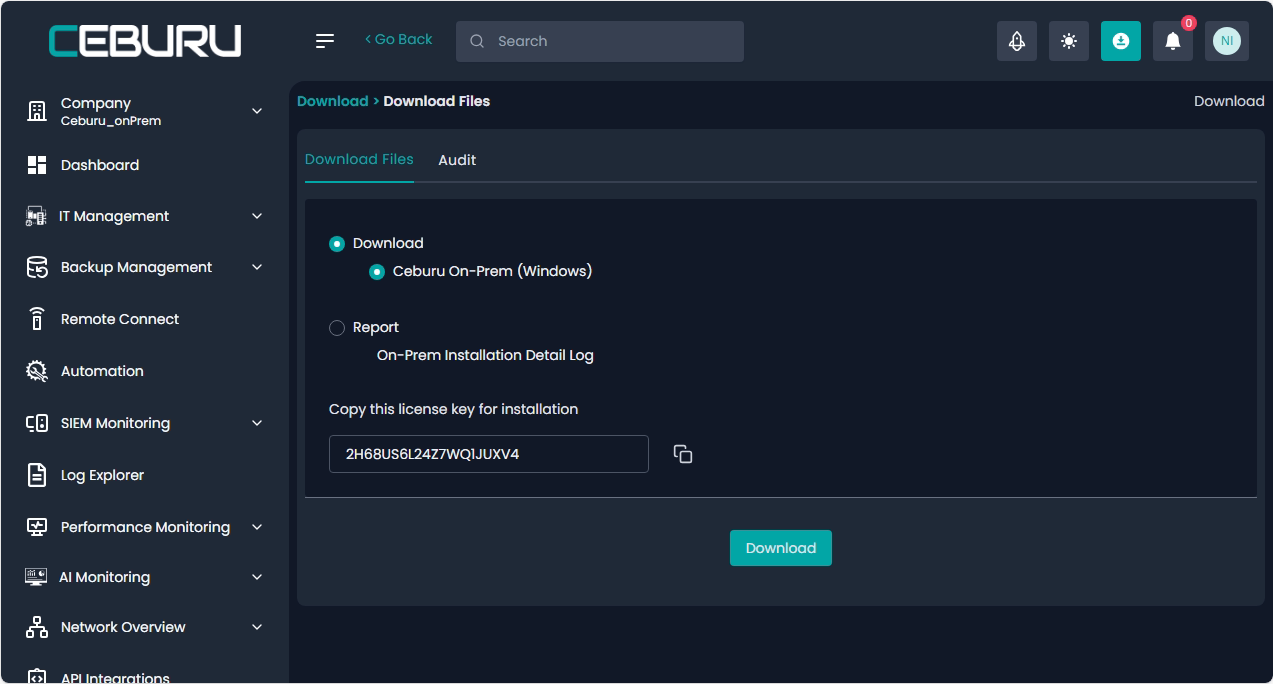
After logging into your Ceburu portal, the Dashboard appears by default.
Click the Download icon in the top-right corner.
Under Download Files, select:
Download → Ceburu On-Prem (Windows)
Copy the License Key displayed for later use during installation.

Locate the downloaded file ceb-onprem-setup.exe in your Downloads folder.

Right-click it and select Run as administrator.
When prompted by Windows UAC, click Yes to allow changes.

The setup wizard will launch. Click Next to continue.

Select or confirm the destination folder where Ceburu On-Prem will install.
Default path:
C:\Program Files (x86)\CeburuClick Next to proceed.

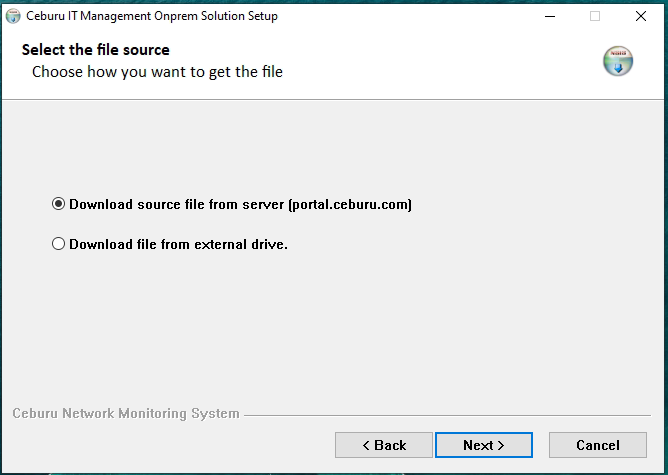
Choose where to get the installation source files from:
Download source file from server (portal.ceburu.com) – Recommended
Download file from external drive – Offline option Download from the link below: https://portal.ceburu.com:7878/media/dependencies/Ceburu-Windows-Onprem.zip
Click Next.
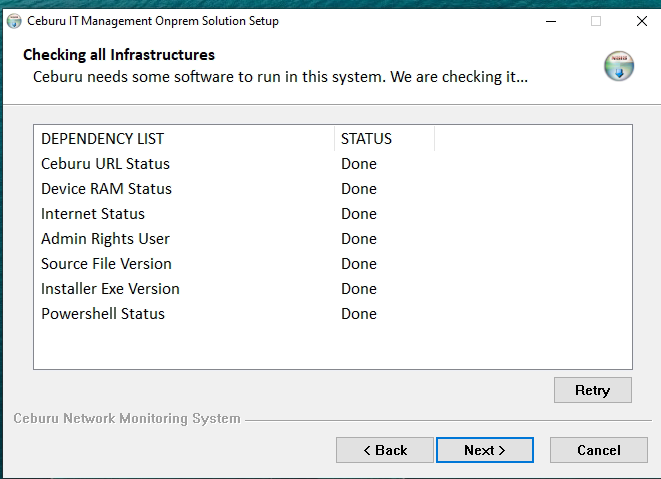
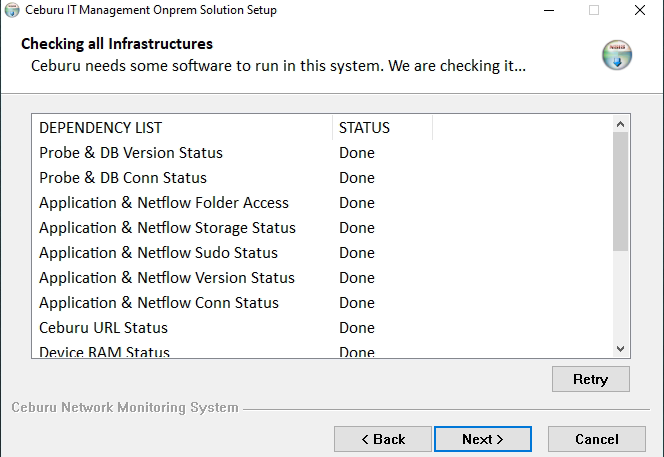
The installer verifies your environment automatically:

Wait until all show Done, then click Next..
Enter your credentials as below:
Username: your Ceburu email
Password: your Ceburu portal password
License Key: the key copied from the Download page
Click Next to continue.


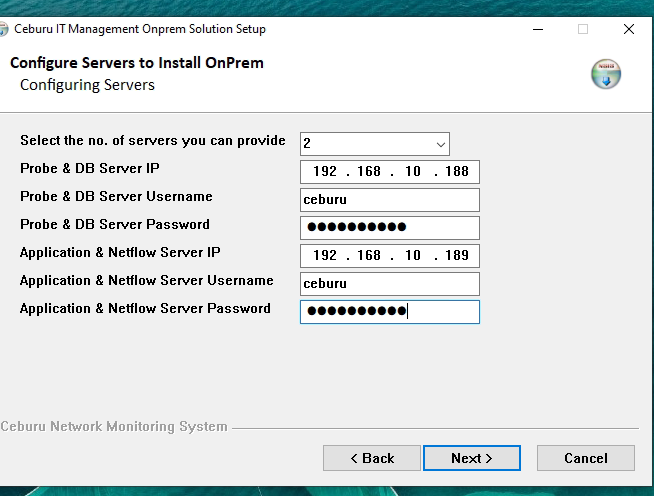
Next, the setup will ask for server configuration details.
Select the number of servers you want to configure.
(e.g., 2 – Probe/DB Server on Windows, Application/NetFlow on Linux)Enter each server’s:
IP Address
Username
Password
Click Next after entering the details.
The setup will automatically check all configurations and prerequisites for both servers, including:
Probe & DB connectivity
NetFlow folder and storage access
Application version and sudo status
If all show Done, click Next.
If any check fails, review logs and click Retry.

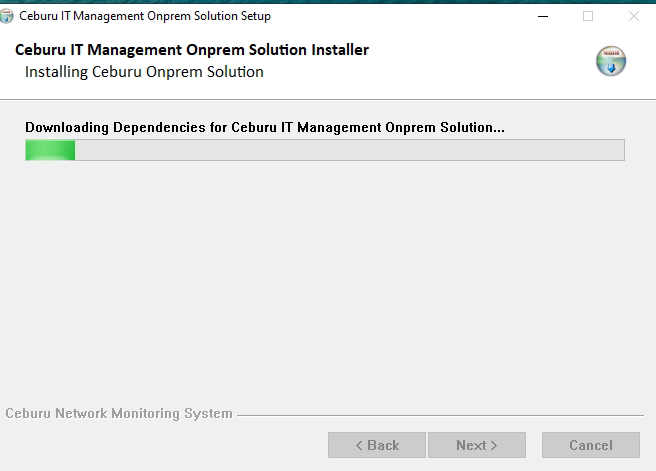
The installer will begin downloading dependencies required for the On-Prem deployment.
Wait for the progress bar to complete before continuing.
Once installation completes successfully, the setup will display:
Number of configured servers
Temporary credentials for portal login
Local portal link
Post-installation steps

Click Next and then Finish to complete setup.
The following features are currently not supported in the On-Prem installation. These capabilities are available in Cloud / Hybrid deployments
Currently Unavailable Features:
Remote Connectivity
Backup for Files, Folders, Drives, and System State
SIEM Functionality
Was this article helpful?
That’s Great!
Thank you for your feedback
Sorry! We couldn't be helpful
Thank you for your feedback
Feedback sent
We appreciate your effort and will try to fix the article